6
5
4
1
6
2
WHITE
RED
PUMP
MAIN
START
L1
L2
BLACK
WHITE
230 VAC 1ø
FROM CONTACTOR
RUN
START
BLACK
START
RELAY
CAPACITOR
CAPACITOR
1
2 3
GREEN
5
2
1
WHITE
RED
PUMP
MAIN
START
L1
L2
BLACK
WHITE
230 VAC 1ø
FROM CONTACTOR
START
BLACK
START
RELAY
CAPACITOR
RUN CAPACITOR
1
2 3
GREEN
2
4
1
6
5
WHITE
PUMP
START
MAIN
BLACK
L2
WHITE
BLACK
RUN CAPACITOR
RED
START CAPACITOR
L1
T2
T1
START
RELAY
3
2
1
GREEN
230 VAC 1ø
(SEE CHART)
(SEE CHART)
MODELS
START CAP.
RUN CAP.
40UF 370V
324-389UF 125V
611/621
A
© Copyright 2010 Zoeller Co. All rights reserved.
Operation
GENERAL
Zoeller pumps are lubricated and tested at the factory prior to shipment
and require minimum pre-start-up maintenance.
Maximum continuous operating temperature of pump liquid for standard
model pumps must not exceed 140° F (40° C). For longest service life all
pumps should be totally submerged on long pumping cycles and a maximum
of ½ hour run time per hour.
These units are not designed to handle liquids other than water or
sewage. If pump is used in water contaminated with heavy, viscous, or
abrasive materials, the warranty will be voided.
NAMEPLATE DATA
The nameplate, located on the top of pump, indicates specifi c information
about the construction of the pump. The model number, date code, and
serial number information should be recorded on the front page in the
“Owner’s Information” section of this manual.
SHORT TERM STORAGE
If pump is to be stored, the following is advised:
• Store pump inside whenever possible or cover with some type of protective
covering.
• Tape or seal in plastic bag the terminal ends of wire leads.
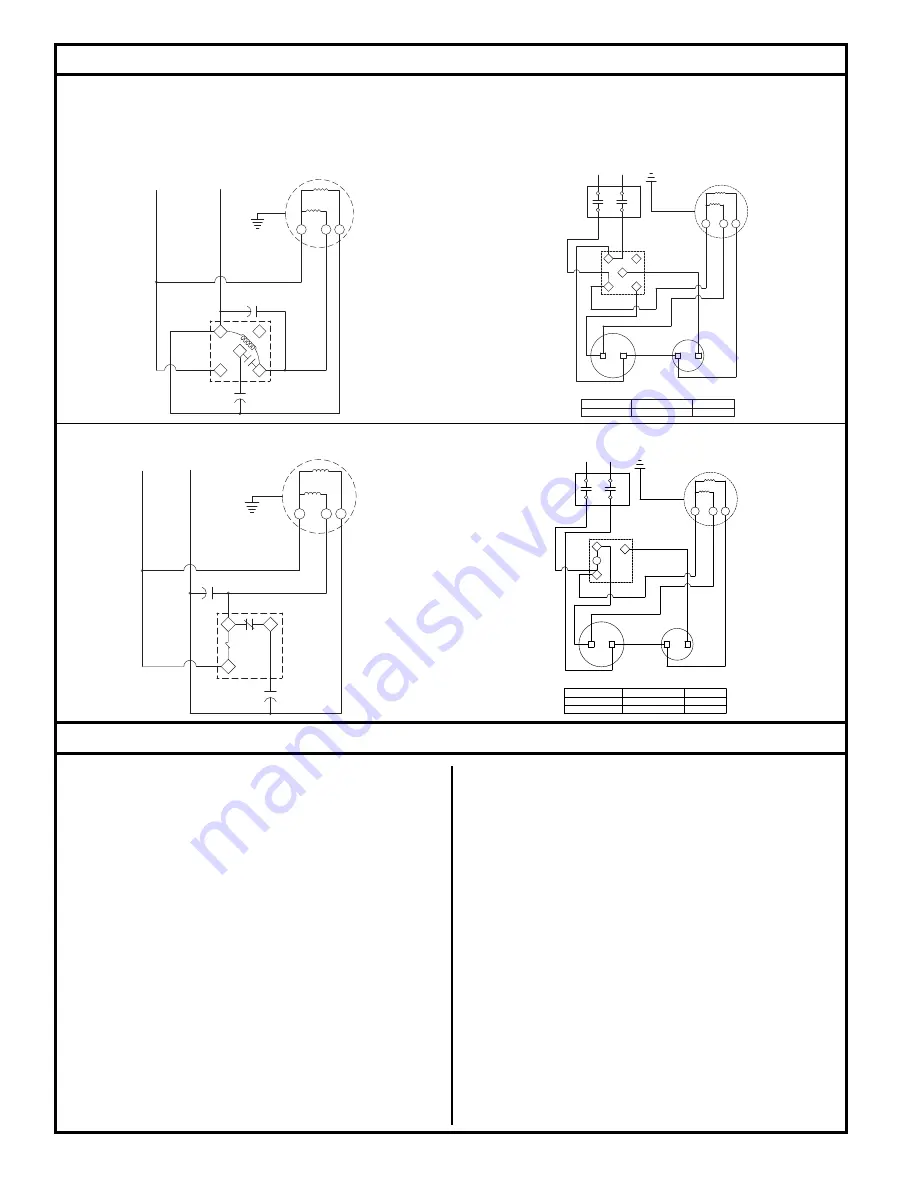
Single Phase Installation
All single phase models require start capacitor, run capacitor and relay in the circuit to start and operate properly. These components can be pur-
chased separately or prewired in Zoeller control panel. For components purchased separately used the diagram for installation and hookup.
Single phase models are nonautomatic. To operate automatically a control panel must be added to the power circuit. Follow the instructions
provided with the panel.
WIRING DIAGRAM
COMPONENT LAYOUT
ZEPA0539
ZEPA0477B
WIRING DIAGRAM
ZEPA0537
COMPONENT LAYOUT
ZEPA0540
MODELS 611 / 621
USING SUPCO PR90
RELAY BEFORE 10/1/07
MODELS 631 / 641 / 651
AND 611 / 621 USING GE
RELAY AFTER 10/1/07
• Spray coat unpainted surfaces with rust inhibiting oil.
• The impeller should be rotated every six months in order to keep the
seals lubricated and not develop a permanent set.
If panel is to be stored, the following is advised:
• Store the panel inside whenever possible and leave in the shipping
box.
• All openings shall be sealed.
• Store in an upright position.
• Do not stack anything on top of panel.
START-UP PROCEDURE
Before placing the equipment into operation the following checked:
• Correct pump rotation (3 Phase units only).
• Clean pit.
• Panel dry and securely installed.
• Floats positioned properly.
• Discharge valves open.
• 3/16” vent hole drilled in pipe between check valve and pump.
(Continued on next page)
2
1
5
WHITE
PUMP
START
MAIN
BLACK
L2
WHITE
BLACK
RUN CAPACITOR
RED
START CAPACITOR
L1
T2
T1
3
2
1
GREEN
230 VAC 1ø
(SEE CHART)
(SEE CHART)
R
RELAY
START
START CAP.
MODELS
RUN CAP.
631/641/651
270-324UF 250V
50UF 370V
611/621
216-259UF 125V
40UF 370V


