background image

20

Car
e and Cleaning

CARE AND CLEANING

WHAT?

HOW?

IMPORTANT!

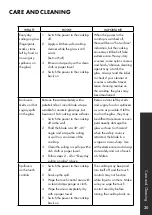
Everyday 
soiling on glass 
(fingerprints, 
marks, stains 
left by food or 
non-sugary 
spillovers on 
the glass)

1.  Switch the power to the cooktop 

off.

2.  Apply a kitchen-safe cooktop 

cleaner while the glass is still 
warm  
(but not hot!)

3.  Rinse and wipe dry with a clean 

cloth or paper towel.

4.  Switch the power to the cooktop 

back on.

When the power to the 
cooktop is switched off, 
there will be no "hot surface" 
indication, but the cooking 
zone may still be hot! Take 
extreme care. Heavy-duty 
scourers, some nylon scourers 
and harsh/abrasive cleaning 
agents may scratch the 
glass. Always read the label 
to check if your cleaner or 
scourer is suitable. Never 
leave cleaning residue on 
the cooktop: the glass may 
become stained.

Boil-overs, 
melts, and hot 
sugary spills 
on the glass

Remove these immediately with a 
palette knife or razor blade scrape 
suitable for ceramic glasstops, but 
beware of hot cooking zone surfaces.
1.  Switch the power to the cooktop 

off at the wall.

2.  Hold the blade at a 30°-45° 

angle and scrape the soiling 
or spill to a cool area of the 
cooktop.

3.  Clean the soiling or spill up with a 

dish cloth or paper towel.

4.  Follow steps 2 - 4 for "Everyday 

soiling on glass" above.

Remove stains left by melts 
and sugary food or spillovers 
as soon as possible. If left to 
cool on the glass, they may 
be difficult to remove or even 
permanently damage the 
glass surface. Cut hazard: 
when the safety cover is 
retracted, the blade in a 
scraper is razor-sharp. Use 
with extreme care and always 
store safely and out of reach 
of children.

Spillovers 
on the touch 
controls

1.  Switch the power to the cooktop 

off.

2.  Soak up the spill.
3.  Wipe the touch control area with 

a clean damp sponge or cloth.

4.  Wipe the area completely dry 

with a paper towel.

5.  Switch the power to the cooktop 

back on.

The cooktop may beep and 
turn itself off, and the touch 
controls may not function 
while liquid is on them. Make 
sure you wipe the touch 
control area dry before 
turning the cooktop back on.

Содержание RCIND-24

Страница 1: ...User Manual www zlinekitchen com INDUCTION COOKTOP...

Страница 2: ...en and bath of your dreams is never out of reach Through our unique designs and unparalleled quality we re dedicated to providing you an elevated experience in the heart of your home With an endless s...

Страница 3: ...For more information go to www P65Warnings ca gov ZLINE is fueled by a passion for innovation A relentless pursuit of bringing the highest end luxury designs and professional features into everyone s...

Страница 4: ...TABLE OF CONTENTS SAFETY INSTRUCTIONS 1 OPERATION 6 CARE AND CLEANING 20 TROUBLESHOOTING 21 WARRANTY 23...

Страница 5: ...vided with this appliance All installation and other servicing should be referred to a qualified technician NEVER use water on grease fires smother fire or flame or use dry chemicals or a foam type ex...

Страница 6: ...o cause burns During and after use do not touch or let clothing or other flammable materials contact surface units or areas near units until they have had sufficient time to cool WARNING Light Error C...

Страница 7: ...raper is exposed when the safety cover is retracted Use with extreme care always store safely and keep out of reach of children Failure to use caution could result in injury or cuts HEALTH HAZARD This...

Страница 8: ...allow for sufficient space around the cooking area This appliance is designed for built in household use only Do not use outdoors Avoid preparing food in aluminum foil or plastic containers over the...

Страница 9: ...ires special waste disposal to ensure environmental safety For further information regarding the treatment recovery and recycling of this product please contact your local government office your house...

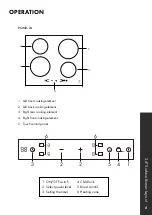
Страница 10: ...ont cooking element 2 Left back cooking element 3 Right rear cooking element 4 Right front cooking element 5 Touch control panel B 1 5 4 2 2 3 6 6 1 ON OFF switch 2 Select power level 3 Setting the ti...

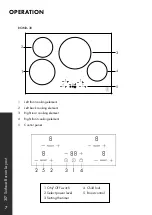
Страница 11: ...OOST 1 2 3 4 5 1 Left front cooking element 2 Left back cooking element 3 Right rear cooking element 4 Right front cooking element 5 Control panel 2 5 2 3 1 4 1 ON OFF switch 2 Select power level 3 Se...

Страница 12: ...3 4 5 1 Left front cooking element 2 Left back cooking element 3 Middle cooking element 4 Right rear cooking element 5 Right front cooking element 6 Control panel 1 ON OFF switch 2 Select power level...

Страница 13: ...only because the pan eventually warms it up Iron pot Magnetic circut Cermaic glass plate Induced currents Induction coil USING THE TOUCH CONTROLS The controls respond to touch so you don t need to app...

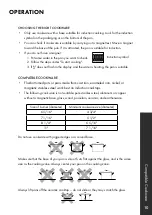
Страница 14: ...e base of your pan is smooth sits flat against the glass and is the same size as the cooking zone Always center your pan on the cooking zone Always lift pans off the ceramic cooktop do not slide or th...

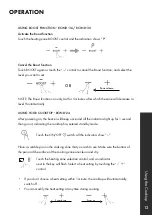
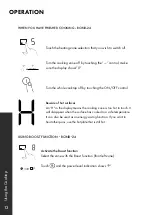
Страница 15: ...If you don t choose a heat setting within 1 minute the cooktop will automatically switch off You can modify the heat setting at any time during cooking Power down Power up WHEN YOU HAVE FINISHED COOK...

Страница 16: ...24 After powering on the buzzer will beep once and all the indicators light up for 1 second then go out indicating the cooktop has entered standby mode Touch the ON OFF switch all the indicators show...

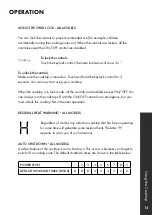
Страница 17: ...y touching the ON OFF control Beware of hot surfaces An H in the display means the cooking zone is too hot to touch It will disappear when the surface has cooled to a safe temperature It can also be u...

Страница 18: ...ktop When the cooktop is in lock mode all the controls are disabled except ON OFF You can always turn the cooktop off with the ON OFF control in an emergency but you must unlock the cooktop first in t...

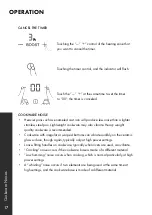
Страница 19: ...E You can set the minute reminder before or after a cooking zone power setting finished Touch the timer key 00 will show in the timer display and 00 will blink Set the time from 1 to 99 minutes by tou...

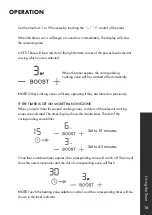
Страница 20: ...NOTE Other cooking zones will keep operating if they are turned on previously IF THE TIMER IS SET ON MORE THAN ONE ZONE When you set a timer for several cooking zones red dots of the relevant cooking...

Страница 21: ...also vibrate Heavy weight quality cookware is recommended Cookware with irregular or warped bottoms can vibrate audibly on the ceramic glass surface though again typically only at high power settings...

Страница 22: ...hot pan and then lower the meat onto the hot pan 4 Turn the steak only once during cooking The exact cooking time will depend on the thickness of the steak and how cooked you want it Times may vary fr...

Страница 23: ...te warming for small amounts of food Melting chocolate butter and foods that burn quickly Gentle simmering Slow warming 3 4 Reheating Rapid simmering Cooking rice 5 6 Pancakes 7 8 Saut ing Cooking pas...

Страница 24: ...mic glasstops but beware of hot cooking zone surfaces 1 Switch the power to the cooktop off at the wall 2 Hold the blade at a 30 45 angle and scrape the soiling or spill to a cool area of the cooktop...

Страница 25: ...ing element being used Incorrect cookware size for the selected cooking element Cookware is not properly resting on the cooking element Circuit breaker tripped or the fuse blown Incorrect cooking elem...

Страница 26: ...ernating with one or two digits in the display Technical fault Please note down the error letters and numbers switch the power to the induction cooktop off at the wall and contact a qualified technici...

Страница 27: ...bs fire stations common areas in multi family dwellings nursing homes food service locations and institutional food service locations such as hospitals or correction facilities This warranty is non tr...

Страница 28: ...Removal or re installation cost 5 Aesthetic damage scratches or natural wear caused by normal use 6 Second hand open box products or products purchased from an unauthorized retailer NOTE In the event...

Страница 29: ...y affixed labels warnings or plates from the product This will void the warranty SERVICE For warranty service please contact our Customer Service team at 1 614 777 5004 or visit www zlinekitchen com c...

Страница 30: ...www zlinekitchen com 1 614 777 5004 contact zlinekitchen com 2 2 0...

Отзывы: