background image

NEDERLANDS

70

Pluton Rev.1.0

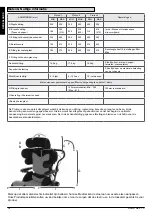
AFMETINGEN (mm)

Pluton 1

Pluton 2

Pluton 3 

Opmerkingen

MIN.

MAX.

MIN.

MAX.

MIN.

MAX.

A Diepte zitting

200

350

300

450

400

550

B  Breedte zitting  

    (Tussen heupen)

150

250 

(315)

230

330 

(395)

310

410 

(475)

(mm) - Wanneer Heupkussens  

zijn verwijderd

C. Zitting tot bovenzijde schouder

300

440

390

560

480

680

D Borstbreedte

150

270

230

350

310

430

E Zitting tot voetenplaat

190

370

260

440

330

510

Beenlengte heeft 2 instellingen Min/

Max

F  Zitting tot hoek rugleuning

Gewicht zitting

14,5 kg

17,0 kg

19,5 kg

Richtlijn (incl. armen, heupen, 

lateralen, voetenplaten)

Capaciteit belasting

Kijk altijd naar de maximale belasting 

van het chassis

Richtlijnen leeftijd

4 - 9 jaar

8 - 12 Jaar 

12 - volwassen

Maten wanneer gemonteerd op een 'Meervoudige hoogte en kantel'- basis

G Zitting tot bodem

100mm zwenkwiel: Min - 355  

/ Max - 815

100mm is standaard

H Kanteling / Voorwaartse hoek

I Basis Voetenplaat

De Pluton is een modulair zitsysteem waarbij de keuze van zitting, rugleuning, breedte en lengte van been, bij de 

beoordeling kan worden gespecificeerd.  Hierna wordt het zitsysteem gebouwd om vanaf het begin de optimale 

aanpassing & maximale groei te verzekeren. De in deze handleiding gegeven afmetingen bieden een richtlijn voor de 

beschikbare standaardmaten.

Merk op dat alle maten slechts indicatief zijn bedoeld. Sunrise Medical kan de stoel aan uw exacte eisen aanpassen. 

Onze Productspecialisten zullen uw kind bekijken om ervoor te zorgen dat de stoel nu en in de toekomst geschikt is voor 

zijn doel. 

F

E

A

H

G

C

B

I

I

D

Maten & Nuttige informatie

Содержание Pluton 1

Страница 1: ...Pluton DIRECTIONS FOR USE MANUALE D USO GEBRUIKERSHANDLEIDING MANUAL DE USUARIO INSTRU ES PARA UTILIZA O SEATING SYSTEM SISTEMA DI SEDUTA ZITSYSTEEM UNIDAD DE ASIENTO SISTEMA DE ASSENTO 294000 22003...

Страница 2: ...rden gelezen in PDF formaat op www SunriseMedical nl Questo documento presente in formato pdf per gli ipovedenti sul sito www SunriseMedical it Si tiene dificultades visuales puede encontrar este docu...

Страница 3: ...rale regolabile F Bracciolo G Pedana 37 A Hoofdsteun B Schouder Pelotten C Laterale ondersteuning D Heupkussens E Bekkensteun F Armsteun G Beensteun 70 A Reposacabezas B Controles de cintura escapular...

Страница 4: ...4 9 years 8 12 Years 12 adult Measurements when fitted to Multi Height Tilt Base G Seat to Floor 100mm Castor Min 355 Max 815 100mm is Standard H Tilt Prone Angle I Base Footprint The Pluton is a modu...

Страница 5: ...nt configurations are exclusively for a user who is unable to walk or has limited mobility for their own personal use indoors or outdoors The maximum weight limit includes both the user and any weight...

Страница 6: ...Fig 16 2 21 16 0 Pad Adjustment 21 Thigh Pad Adjustment Fig 16 3 16 5 22 Adjusting The Wing Angle 23 Adjusting the Headrest Angle 23 Adjusting the Headrest Height 23 Height Width of Supports 23 Flip A...

Страница 7: ...p NOTE The seating system shown and described in this user guide may not correspond in every detail exactly to your own model However all instructions are still entirely relevant irrespective of detai...

Страница 8: ...s of the users skin remain reddened after being out of the seating system for around 10 minutes urgently contact the qualified professional who performed the hand over of the equipment This may be a s...

Страница 9: ...ide a warranty in accordance with these warranty conditions for the remaining warranty period for the wheelchair in accordance with point 1 For original spare parts which have been fitted at the custo...

Страница 10: ...be taken when fitting a chest harness and the following points should always be followed The straps on the harness should never be allowed to move close to or in any way cause an obstruction to the ch...

Страница 11: ...possible chance of the child getting the straps caught around their neck REMOVE THE HARNESS IMMEDIATELY 5 0 Lap Strap Safety DANGER INCORRECT FITTING OF LAP STRAPS CAN PUT THE USER AT SERIOUS RISK La...

Страница 12: ...ness is being used When altering the angle between the seat and the back of the chair always re adjust the chest harness and lap strap accordingly to ensure all safety recommendations are followed Har...

Страница 13: ...ents in the future To use Turn the lever handle clockwise to tighten or anti clockwise to loosen To use the lever when an obstruction is met Pull the handle of the lever outwards towards you A This di...

Страница 14: ...r out Lock the pad in place by re securing locking screw A Pad Protraction Angle To set the angle of the pad you should loosen the securing handwheel B by rotating a couple of turns in an anti clockwi...

Страница 15: ...lugs B on the seating unit to fit into Position the seating unit above the interface plate lining up the locating lugs B with the cut outs A on the interface plate Carefully lower the seat onto the i...

Страница 16: ...ulic pump mechanism To Raise The Chair Fig 9 7 Pump the foot pedal several times until the desired height is reached The chair will raise with each pump To Lower The Chair Fig 9 8 Place your foot unde...

Страница 17: ...one position Once in position release handle B to lock the tilt mechanism Ensure that the latch A on the handle moves back into a closed position this ensures the tilt position is locked in place WARN...

Страница 18: ...N If you find performing these actions difficult to do simultaneously on your own please get another person to help you To Perform the Tilt in Space on the 5 Star Base Refere to Fig 12 2 12 3 Lift saf...

Страница 19: ...to the required position Relocate the levers into the relevant positioning holes B to secure the back in place Always ensure that the back is secure and that the levers are located fully in a hole bef...

Страница 20: ...seat in or out to change the length Fix the position by tightening the allen key bolts securely 15 0 Fitting A Tray DANGER Always ensure that the arms are fixed in position and the tray is secure bef...

Страница 21: ...endently Hip Pad Adjustment Fig 16 2 Hip Pad Width Loosen Locking Bolt A by one full turn using the 4mm Allen Key Provided The Hip Pad can now be freely moved along the width adjustment rail B Set the...

Страница 22: ...position Once attained lock off screws using the 4mm Allen Key provided Flip Down the Inner Thigh Pad To facilitate Transfers Press and Hold Button C whilst flipping down the inner thigh pad To reenga...

Страница 23: ...Headrest Height Loosen the hand wheel C Slide the headrest up or down inside the bracket on the back of the chair Re tighten the hand wheel to secure in place WARNING Always check that the headrest is...

Страница 24: ...has been achieved you should release the handwheel and re secure it by turning in a clockwise direction until hand tight CAUTION The plunger A should pull out freely if resistance is felt ensure no we...

Страница 25: ...g the Leg Stem Facilitates Standing Transfer NOTE Removal of the Footplates can also help when packaging for transportation or when the seat is to be utilised on a chassis with its own integrated foot...

Страница 26: ...k into place Footplate Height Pull and hold open Plunger C whilst maintaining hold of the footplate with your other hand Once disengaged the footplate stem should be free to slide up and down the legr...

Страница 27: ...you have achieved the desired position you should release the Plunger to engage it within the closest available location hole Ensure the plunger is fully engaged before commencing use of the chair Fo...

Страница 28: ...ermined by the user s weight seating position seat design and personal preference The air pressure is adjusted with a standard schrader valve shock system pump B on the main air valve of the dynamic m...

Страница 29: ...tion once the activity demanding the lock out has been completed Maintenance Schedule The rear shock systems need a minimum of maintenance only use water and soap to clean the system CAUTION Never use...

Страница 30: ...able parts are re lubricated 24 0 General Maintenance General maintenance should be carried out by a competent professional person who is well informed on how to use the equipment see warranty page 33...

Страница 31: ...of the seat should be monitored whilst a user is positioned in the system With the load on press the lever ensure the seat travels freely to the lowest position Seat Backrest Upholstery Check the atta...

Страница 32: ...nauthorised modifications will also invalidate the warranty Any new parts required should be genuine Sunrise Medical Seating Solutions Ltd approved parts fitted to Sunrise Medical specifications Frequ...

Страница 33: ...an inspection service or any other significant manipulation has taken place Sunrise Medical Seating Solutions Ltd will require proof of service for any warranty claims or orders Seating system serial...

Страница 34: ...l is Obliged to Complete Sunrise Medical s obligation under this warranty is to replace or repair any defective goods within the period of the warranty free of charge What the Warranty Does Not Cover...

Страница 35: ...th an electrical function you should always contact Sunrise Medical or your authorised representative for de comissioning information Appropriateness of Equipment Check that the equipment supplied is...

Страница 36: ...se them if possible Labelling Any labelling specific to the previous user should be removed and replaced with labelling specific to the new user Adjustment Adjustment of the equipment to the new user...

Страница 37: ...Linee guida per l et 4 9 anni 8 13 anni 12 adulto Misure quando dotato di base a pi altezze e inclinabile G Da sedile a pavimento Ruote piroettanti 100 mm Min 355 Max 815 Misura standard 100 mm H Ang...

Страница 38: ...sistemi di seduta sono destinati unicamente all utilizzo da parti di utenti non in grado di camminare o con mobilit limitata in ambienti chiusi o all aperto La portata massima rappresentata dal peso...

Страница 39: ...6 2 54 Regolazione del supporto sacrale figg 16 3 16 5 55 Regolazione dell inclinazione degli elementi laterali dell appoggiatesta 56 Regolazione dell inclinazione dell appoggiatesta 56 Regolazione de...

Страница 40: ...Firma e timbro del rivenditore NOTA possibile che il sistema di seduta illustrato e descritto in questo manuale differisca leggermente dal modello acquistato Tuttavia tutte le istruzioni sono pertine...

Страница 41: ...uti dopo che l utente ha lasciato il sistema di seduta mettersi quanto prima in contatto con il professionista qualificato che ha consegnato il prodotto La presenza di arrossamenti potrebbe essere un...

Страница 42: ...il periodo di garanzia rimanente per la carrozzina Per le parti di ricambio originali montate sulla carrozzina a spese del cliente vale una garanzia di 12 mesi a partire dall installazione conformemen...

Страница 43: ...toracico necessario FARE PARTICOLARE ATTENZIONE e procedere sempre come segue Le cinghie del bretellaggio non devono mai potersi muovere vicino al collo dei bambini n generarne mai l ostruzione Le cin...

Страница 44: ...possa avvolgersi le cinghie attorno al collo RIMUOVERE IMMEDIATAMENTE IL BRETELLAGGIO 5 0 Sicurezza della cintura pelvica ATTENZIONE IL MONTAGGIO NON CORRETTO DELLE CINTURE PELVICHE PU METTERE L UTENT...

Страница 45: ...fica l angolazione fra la seduta e lo schienale regolare sempre di nuovo il bretellaggio toracico e la cintura pelvica per garantire il rispetto di tutte le raccomandazioni di sicurezza Posizionamento...

Страница 46: ...uccessive regolazioni Come usarle Ruotare la maniglia della leva in senso orario per stringere e in senso antiorario per allentare Come usare la leva quando si incontra un ostacolo Tirare la leva vers...

Страница 47: ...esterno Stringere la vite di blocco A per bloccare l imbottitura superiore dello schienale in posizione Imbottitura superiore dello schienale Angolo di protrazione Per impostare l inclinazione dell i...

Страница 48: ...nto B del sedile Posizionare l unit del sedile sopra la piastra di interfaccia allineandone i piedini B agli intagli A della piastra di interfaccia Abbassare con attenzione il sedile sulla piastra di...

Страница 49: ...aulica Sollevamento di Pluton fig 9 7 Premere pi volte il pedale della pompa fino a quando si sar raggiunta l altezza desiderata Pluton si sollever a ogni pressione del pedale Abbassamento di Pluton f...

Страница 50: ...B per bloccare in posizione il meccanismo di reclinazione Accertarsi che la leva di blocco A della maniglia ritorni in posizione di chiusura per essere sicuri che la posizione di reclinazione raggiunt...

Страница 51: ...tanea di queste operazioni farsi aiutare da un altra persona Basculamento della seduta su base 5 Star Fare riferimento alle figg 12 2 e 12 3 Sollevare il blocco di sicurezza B per preparare la base pe...

Страница 52: ...ei corrispondenti fori di blocco B per bloccare lo schienale nella sua posizione finale Prima di utilizzare di Pluton accertarsi sempre che lo schienale sia regolarmente fissato e che le leve siano co...

Страница 53: ...odificarne la profondit Fissarlo in posizione serrando completamente i bulloni Allen 15 0 Montaggio del tavolino ATTENZIONE Prima di lasciare un utente incustodito accertarsi sempre che i braccioli si...

Страница 54: ...porto sacrale Regolazione del sistema di contenimento per il bacino bacino fig 16 2 Larghezza del sistema di contenimento per il bacino Allentare entrambi i bulloni A di fissaggio di un giro completo...

Страница 55: ...mente le viti servendosi della chiave Allen da 4 mm fornita Ribaltamento verso il basso del cuneo anteriore per il cuscino per facilitare i trasferimenti dell utente Premere e mantenere premuto il pul...

Страница 56: ...atesta Allentare la manopola C Infilare l appoggiatesta verso l alto o verso il basso nella staffa dello schienale di Pluton Stringere la manopola per fissare l appoggiatesta in posizione AVVERTENZA C...

Страница 57: ...o sar raggiunta la posizione desiderata rilasciare la manopola e ruotarla in senso orario per stringerla completamente ATTENZIONE Il perno di fissaggio A deve poter essere estratto facilmente in caso...

Страница 58: ...supporto per le gambe Facilita il trasferimento in posizione eretta NOTA La rimozione dell appoggiapiedi pu facilitare il trasporto di Pluton o qualora Pluton debba essere montato su un telaio dotato...

Страница 59: ...piedi con l altra mano Dopo avere sbloccato l appoggiapiedi il tubo dell appoggiapiedi dovrebbe poter scorrere liberamente verso l alto o verso il basso lungo il tubo di supporto per le gambe Prima di...

Страница 60: ...are il perno di fissaggio per bloccarlo in posizione in corrispondenza del foro di posizionamento pi prossimo Prima di iniziare a usare Pluton accertarsi che i perni di fissaggio siano adeguatamente b...

Страница 61: ...e personali dell utente La pressione dell aria viene regolata da una pompa per sistema ammortizzatore con valvola Schrader standard B applicata alla valvola dell aria principale del meccanismo dinamic...

Страница 62: ...ogramma di manutenzione Il sistema ammortizzatore posteriore richiede un livello di manutenzione minimo e per pulire il sistema utilizzare unicamente acqua e sapone ATTENZIONE Per pulire il sistema am...

Страница 63: ...le deve essere eseguita da personale competente che abbia ricevuto la formazione adeguata su come utilizzare l apparecchiatura vedere le norme di garanzia a pag 33 se non fosse disponibile personale p...

Страница 64: ...la leva e accertarsi che il sedile possa muoversi liberamente fino a raggiungere la posizione pi bassa Rivestimento sedile schienale Controllare la tenuta dei punti di fissaggio del rivestimento del...

Страница 65: ...a Tutti gli accessori applicati successivamente devono essere componenti originali approvati da Sunrise Medical e montati nel rispetto delle specifiche fornite da Sunrise Medical Frequenza dell assist...

Страница 66: ...i di ispezione di assistenza o qualsiasi altra modifica Per qualsiasi richiesta relativa alla garanzia o per ordinare componenti Sunrise Medical richieder di fornire lo storico degli interventi di ass...

Страница 67: ...corso del suo periodo di validit Sunrise Medical tenuta a sostituire o riparare gratuitamente qualsiasi componente difettoso Questa garanzia non copre Componenti danneggiati o guasti a causa di normal...

Страница 68: ...iche contattare Sunrise Medical o il rivenditore autorizzato per ottenere le informazioni relative allo smaltimento Adeguatezza dell apparecchiatura Verificare che l apparecchiatura fornita sia adegua...

Страница 69: ...asi etichetta relativa all utente precedente e sostituirla con l etichetta specifica per il nuovo utente Regolazione La regolazione dell apparecchiatura per adattarla al nuovo utente deve essere esegu...

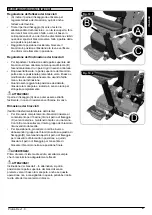
Страница 70: ...9 jaar 8 12 Jaar 12 volwassen Maten wanneer gemonteerd op een Meervoudige hoogte en kantel basis G Zitting tot bodem 100mm zwenkwiel Min 355 Max 815 100mm is standaard H Kanteling Voorwaartse hoek I...

Страница 71: ...zijn uitsluitend bedoeld voor personen die niet kunnen lopen of verminderd mobiel zijn De rolstoel is bedoeld voor persoonlijk gebruik zowel binnens als buitenshuis Het maximale gewicht dat de stoel k...

Страница 72: ...Fig 16 3 16 5 88 Aanpassing van de hoek van de vleugel 89 Aanpassen van de hoek van de hoofdsteun 89 Aanpassen van de hoogte van de hoofdsteun 89 Hoogte Breedte van ondersteunende elementen 89 Wegkla...

Страница 73: ...ing dealer OPMERKING Mogelijk is het getoonde en beschreven zitsysteem in deze handleiding qua detail niet precies hetzelfde is als uw eigen model Alle instructies zijn echter belangrijk ongeacht de v...

Страница 74: ...t of tien in de stoel te hebben gezeten rode plekken op de huid zichtbaar zijn moet er direct contact worden opgenomen met de gekwalificeerde professional die verantwoordelijk was voor de overdracht v...

Страница 75: ...gen bieden we een garantie in overeenstemming met deze garantievoorwaarden voor de resterende garantieperiode voor de rolstoel in overeenstemming met punt 1 Voor originele reserveonderdelen die op kos...

Страница 76: ...OGELIJKE ZORG worden aangepast en de onderstaande punten moeten in acht worden genomen De banden van het harnas mogen nooit dicht in de buurt van de nek van het kind komen of het kind in de nek hinder...

Страница 77: ...t gebruikt GEVAAR Als er ook maar de geringste kans bestaat dat de banden om de hals van het kind kunnen komen MOET HET HARNAS DIRECT WORDEN VERWIJDERD 5 0 Veiligheid heupgordel GEVAAR HET ONJUIST AAN...

Страница 78: ...gleuning van de stoel wordt gewijzigd pas dan altijd het borstharnas en de heupgordel overeenkomstig aan om te garanderen dat alle veiligheidsaanbevelingen worden opgevolgd Positionering van harnas en...

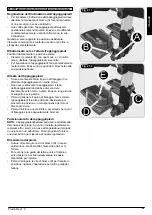
Страница 79: ...met de klok mee om hem aan te draaien en tegen de klok in om hem los te draaien Om de hendel te gebruiken wanneer men een obstakel tegen komt Trek de greep van de hendel naar buiten in uw richting A H...

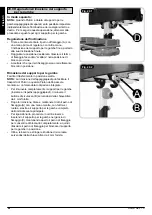
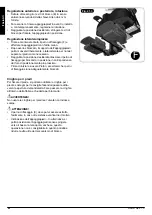
Страница 80: ...positie door het naar binnen of buiten te laten glijden Vergrendel het kussen op de gewenste plaats door schroef A weer vast te draaien Kussen Protractiehoek Om de hoek van het kussen in te stellen m...

Страница 81: ...id in worden geplaatst Breng de ziteenheid boven de interfaceplaat waarbij de aansluitingen B in lijn worden gebracht met de uitsparingen A op de interfaceplaat Laat de ziteenheid voorzichtig op de in...

Страница 82: ...dreven door een hydraulisch pompmechanisme Om de stoel omhoog te brengen Fig 9 7 Pomp enkele malen op de voetpedaal totdat de gewenste hoogte is bereikt De stoel gaat met iedere pompbeweging omhoog Om...

Страница 83: ...om het kantelmechanisme te vergrendelen Controleer of de kleine veer A op de hendel teruggaat naar een gesloten positie Hierdoor wordt geborgd dat de gekantelde positie is vergrendeld WAARSCHUWING De...

Страница 84: ...endel A naar beneden duwt OPGELET Als u het lastig vindt om deze handelingen alleen uit te voeren laat u dan door iemand helpen Kantelen op de 5 Star basis Zie Fig 12 2 12 3 Til de veiligheidsveer B o...

Страница 85: ...s los in de betreffende positiegaten B om de rugleuning op deze plaats te vergrendelen Controleer altijd of de rugleuning goed vastzit en of de hendels goed in de gaten vast zitten voordat de stoel wo...

Страница 86: ...n glijden om de lengte te wijzigen Zet de positie vast door de inbusschroeven weer goed vast te draaien 15 0 Monteren van een werkblad GEVAAR Controleer altijd of de armleuningen in hun positie zijn v...

Страница 87: ...nafhankelijk aanpassen Aanpassing heupkussen Fig 16 2 Breedte heupkussen Draai bout A met behulp van de meegeleverde 4mm inbussleutel los met n volle slag Het heupkussen kan nu vrijelijk langs de aanp...

Страница 88: ...p van de meegeleverde 4mm inbussleutel Neerklappen van het binnenste dijbeenkussen om overplaatsingen mogelijk te maken Duw knop C en houd deze vast terwijl u het binnenste dijbeenkussen naar beneden...

Страница 89: ...de achterkant van de stoel Nadat de gewenste positie is bereikt draait u het handwiel weer stevig aan WAARSCHUWING Controleer altijd of de hoofdsteun goed vastzit en de vleugels niet te dicht tegen he...

Страница 90: ...wenste positie is bereikt kunt u het handwiel loslaten en het met de klok mee weer vastdraaien tot het vast zit OPGELET De vergrendeling A moet gemakkelijk naar buiten getrokken kunnen worden Als u we...

Страница 91: ...aatsing mogelijk OPMERKING Het verwijderen van de voetenplaat kan ook helpen wanneer de stoel voor transport wordt verpakt of wanneer de zitting op een chassis met eigen ge ntegreerde voetenplaat word...

Страница 92: ...terwijl u met de andere hand de voetenplaat vasthoudt Als hij is ontkoppeld moet de stang van de voetenplaat vrij zijn om omhoog en omlaag langs de stang van de beensteun te glijden Laat hem naar de g...

Страница 93: ...r worden geplaatst Wanneer de gewenste positie is bereikt laat u de vergrendeling los zodat hij vergrendelt in het dichtstbijzijnde gat Controleer of de vergrendeling volledig vergrendeld is voordat u...

Страница 94: ...de zitpositie het stoelontwerp en de persoonlijke voorkeur van de gebruiker De luchtdruk wordt aangepast met een standaard Schrader klepveersysteempomp B op de hoofdafsluiter van het dynamische mecha...

Страница 95: ...chanisme is teruggezet in de open positie nadat de activiteit waarvoor de vergrendeling nodig was is afgerond Onderhoudsschema Het veringsysteem aan de achterzijde heeft slechts zeer weinig onderhoud...

Страница 96: ...gesmeerd 24 0 Algemeen onderhoud Algemeen onderhoud moet uitgevoerd worden door een vakbekwame professional die goed op de hoogte is van de wijze waarop het zitsysteem wordt gebruikt zie garantie blz...

Страница 97: ...an de stoel worden gecontroleerd terwijl er een gebruiker in de stoel zit Druk terwijl er iemand op de stoel zit op de hendel en controleer of de stoel gemakkelijk naar de laagste positie gaat Bekledi...

Страница 98: ...Als er onderdelen vervangen moeten worden moeten dit oorspronkelijke door Sunrise Medical Seating Solutions Ltd goedgekeurde onderdelen zijn die worden gemonteerd volgens de specificatie van Sunrise M...

Страница 99: ...eer een inspectie onderhoudsbeurt of andere belangrijke handeling heeft plaatsgevonden worden ingevuld Sunrise Medical Seating Solutions Ltd vraagt om bewijs van onderhoud bij garantievorderingen of b...

Страница 100: ...ebrekkige goederen binnen de garantieperiode kosteloos te vervangen of te repareren Wat is niet gedekt door de garantie Onderdelen die beschadigd of gebrekkig zijn door natuurlijke slijtage extreem ge...

Страница 101: ...functie dient u altijd contact op te nemen met Sunrise Medical of uw erkende vertegenwoordiger voor meer informatie over de afvoer van het product Geschiktheid van product Controleer of het geleverde...

Страница 102: ...e aanpassingen ongedaan te maken Labels Aangebrachte labels die specifiek voor de voorgaande gebruiker waren dienen te worden verwijderd en vervangen door labels die specifiek op de nieuwe gebruiker v...

Страница 103: ...Medidas con base multiposicionadora G Del asiento al suelo Rueda delantera de 100 mm M n 355 M x 815 100 mm es el tama o est ndar H ngulo prono basculaci n I Marca de base La Pluton es una unidad de a...

Страница 104: ...ivamente para la utilizaci n personal de un usuario incapaz de caminar o con movilidad reducida tanto en el exterior como en el interior El l mite de peso m ximo que incluye el peso del usuario m s el...

Страница 105: ...res adductores 121 C mo ajustar el ngulo de las almohadillas laterales del reposacabezas 122 C mo ajustar el ngulo del reposacabezas 122 C mo ajustar la altura del reposacabezas 122 Altura y anchura d...

Страница 106: ...ibuidor NOTA Es posible que la unidad de asiento mostrada y descrita en este manual no sea exactamente igual al modelo que usted posee No obstante todas las instrucciones aqu proporcionadas pueden apl...

Страница 107: ...omento se observan reas enrojecidas en la piel del ni o tras haber estado sentado en la unidad de asiento durante unos 10 minutos contacte de manera urgente con el distribuidor autorizado de Sunrise M...

Страница 108: ...o de esta garant a ofrecemos una garant a de conformidad con las condiciones de sta para el per odo de garant a restante de la silla de ruedas seg n lo dispuesto en el punto 1 En cuanto a las piezas d...

Страница 109: ...deber tener MUCHO CUIDADO al instalar el peto y seguir los siguientes pasos Las cinchas del peto no deben quedar cerca o causar ning n tipo de obstrucci n en el cuello del ni o Las cinchas nunca deben...

Страница 110: ...cinchas quedaran enredadas alrededor del cuello del ni o RETIRE EL ARN S DE MANERA INMEDIATA 5 0 Seguridad del cintur n p lvico PELIGRO LA COLOCACCI N INCORRECTA DEL CINTUR N P LVICO PODR A PONER AL...

Страница 111: ...ajustar el arn s pectoral y el cintur n p lvico seg n sea necesario para asegurarse que cumple con todas las advertencias de seguridad Posicionamiento del arn s y el cintur n p lvico El siguiente dia...

Страница 112: ...arla Gire la palanca en el sentido de las agujas del reloj para ajustarla o en el sentido contrario para desajustarla Para usar la palanca cuando se enfrenta a una obstrucci n Tire de la empu adura de...

Страница 113: ...ndola hacia dentro o fuera Fije el control en el lugar seleccionado y vuelva a ajustar el tornillo de bloqueo A ngulo de los controles de cintura escapular Para ajustar el ngulo debe aflojar el pomo...

Страница 114: ...n de las orejetas B de la unidad de asiento Coloque la unidad del asiento encima de la base alineando las orejetas B con las dos hendiduras A Baje con cuidado la unidad de asiento hacia la base asegur...

Страница 115: ...anismo de bombeo hidr ulico Para elevar la silla Fig 9 7 Presione el pedal varias veces hasta alcanzar la altura deseada La silla se elevar con cada presi n Para bajar la silla Fig 9 8 Coloque el pie...

Страница 116: ...osici n suelte la palanca B para bloquear el mecanismo de basculaci n Compruebe que el pestillo peque o de la palanca A se encuentre hacia atr s en posici n cerrada de este modo se asegura que la basc...

Страница 117: ...ano mientras empuja hacia abajo la palanca A PRECAUCI N Si le resulta dif cil realizar estas operaciones a la vez quiz s necesite ayuda de otra persona C mo bascular la base Star 5 Consulte la Fig 12...

Страница 118: ...colocar las palancas en los orificios B para fijar el respaldo en su lugar Compruebe siempre que el respaldo est seguro y que las palancas est n completamente fijas en un orificio antes de utilizar la...

Страница 119: ...d Asegure la posici n ajustando los tornillos Allen con firmeza 15 0 C mo instalar la bandeja PELIGRO Compruebe siempre que los reposabrazos est n fijos en la posici n deseada y que la bandeja est seg...

Страница 120: ...ici n del lado derecho e izquierdo Ajuste de los soportes p lvicos Fig 16 2 Anchura de los soportes p lvicos Afloje el tornillo de fijaci n A una vuelta completa utilizando la llave Allen de 4 mm sumi...

Страница 121: ...ci n adecuada ajuste los tornillos utilizando la llave Allen de 4 mm suministrada C mo abatir los pads abductores para facilitar las transferencias Presione y sostenga el bot n C mientras baja el pad...

Страница 122: ...ice el reposacabezas hacia arriba o abajo dentro del soporte en el respaldo de la silla Vuelva a ajustar los pomos roscados para fijar el reposacabezas en su lugar ADVERTENCIA Compruebe siempre que el...

Страница 123: ...nido la posici n deseada suelte el pomo roscado y f jelo girando en el sentido de las agujas del reloj hasta ajustarlo totalmente PRECAUCI N El pomo A tendr a que poder sacarse f cilmente si experimen...

Страница 124: ...iginal C mo retirar los tubos de los reposapi s Facilita las transferencias NOTA Retirar las plataformas de los reposapi s tambi n puede ayudar a compactar la silla cuando se va a embalar por ejemplo...

Страница 125: ...el pin C mientras sostiene la plataforma con la otra mano Una vez desencajado el tubo de la plataforma se desliza f cilmente hacia arriba y abajo por el tubo principal Deslice la plataforma hasta la p...

Страница 126: ...rio Una vez alcanzada la posici n deseada suelte el pin para trabarlo en el orificio de fijaci n m s cercano Aseg rese de que el pin est completamente bloqueado en su posici n correcta antes de usar l...

Страница 127: ...o din mico A La resistencia se ajusta variando la presi n de aire y est determinada por el peso del usuario la posici n el tipo de asiento y las preferencias personales La presi n de aire se ajusta me...

Страница 128: ...desactivarlo Programa de mantenimiento Los sistemas de amortiguaci n trasera necesitan un m nimo de mantenimiento Utilice solo agua y jab n para limpiarlos PRECAUCI N Nunca utilice m quinas de lavado...

Страница 129: ...ajustables 24 0 Mantenimiento general Sunrise Medical recomienda encarecidamente que las operaciones de mantenimiento y servicio sean llevadas a cabo por un distribuidor autorizado de Sunrise Medical...

Страница 130: ...en el asiento presione la palanca y aseg rese de que se mueve libremente hasta la posici n m s baja Tapicer a del asiento y respaldo Compruebe que los puntos de conexi n de la tapicer a del asiento y...

Страница 131: ...zadas invalidan la garant a Las piezas nuevas de repuesto tienen que ser originales de Medical y deben instalarse seg n las indicaciones de Sunrise Medical Frecuencia del mantenimiento y servicio Sunr...

Страница 132: ...operaciones de mantenimiento o cualquier otra manipulaci n importante de la silla Sunrise Medical solicitar un comprobante de los servicios realizados ante cualquier reclamaci n de la garant a N mero...

Страница 133: ...de los primeros 24 meses a partir de la fecha en la que el comprador original adquiri la silla de ruedas y siempre que la misma siga siendo propiedad de dicho comprador original el componente o compon...

Страница 134: ...o Es imprescindible una valoraci n previa por un profesional sanitario para determinar la idoneidad del producto para el nuevo usuario Para ello tenga en cuenta factores importantes tales como la edad...

Страница 135: ...las medidas correctoras necesarias siempre que sea seguro y pr ctico para revertirlas Etiquetas Todas las etiquetas correspondientes al usuario anterior deben eliminarse y reemplazarse con las etiquet...

Страница 136: ...ta es de idade 4 9 anos 8 13 anos 12 adulto Medi es quando equipada com base de m ltiplas alturas e inclina es G Assento ao ch o Roda girat ria de 100 mm M n 355 M x 815 100 mm padr o H ngulo de incli...

Страница 137: ...sivamente para um utilizador que n o consiga andar ou cuja mobilidade seja limitada para seu uso pessoal em interiores e exteriores O limite m ximo de peso inclui o utilizador e o peso de acess rios i...

Страница 138: ...Fig 16 2 153 16 0 Ajuste da almofada 153 Ajuste da almofada para as coxas Fig 16 3 16 5 154 Ajuste do ngulo das asas 155 Ajuste do ngulo do encosto da cabe a 155 Ajuste da altura do encosto da cabe a...

Страница 139: ...ornecedor NOTA O sistema de assento representado e descrito neste manual de utilizador pode n o ser corresponder exactamente ao seu modelo No entanto todas as instru es s o perfeitamente aplic veis in...

Страница 140: ...ar que algumas reas da pele do utilizador continuam vermelhas depois de estar cerca de 10 minutos fora do sistema de assento contacte urgentemente o profissional qualificado que fez a entrega do equip...

Страница 141: ...rantia oferecemos uma garantia de acordo com estas condi es para o restante per odo da garantia para a cadeira de rodas de acordo com o ponto 1 As pe as sobressalentes originais que tenham sido instal...

Страница 142: ...o PERIGO Deve ter o M XIMO CUIDADO quando instalar um arn s para o peito e deve sempre ter em conta o seguinte As correias do arn s nunca devem ficar perto do ou de qualquer maneira prender o pesco o...

Страница 143: ...do pesco o da crian a ficar preso nas correias REMOVA O ARN S IMEDIATAMENTE 5 0 Seguran a do cinto PERIGO A INSTALA O INCORRECTA DOS CINTOS PODE COLOCAR S RIOS RISCOS AO UTILIZADOR Instala o do cinto...

Страница 144: ...parte traseira da cadeira reajuste sempre o arn s para o peito e o cinto de acordo para garantir o cumprimento de todas as recomenda es de seguran a Posicionamento do arn s e do cinto O seguinte diag...

Страница 145: ...ilizar Rode o man pulo da alavanca na direc o dos ponteiros do rel gio para apertar e na direc o inversa para desapertar Para utilizar a alavanca quando deparar com uma obstru o Puxe o man pulo da ala...

Страница 146: ...dentro ou para fora Fixe a almofada apertando novamente o parafuso de fixa o A ngulo da almofada de projec o Para configurar o ngulo da almofada deve desapertar a roda manual de fixa o B rodando algu...

Страница 147: ...ra encaixar a unidade de assento Posicione a unidade de assento sobre a placa da interface alinhando as argolas de posicionamento B com os sulcos A da placa Baixe cuidadosamente o assento sobre a plac...

Страница 148: ...ontrolada por um mecanismo de bomba hidr ulica Para levantar a cadeira Fig 9 7 Bombeie o pedal v rias vezes at atingir a altura pretendida A cadeira sobe com cada bombada Para descer a cadeira Fig 9 7...

Страница 149: ...n pulo B para bloquear o mecanismo de inclina o Certifique se de que a lingueta A no man pulo se move para tr s para a posi o fechada Isto garante a fixa o da posi o de inclina o AVISO O operador deve...

Страница 150: ...ADO Se tiver dificuldade em fazer estas opera es simultaneamente sozinho pe a ajuda a outra pessoa Para inclinar no espa o com uma base 5 Star Consulte a Fig 12 2 12 3 Levante a lingueta de seguran a...

Страница 151: ...nos orif cios de posicionamento B relevantes para fixar a traseira Certifique se sempre de que o encosto est fixo e de que alavancas est o totalmente posicionadas num orif cio antes de utilizar a cade...

Страница 152: ...assento para dentro e para fora para ajustar o comprimento Fixe a posi o apertando firmemente os parafusos com a chave Allen 15 0 Instalar tabuleiro PERIGO Certifique se sempre de que os bra os est o...

Страница 153: ...mente Ajuste da almofada para as ancas Fig 16 2 Largura da almofada para a anca Desaperte o parafuso de fixa o A com uma volta completa com a chave Allen de 4 mm fornecida Pode agora mover livremente...

Страница 154: ...com a chave Allen de 4 mm fornecida Dobrar para baixo a almofada interior para as coxas para facilitar a entrada e sa da Mantenha pressionado o bot o C enquanto dobra para baixo a almofada interior pa...

Страница 155: ...roda manual C Deslize o encosto da cabe a para cima ou para baixo no interior do suporte no encosto da cadeira Aperte a roda manual novamente para fixar AVISO Verifique sempre se o encosto da cabe a e...

Страница 156: ...x la novamente rodando a na direc o contr ria dos ponteiros do rel gio at apertar firmemente CUIDADO O mbolo A dever mover se sem problemas Se sentir resist ncia certifique se de que o apoio do bra o...

Страница 157: ...e sa da de p NOTA A remo o dos apoios de p s tamb m pode ajudar quando embalar a cadeira para transporte ou quando utilizar o assento como chassis com os seus pr prios apoios de p s integrados Para r...

Страница 158: ...ha o nessa posi o enquanto segura no apoio de p s com a outra m o Depois de desengatar a haste do apoio de p s dever deslizar livremente para cima e para baixo na haste do apoio de pernas Deslize para...

Страница 159: ...pretendida deve libertar o mbolo para o engatar no orif cio de posicionamento dispon vel mais pr ximo Certifique se de que o mbolo est completamente engatado antes de come ar a utilizar a cadeira Corr...

Страница 160: ...ser determinada pelo peso do utilizador a posi o sentada o desenho do assento e as prefer ncias pessoais A press o do ar ajustada com uma bomba do sistema de choque da v lvula schrader padr o B da v l...

Страница 161: ...ecess rio bloquear o sistema Programa de manuten o Os sistema de choque da traseira s precisa do m ni mo de manuten o utiliza gua e sab o para limpar o sistema CUIDADO Nunca utiliza um dispositivo de...

Страница 162: ...pre de que as pe as m veis ou ajust veis s o relubrificadas 24 0 Manuten o Geral A manuten o geral deve ser efectuada por um profissional competente bem informado sobe como utilizar o equipamento cons...

Страница 163: ...no sistema Com carga no assento empurre a alavanca e certifique se de o assento se move livremente at posi o mais inferior Forro do assento encosto Verifique se os pontos de fixa o do forro do assento...

Страница 164: ...das invalidar o a garantia Quaisquer novas pe as devem ser pe as genu nas autorizadas pela Sunrise Medical Seating Solutions Ltd instaladas segundo as especifica es da Sunrise Medical Frequ ncia do se...

Страница 165: ...u quando for feita qualquer outra altera o significativa A Sunrise Medical Seating Solutions Ltd Requer prova de servi o para quaisquer reclama es associadas garantia ou encomendas N mero de s rie do...

Страница 166: ...Medical segundo esta garantia substituir ou reparar gratuitamente quaisquer pe as com defeito durante o per odo da garantia O que a garantia n o cobre As pe as danificadas ou com problemas causados p...

Страница 167: ...torizado para obter informa es sobre o desmantelamento Adequa o do equipamento Verifique se o equipamento fornecido apropriado s necessidades do utilizador considerando a idade peso capacidade diagn s...

Страница 168: ...as e pr ticas para inverter o seu estado se poss vel Etiquetas Quaisquer etiquetas espec ficas do utilizador anterior devem ser removidas e substitu das por etiquetas espec ficas do novo utilizador Aj...

Страница 169: ......

Страница 170: ......

Страница 171: ......

Страница 172: ...Italia Tel 39 0523 573111 Fax 39 0523 570060 www SunriseMedical it Sunrise Medical AG L ckhalde 14 3074 Muri Bern Schweiz Suisse Svizzera Fon 41 0 31 958 3838 Fax 41 0 31 958 3848 www SunriseMedical...

Отзывы: