background image

18

USER MANUAL 

805846UK  - ZIP HYDROTAP G4 V1.00 NOV 2017

TECHNICAL SUPPORT

 TEL: 0345 6 005 005 EMAIL: SERVICE@ZIPINDUSTRIES .CO.UK   

WWW.ZIPWATER.CO.UK

SECTION 8 LCD SCREEN

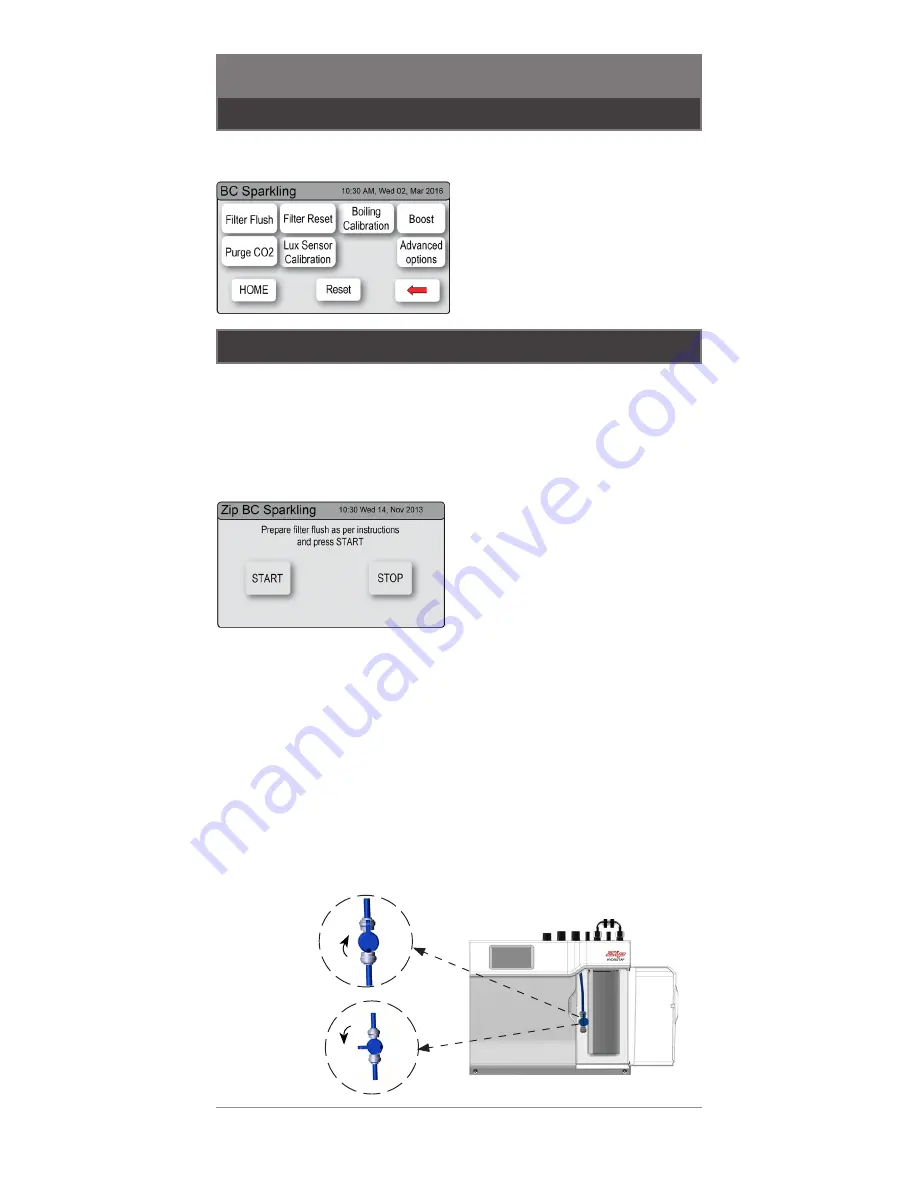
8.3.1 Filter flush

Once your Zip HydroTap


G4 unit has been installed, Go to the install menu to 

configure the system settings for your product. 

Have a bucket or similar container (not supplied) at the ready to hold a 

quantity of water that will be ejected while the filter flush mode is in operation. 

Open the filter access door on the front of the HydroTap


G4 and the filter 

cartridge will be exposed. Located to the rear right hand side of the cartridge 

is a flush line, approx 600mm long and the flush line stop cock. Place the 

free end of the flush line into the bucket or container (not supplied).    

• 

Press [MENU] button for main 

menu.

• 

Press the [Install] button. Turn the 

stop cock on. 

• 

Press the [Filter Flush] button.

• 

Press [START] button to start 

filter flush. Once the filter flush 

is finished, turn the stop cock off 

first (ensure the cock is properly 

closed) then press [STOP] to end 

filter flush mode.

• 

Press [<=] button for the previous 

menu or press [HOME] button to 

return to the home screen. 

• 

After initial installation,turning 

off the filter flush mode puts the 

HydroTap


G4 into calibration 

mode. With subsequent filter 

changes, the system reverts to 

the main menu.

Note:


Run at least 10 Litres 

of water through to flush the 

filter of any excess black carbon 

particles (this is normal). Once 

the filter flush has finished, 

press the [STOP] button to 

display the main menu

OPEN 

Position

CLOSED 

Position

ON

OFF

8.3 Install

Sub menu 

8.3.1 Filter flush.

8.3.2 Filter reset.

8.3.3 Boiling calibration.

8.3.4 Booster.

8.3.5 CO

2

 purge.

8.3.6 Lux sensor calibration.

8.3.7 Advanced options

8.3.8 Reset

Содержание HydroTap G4 Series

Страница 1: ...MODEL NUMBER All G4 systems ZIPHYDROTAP G4 USER MANUAL Pure tasting boiling chilled sparkling water Instantly...

Страница 2: ...n 2 HydroTap functionality 4 Section 3 Elite HydroTap 4 Section 4 Classic HydroTap 7 Section 5 Arc Cube HydroTap inc AIO Celsius Arc 10 Section 6 Celsius HydroTap 13 Section 7 Mixer taps 14 Section 8...

Страница 3: ...SERVICE ZIPINDUSTRIES CO UK WWW ZIPWATER CO UK SECTION 1 HYDROTAP CONTROL STYLES Elite Touch controls See page 4 Classic Press pull controls See page 7 Celsius Rotate controls See page 13 All in One C...

Страница 4: ...Chilled C All models ON Water at set temp FLASHING SLOWLY Water below set temp wait FLASHING QUICKLY System fault see page 17 BOILING TEMP CHILLED TEMP ON Water at set temp FLASHING SLOWLY Water abov...

Страница 5: ...to dispense BC models touch to dispense BCS models touch to dispense B models touch to dispense C models Boiling water Chilled water Sparkling water both Boiling water Chilled water Boiling water Ambi...

Страница 6: ...E WWW ZIPWATER CO UK CS models touch to dispense SECTION 3 ELITE HYDROTAP Chilled water BCS BC BA B models touch to dispense Boiling water Activate deactivate the safety lock see page 27 Either Sparkl...

Страница 7: ...P CHILLED TEMP ON Water at set temp FLASHING SLOWLY Water above set temp wait FLASHING QUICKLY System fault see page 17 OFF Filter within life span FLASHING SLOWLY Change filter see pages 19 28 Filter...

Страница 8: ...se Boiling water Chilled water BC models press to dispense Boiling water Chilled water BA models press to dispense Boiling water Ambient water C models press to dispense Chilled water either B models...

Страница 9: ...ROTAP SAFETY LOCK 4 5 CLASSIC HYDROTAP SAFETY SENSOR Pull both levers forward Safety sensor Shield the HydroTapG4 from any direct sunlight With the Command Centre in normal operating mode and safety l...

Страница 10: ...t set temp FLASHING SLOWLY Water below set temp wait FLASHING QUICKLY continuous System fault see page 17 FLASHING QUICKLY for 2 secs Ready to dispense boiling water with safety lock on CHILLED TEMP O...

Страница 11: ...n turn to dispense Boiling water Chilled water Sparkling water BC models select then turn to dispense Boiling water Chilled water BA models select then turn to dispense Boiling water Ambient water C m...

Страница 12: ...se Chilled water BCS BC BA B models 4 steps to dispense boiling water Flash for 2 secs Activate deactivate the safety lock see page 27 Sparkling water Boiling water mode with safety lock on 1 2 Touch...

Страница 13: ...ASHING SLOWLY Water above set temp wait FLASHING QUICKLY System fault see page 17 FLASHING EVERY 10 SEC Change filter see pages 19 28 Indicator Warning FILTER 6 2 CELSIUS HYDROTAP LIGHTS The Indicator...

Страница 14: ...ds the tap will decrease the flow When the lever is moved in the direction of the blue dot the temperature is decreased and when moved in the direction of the red dot the temperature is increased The...

Страница 15: ...or more system faults Refer to section 8 2 System info Sleep Mode System is in sleep mode Neither boiling or chilled water are available Refer to section 8 7 Energy modes Change Filter External Intern...

Страница 16: ...er flush Filter reset Boiling calibration Booster CO2 Purge Lux sensor calibration Advanced options Start Stop Internal External Calibration options Enable Disable 8 3 Service Password protected 8 4 S...

Страница 17: ...een Press Filter Log to check the filter resets Press button for the previous menu or press HOME button to return to the home screen Press the MENU button for main menu Press the Info button to review...

Страница 18: ...menu Press the Install button Turn the stop cock on Press the Filter Flush button Press START button to start filter flush Once the filter flush is finished turn the stop cock off first ensure the co...

Страница 19: ...button for main menu Press the Install button Press the Boost button In the next screen press button A to enable the booster dispense boiling water for 30 seconds and check the insulated outlet hose...

Страница 20: ...of the Lux sensor can be verified by selecting Lux Sensor OFF When the room is subsequently darkened below the calibrated light level the lights will turn off after approx 30 seconds SECTION 8 LCD SCR...

Страница 21: ...ectrician plumber or call Zip on 0345 6 005 005 for assistance service spare parts or enquiries Fan speed adjustment If the Command Centreis operating near 35O C or higher then the fan speed must be 1...

Страница 22: ...n Press Disable Press button for the previous menu 8 5 Security The Zip HydroTap G4 allows the appliance coordinator to set up a password to protect against users changing the preferred system setting...

Страница 23: ...ressing the square button The selected mode will be displayed in dark grey colour with a tick box on the right Press NEXT button to set time 8 7 1 Set Date Time Press the MENU button for main menu Pre...

Страница 24: ...aximum of 10000 litres Factory set at 6000 litres To edit the filter usage This function is to reset the filter change display after a filter has reached the end of its life see page 28 Filter mainten...

Страница 25: ...Sensor 680 C Dark N A Sleep 680 C ON Lux Sensor OFF Dark N A OFF OFF OFF Lux Sensor or 2 Hr 680 C Dark 2 Hr Sleep 680 C ON Lux Sensor or 2 Hr OFF Dark 2 Hr OFF OFF OFF Disable N A N A ON ON ON In slee...

Страница 26: ...at a specific time To activate On Off mode Press the MENU button for main menu Press the Settings button Enter your 4 digit password and press Enter Press the Energy Modes button Press the On Off Mod...

Страница 27: ...d with a safety mode that allows for additional safety protection if needed Hot isolation To allow safety changes select YES on the safety settings screen To activate press button to disable safety lo...

Страница 28: ...filter replacement is due If you notice one of the following you will need to change the filter The white change filter light will flash and remain so until reset The filter percentage will show 0 on...

Страница 29: ...lockwise until it comes to a complete stop and locks with the front label facing forward Initiate the filter flush programme by scrolling through the menu screen see page 18 When completed clean up an...

Страница 30: ...op securing strap Turn the regulator on turn regulator knob anti clockwise to end stop Check all joints for gas leaks using a sponge and soapy water Purge the gas lines see CO2 purge page 20 Note When...

Страница 31: ...adjusted by litres and by days used 50 Boiling temperature The temperature of the water in the boiling tank will be displayed This is optimises at 98 C but may be adjusted between 68 C 98 C See page...

Страница 32: ...Zip Water UK 14 Bertie Ward Way Dereham Norfolk NR19 1TE 0345 6 005 005 sales zipindustries co uk www zipwater co uk...

Отзывы: