


PREMIER QUATRO INSTALLATION MANUAL
Software Versions: PANEL 1.52 & LOOP CARD 2.0
Doc No. GLT.MAN-134
PAGE 33
Issue: 1.33 Author: GW/NJ Date: 14/1/2013
13. DISABLEMENT
To aid commissioning and assist routine maintenance checks, various functions of the Quatro fire alarm system can be disabled as
described below.
13.1 ZONE DISABLEMENT
When a zone is disabled, the panel will not respond to any fault or fire signals it receives from DETECTORS from that zone.
This might be used if the system requires routine maintenance, and the user needs the rest of the system to continue running, but
doesn’t want spurious false alarms.
The panel will respond in the usual manner to any events in any non-disabled zones.
Any number of zones can be disabled, but it is good practice to only disable one zone at a time.
A zone can be disabled as follows:
Turn the keyswitch clockwise to the Controls Enabled Position. The controls Active LED will light.
Press any key followed by the Level 1 password (default 1111). Select Zones then Disable. Enter the zone(s) or range of zones to be
disabled. Finally select Accept and then Exit.
When zones have been disabled, the General Disablement LED will be lit and also the zonal disablement LEDs (in one or both of the
columns labelled FAULT DISABLE TEST). The zonal disablement LEDs only apply to zones 1 to 20.
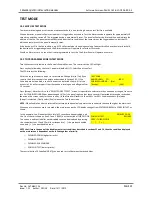
When one or more zones have been disabled, the main screen on the LCD display changes from SYSTEM NORMAL to DISABLED
ZONES, as shown.
In the example, line 2 indicates that a total of 9 zones have been disabled, and
the 5th of these is shown on line 3. Zone 1 (Z001) has the text label FIRST FLOOR.
The zone no. and text label for each disabled zone can be displayed by pressing
the control buttons F1 and F2 which correspond to [ - ], the previous disabled
zone, and [ + ], the next disabled zone.
13/04/11 11:49
DISABLED ZONES
005/009
Z001 – FIRST FLOOR
[ - ] [ + ]
Alternatively, up to 10 disabled zones (without text labels) can be displayed in one screen as follows. Select any key followed by
Level 1 password ( default 1111), and then Zones followed by Show Disabled Zone. Zones are displayed in groups of 10, with the
symbol X underneath a zone which has been disabled. The next group of 10 zones can be displayed by pressing the + symbol. The –
symbol can be used to go back 10 zones.
To re-enable a disabled zone, repeat the same procedure used for disabling the zone, selecting Enable instead of Disable.
13.2 DEVICE DISABLEMENT
Rather than disable an entire zone, it is often useful to just disable one or more input devices or points (detector, call point, or
interface) within a zone, especially if they are malfunctioning and likely to cause a false alarm or repeatedly indicate a fault.
To disable a device / point follow the same procedure as in Section 13.1 but selecting Point instead of Zone, followed by Disable.
Once a device is disabled, the panel ignores any alarms or faults generated by the device.
If all devices in a zone are disabled, the panel will indicate a zone disablement. If subsequently one or more devices are re-enabled
then the zone disablement indication will be automatically cancelled.
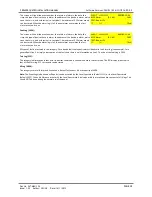
When one or more points have been disabled, the main screen on the LCD display changes from SYSTEM NORMAL to DISABLED
POINTS, as shown.
In the example, line 2 indicates that a total of 5 points have been disabled, and
the 1st of these is shown on line 3. The 1st disabled device is an MCP which is
located on loop 1 at address 97, with the text label “ENTRANCE”. Each disabled
point can be displayed by pressing the control buttons F1 and F2 which
correspond to [ - ], the previous disabled point, and [ + ], the next disabled zone.
13/04/11 15:07
DISABLED POINTS
001/005
MCP
(1.097) ENTRANCE
[ - ] [ + ]
Alternatively, up to 10 disabled points (without indicating device type or address) can be displayed on one screen as follows.
Select any key followed by Level 1 password (default 1111), and then Points followed by Show Disabled Points. The menu structure
is then the same as for zone disablement.
To re-enable a disabled device, repeat the same procedure used for disabling the device, selecting Enable instead of Disable.


