background image

13.

4.  When the Hydra is switched on (without the remote controller 

switched on) The lights on the arms of the Hydra will flash. While 
these lights are flashing the WiFi signal will start up be available for 
connection.

5.  In your Smart-phone’s WiFi settings find the and select the Zero-X 

Hydra WiFi connection.

6.  Open the Zero-X Hydra App.

7.  Press the App Control button on screen to access FPV mode.

3.9 

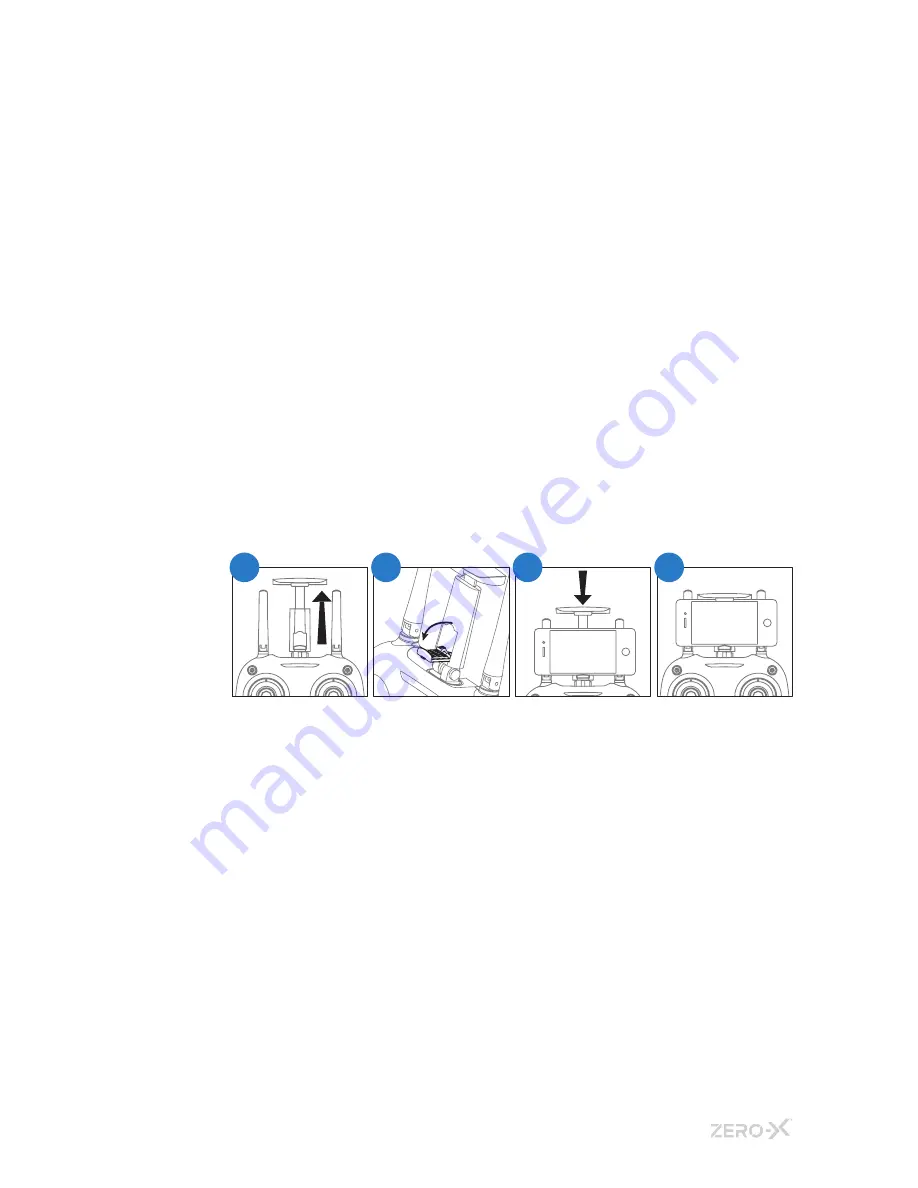
 USING THE REMOTE CONTROL SMART PHONE 

HOLDER

1.  Extend the Phone cradle from the top of the drone.

2.  Flip down the bottom grip of the phone cradle.

3.  Lift the top grip and place your smart phone horizontally between the 

two grips.

4.  Release the top grip making sure that your smart phone is securely in 

position.

4.0 

FLYING YOUR HYDRA

GETTING STARTED, POWERING UP, PAIRING, CALIBRATING AND 
UNLOCKING THE MOTORS

1.  Now that you have installed fully charged battery into your Hydra 

Drone and 4 x AA batteries (AA batteries not included) into 
your remote control, please conduct a complete check of your 
surroundings to ensure that your location is safe to take off from.

2.  On your Android or Apple Smart-phone, open your WiFi settings and 

connect to the Zero-X Hydra WiFi connection. Once connection is 
made, open the Zero-X Hydra app on your Smart-phone.

3.  Position your phone in the remotes smart phone holder.

1

2

3

4

Содержание Hydra ZX-HRA

Страница 1: ...ZX HRA v2 Capture the skies Full HD Camera Drone with WIFI GPS FPV DRONE USER MANUAL hydra...

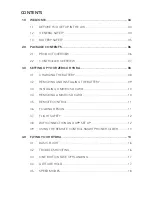
Страница 2: ...NG THE BATTERY 08 3 2 REMOVING AND INSTALLING THE BATTERY 09 3 3 INSTALLING A MICRO SD CARD 10 3 4 REMOVING A MICRO SD CARD 10 3 5 REMOTE CONTROL 11 3 6 FOLDING DESIGN 11 3 7 FLIGHT SAFETY 12 3 8 WIFI...

Страница 3: ...CK DOWN 18 4 8 TRIMMING 19 4 9 RETURN TO HOME 19 4 10 POINT OF INTEREST 19 5 0 APP NAVIGATION 21 5 1 APP CONTROL SCREEN 21 6 0 MAINTENANCE 24 6 1 REPLACING ROTOR BLADES 24 6 2 REPLACEMENT PARTS 25 7 0...

Страница 4: ...arefully and understand this information as operating a drone outside of these guidelines may result in legal issues Zero X takes no responsibility for operation of this product outside of what is leg...

Страница 5: ...teries when charging Do not leave batteries in direct sunlight After each flight or crash please check battery for any damage or swelling If the battery is damaged leaking making noise punctured or ma...

Страница 6: ...arger 5 Battery 6 Rotor Blades 7 User Guide 1 Front Left Foot 2 Camera 3 Front Right Foot 4 Battery 5 Battery Release 6 Rear Left Foot 7 Power Button 8 Rear Right Foot 9 Front Right Rotor Blade 10 Fro...

Страница 7: ...2 CONTROLLER OVERVIEW 1 Phone Holder 2 Video Button 3 Left Thumbstick 4 Return To Home 5 Power Switch 6 Photo Button 7 Right Thumbstick 8 One Button Take Off Landing Emergency Stop Button 6 1 7 8 5 2...

Страница 8: ...charging cable before charging is complete If you have just nished ying your Hydra drone please allow the battery to cool down for at least 30 minutes before recharging When the Hydra battery has nis...

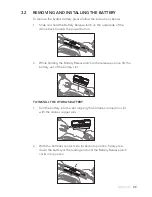
Страница 9: ...r button 2 While holding the Battery Release latch in the release position lift the battery out of the battery slot TO INSTALL THE HYDRA S BATTERY 1 Slot the battery into the slot aligning the batteri...

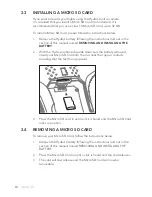
Страница 10: ...Y 2 With the Hydra positioned upside down and the battery removed insert your Micro SD Card into the slot near the copper contacts ensuring that the text facing upward 3 Press the Micro SD card in unt...

Страница 11: ...types of batteries 3 6 FOLDING DESIGN The Hydra can fold down for easy storage and transport To fold the Hydra s arms down it requires that the arms are folded down and unfolded in a specific order W...

Страница 12: ...obstacles or dangers in the area including overhead power lines and bodies of water If there are hazards present in your intended area of flight please consider an alternative location 3 8 WIFI CONNE...

Страница 13: ...the top grip and place your smart phone horizontally between the two grips 4 Release the top grip making sure that your smart phone is securely in position 4 0 FLYING YOUR HYDRA GETTING STARTED POWERI...

Страница 14: ...e position 7 On your Hydra Drone press and hold the power on off button at the back of the drone for 2 seconds The drone should turn on with all lights active and shining brightly Once the drone light...

Страница 15: ...1 Vertical correction Rotate the drone vertically on the ground until the remote control makes another long beep When the four indicator start flashing in a clockwise sequence it indicates that the dr...

Страница 16: ...of the Remote Control C The connection between the Remote Control and the Hydra may not have been completed correctly Ensure that when activating the connection the Left Thumb stick Acceleration Yaw i...

Страница 17: ...button The drone will then descend and land EMERGENCY LANDING If you need to bring the drone down in an emergency while flying hold the one button take off land button The motors will stop completely...

Страница 18: ...ng low the remote will issue a fast series of beeps signalling that the battery needs to be recharged The remote will quickly beep twice when the Hydra is flying out of range If the controller begins...

Страница 19: ...this manual 4 9 RETURN TO HOME Return to home brings the Hydra back to the location it was launched from To activate Return to Home press the Return to Home button on the front of the remote control...

Страница 20: ...he target Moving the left thumb stick left will make Hydra circle the target counter clockwise while focusing on the target Moving the thumb stick down will move the Hydra away from the target making...

Страница 21: ...s on the remote control use the Control Assist setting and press the button to show the on screen controls In this mode the controller must be used for take off 5 1 APP CONTROL SCREEN APP ICONS HOME P...

Страница 22: ...ed the icon will be displayed REMOTE CONTROL SIGNAL Displays the Hydra s WiFi signal strength SETTINGS Settings will allow you to set your transmission resolution trimming ON SCREEN CONTROLS This will...

Страница 23: ...TON TAKE OFF This button will launch the drone When selected the drone will take off and hover at shoulder height ONE BUTTON LANDING This button will initiate the automatic landing sequence Please be...

Страница 24: ...LACING ROTOR BLADES If your rotor blades become damaged or the Hydra drone is no longer flying straight the rotor blades may need to be replaced To replace the Hydra s Rotor Blades please follow the d...

Страница 25: ...your first two orders of any spare parts by using the codes in the coupons below There you will be able to find and buy the spare parts listed below Visit www zero x com au to make your purchase Batt...

Страница 26: ...kaging This warranty is only valid where you have used the product in accordance with any recommendations or instructions provided by Zero X This warranty excludes defects resulting from alterations o...

Страница 27: ...27 NOTES...

Страница 28: ...Capture the skies maverick www zero x com au www zero x co nz Zero X v2 0 2018...

Отзывы: