4
To Install Software (MAC)
1
Plug your turntable into an AC power outlet and use the included USB cable to connect the
USB
port on your turntable to the USB port on your computer.
2
Turn your computer on if it is not on already. Allow it to boot fully.
3
Insert the included
CD
into your computer’s CD drive.
4
Open the CD icon on the desktop.
5
Drag the installation folder for Audacity to your hard drive. We recommend that you move
the folder to your
Applications
folder.
6
A window will come up which shows the files copying.
7
Once the files are done copying, EJECT the CD.
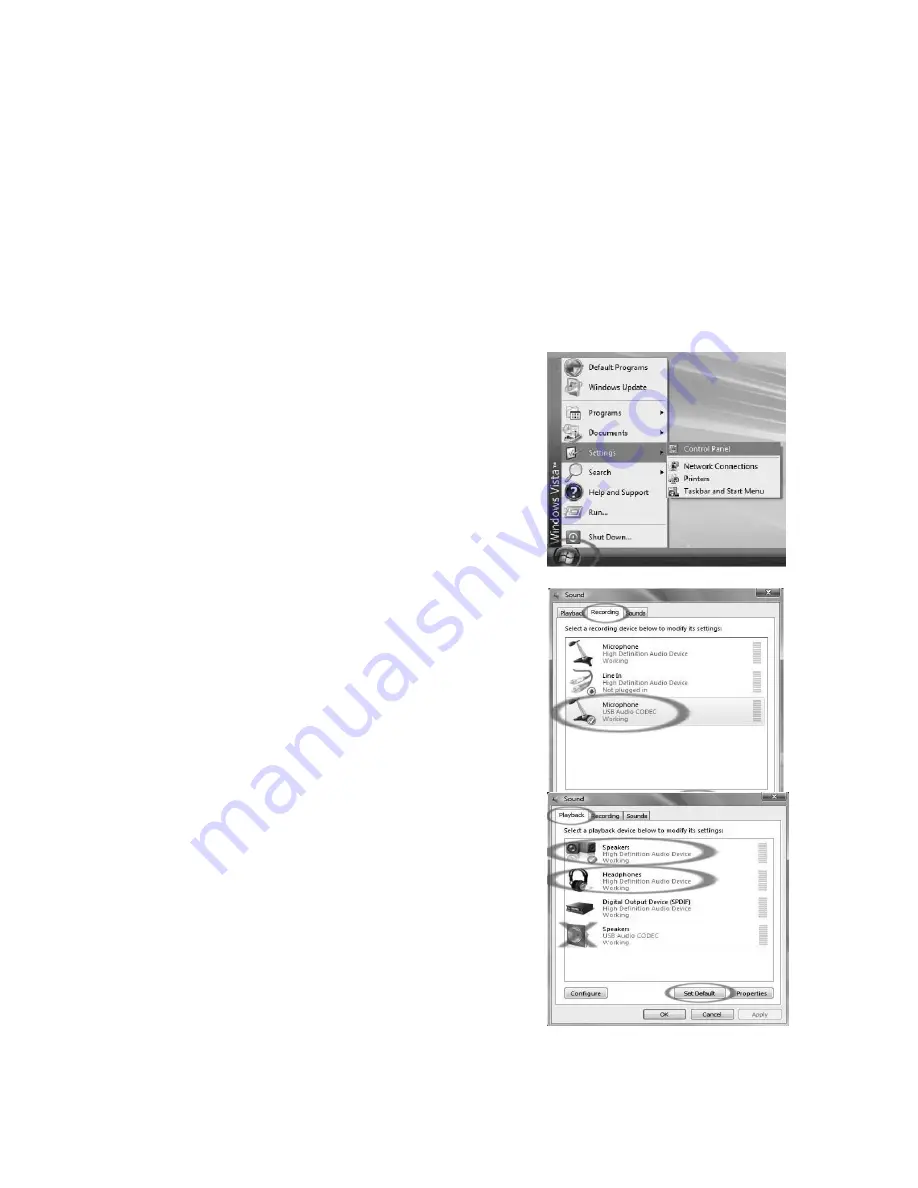
CONFIGURING MICROSOFT WINDOWS VISTA TO WORK WITH THE USB TURNTABLE
1. Close all programs that are open on your computer.
2. On the bottom left of your screen, select the
start
menu
3. Select
settings
then
control panel
4.
In the window that opens, find and double-click
the
Sound
control panel. (If you don’t see a
choice called “Sound”, choose the Switch to
Classic View option in the panel on the left of the
window, and the
Sound
Control Panel should
become available on the right.)
5.
Select the
Recording
tab at the top of the Sound
Control Panel.
6.
Under the
Recording
tab, choose
Microphone -
USB Audio Codec
as the default device. The
USB Audio Codec represents your Turntable.
7.
Click on the
Set Default
button to confirm your
choice.
8.
Now select the
Playback
tab at the top of the Sound
control panel.
9.
Under the
Playback
tab, choose the device that you
would like your computer’s audio to come out of.
Your computer’s audio outputs may appear as:
Speakers-High
Definition Audio Device or
Headphones-High Definition Audio Device
Or both, depending on the hardware installed in your computer.
Click on the device that best matches your desired audio setup
and click
Set Default
to confirm your selection.
Note:
Do NOT choose “Speakers - USB Audio Codec” as your playback device. USB Audio Codec
represents your turntable, and can only be used as recording input, not a playback output.


