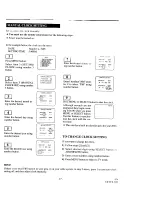
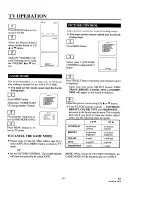
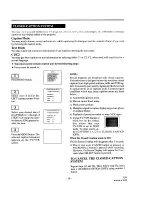
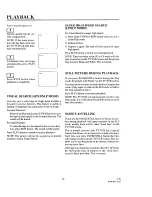
background image

Содержание SRV1300S

Страница 1: ...Operating Guide Warranty ___ _ _ ii iiiiiiiiiiiiiiiiiiiiii 13 ColorTV VCR Combination SRV1300S...

Страница 2: ...e appliance Use only with a cart stand tripod bracket or table recommended by the manufacturer or sold with the TV VCR Any mounting of PORTABLE CART WARNING the applianceshould follow the _l_ manufact...

Страница 3: ...s that could result in a fire or electric shock Never spill liquid of any kind on the TV VCR 18 Servicing Do not attempt to service this TV VCR your self as opening or removing covers may expose you t...

Страница 4: ...K 16 AUTO CLOCK SETrlNG 16 MANUAL CLOCK SETI ING 17 TV OPERATION 18 GAME MODE 18 PICTURE CONTROL 18 CLOSED CAPTION SYSTEM 19 PLAYBACK 20 SPECIAL PLAYBACK 21 RENTAL PLAY 21 AUTO REPEAT PLAYBACK 21 COUN...

Страница 5: ...a cold place to a warm place or after heating a cold room or under conditions of high humid ity Ifa tape is played in a TV VCR which has moisture it may damage the tape and TV VCR Therefore when the c...

Страница 6: ...Play Mode Improves playback picture quality of worn tapes especially rental tapes Auto Repeat Playback Allows you to repeat a tape indefinitely without using the PLAY button You can select all feature...

Страница 7: ...g precau tions Avoid moisture which can condense on the tape if it is moved from a cold place to a warm place Play ing a tape that has moisture in it will damage the tape and your TV VCR Before using...

Страница 8: ...to view video in forward during Play mode at a faster than normal speed Press PLAY button to return TV VCR to normal playback speed 10 REC OTR button Press to begin manual record ing Press again to a...

Страница 9: ...AUDIO IN jack For connection to audio output jack of your audio equipment or another VCR 18 VIDEO IN jack For connection to video output jack of your video camera or another VCR 19 ANT terminal For c...

Страница 10: ...so be used to adjust the picture control See page 18 TRACKING function Press or button to minimize video noise lines or dots on screen dur ing the Play mode See page 30 5 STOP button Press to stop the...

Страница 11: ...desired chan nels and select item in the Menu mode They cannot be used to set desired channel during Timer Record ing To select channels 1 to 9 first press the 0 button and then 1 to 9 100 button Pre...

Страница 12: ...position Avoid handling the top section when making adjustments Usc this ctnmcction il yore cable system commcts di rectly to your TV VCR without a converter box With this connection you 1 can use you...

Страница 13: ...output ca bles to the AUDIO IN VIDEO IN jacks of your AUX TV VCR Then press CHANNEL or button or enter 00 with number button so that AUX appears on the screen TO COPY A VIDEO CASSETTE Requires anothe...

Страница 14: ...selected channels you can select the desired channel directly by number button or CH or button on the remote control unit TO RETURN TO TV MODE WHEN SCANNING Press MENU button in scanning mode IKI IT_...

Страница 15: ...HANNEL t Press ADD DELETE but ton The channel number l _ _ changes to light red The channel is deleted from memory To delete another channel repeat steps 3 and 4 If you press the ADD DELETE button aga...

Страница 16: ...ee the HINTS below The power must remain off during this search HINTS 1 If you choose 00 during step 4 the TV VCR must search through all the available channels one starting with the lowest numbered c...

Страница 17: ...UTE AP NPM r 1 MoN r_ DAY _EAR 03 I 0t WED 19_ _ H_I_ _MIN U T E AM PM __ Enter the desired mute us ing number button MONTH bay YEAR 03 DI WED 1_ OUR _L_ _E AM_ _x _ _ __ Enter 1to select AM or en ter...

Страница 18: ...AI_UAGE 8ELECT T_E SEARCH _ USER S SET UP COO SELECT t GAME MODE ONI Press number 1 button to se 2 ENTAL ore lect GAME MODE ON 3 EPEAT_AY oPP Press MENU button to re turn to TV mode TO CANCEL THE GAME...

Страница 19: ...K3NC1 3 CAPT_N C2 4TEXT CI 5TEXT C2 I CLOSED CAPTK N SET UP N J 1 CLOSEDCAPTK N IONI 2 CAPTK N C1 ON 3 CAPTK N C2 TEXT O_ 5 TEXT C2 NOTE Not all programs are broadcast with closed captions Your televi...

Страница 20: ...supcr high speed Press PLAY button to return to normal playback NOTE Tapes recorded in the SP or LP mode will dis play a noise bar on the TV VCR screen and the picture may revert to Black and White T...

Страница 21: ...rom the beginning of the tape to the first blank section of the tape it must be blank for more then 10 seconds Before playback follow steps below You must use the remote control unit for the follow in...

Страница 22: ...er Point If the count is displayed on the TV VCR screen skip step 1 If the count is not displayed press C MEMORY button J so that the counter appears on the TV VCR screen _ Press C RESET button The co...

Страница 23: ...he desired minutes with number button rIME_p_H _ _ To correct the hour press DELETE button and re peat steps 3 and I4 To correct the minute enter correct numbers using number button To cancel the Time...

Страница 24: ...up p To skip some material while you are re cording E Ii AUSE Press PAUSE STILL button on the remote control to tem porarily stop recording Re cording indicator light p blinks NOTES If the TV VCR is l...

Страница 25: ...s 13 pushes 14 pushes 15 pushes 16 pushes 17 pushes 18 pushes DISPLAY NORMAL REC 0 30 I 00 1 30 2 00 2 30 3 00 3 30 4 00 4 30 5 00 5 30 6 00 6 30 7 00 7 30 8 00 LENGTH MODE 30 minutes 60 minutes 90 mi...

Страница 26: ...low page 16 to set the clock and repeat from step 2 Enter your desired program number using number but ton The program number 8 o RSC _RAM NUMSEP _ _ _ DATE _ _ START TIME J J END TIME CHANNEL TAPE SP...

Страница 27: ...C STANDBY starts flashing on the TV VCR screen 2 minutes be fore the programmed start time You must turn offthe TV VCR to activate automatic timer recording TO CORRECT A PROGRAM While setting a progra...

Страница 28: ...nitial display step 2 Press CH A or v button until your desired hour is dis played Press VOLUME A button I QUK_K SET PROGRAM DATE 0 01 WED END T ME _ _ il CHANNEL 0 E TAPE SPEED SLP Press CH or v butt...

Страница 29: ...RECORD button for timer recording Recording begins automatically at the set ofthe Start time If you are recording using a Timer mode you may not operate the unit manually The erase prevention tab on...

Страница 30: ...djust the tracking control by pressing CH or v button until the streaks disappear To re turn to the DTR function stop the tape once and start playback again To set center position press both CH and v...

Страница 31: ...esired hours us ing number button E 3 Enter the desired minutes using number button Enter I to select AM or en ter 2 to select PM using _ number button To correct the time press DELETE button and re p...

Страница 32: ...ntrol unit or main unit is in minimum position MUTE button on the remote control unit is in the ON position The timer recording is set incorrectly The timer recording is not set to ON The erase preven...

Страница 33: ...dcasters may at times use a time compression process to speed up the actual program so that additional advertising time can be given Since the decoder cannot read the compressed information captions w...

Страница 34: ...2 6 7 13 14 69 5A A5 A 1 A I J W W 1 W 84 VHF UHF 75 ohms unbalanced RCA connector X 2 RCA connector X 2 1 8 monaural 3 5 mm Video input level Audio input level Video S N ratio Audio S N ratio 0 5 2...

Страница 35: ...day 7 days a week 1 8OO 4 REPAIR 1 800 473 7247 For the location of a SearsRepair Service Center in yourarea Call 24 hours a day 7 days a week 1 800 488 1222 i mmmmmm mmmmmm For information on purchas...

Страница 36: ...WARRANTY ON PICTURE TUBE After one year from the date of purchase and up to two ears Sears will furnish free of charge a replacement for the picture tube if defective You pay for labor Warranty servic...

Отзывы: