Zenith P50W26 Скачать руководство пользователя страница 7

7

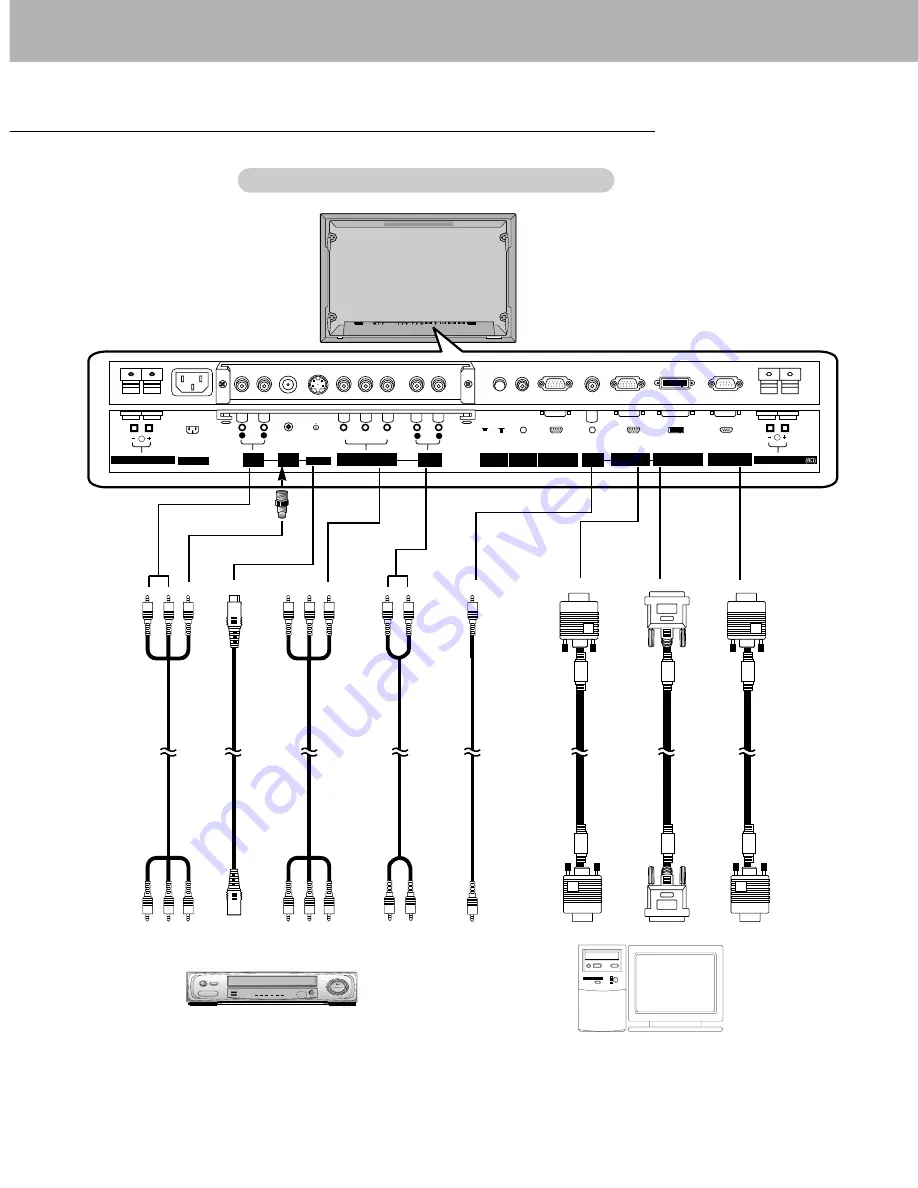
External Equipment Connections

Connection to PC

Note: All cables shown are not provided with the Monitor, except:

A D-sub 15 pin cable and DVI cable is supplied to connect the Monitor to a PC.

Connection to AV equipment

Y

P

B

P

R

(  )

(  )

R

(MONO)

R

AUDIO

ON/

OFF

L

R

AUDIO

L

(  )

(  )

L

AC INPUT

(8

)

EXTERNAL SPEAKER

COMPONENT

(DVD/DTV INPUT)

RGB1 OUTPUT

(PC/DTV OUTPUT)

LOCK

REMOTE

CONTROL

CONTROL

RGB1 INPUT

(PC/DTV INPUT)

INPUT

AUDIO

INPUT

AUDIO

INPUT

AUDIO

INPUT

VIDEO

RGB2 INPUT

(DIGITAL RGB INPUT)

RS-232C INPUT

(CONTROL/SERVICE)

S-VIDEO

EXTERNAL SPEAKER

AUDIO INPUT

VIDEO INPUT

COMPONENT
(DVD/DTV
INPUT)

S-VIDEO
INPUT

COMPONENT
AUDIO 
INPUT RGB

AUDIO INPUT

RGB1 INPUT
(PC/DTV 
INPUT)

RGB2 INPUT
(DIGITAL
RGB INPUT)

RS-232C INPUT

Monitor External Equipment Connection Panel

Содержание P50W26

Страница 1: ...Copyright 2002 Zenith Electronics Corporation Installation and Operating Guide Model Numbers P50W26 P50W26B PLASMA DISPLAY PANEL...

Страница 2: ...nd found to comply with the limits for a Class B digital device pursuant to Part 15 of the FCC Rules These limits are designed to provide reasonable protection against harmful interference in a reside...

Страница 3: ...abinet are provided for ventilation and to ensure reliable operation of the product and to protect it from overheating and these openings must not be blocked or covered The openings should never be bl...

Страница 4: ...amaged f If the product exhibits a distinct change in performance 21 Replacement Parts When replacement parts are required be sure the service tech nician has used replacement parts specified by the m...

Страница 5: ...on 19 Manual Configure 19 Screen Adjustments 19 Initializing 19 PIP Picture In Picture Feature Watching PIP 20 PIP Size 20 PIP Aspect Ratio 20 Swapping PIP 20 Moving PIP 20 Selecting a Input Signal So...

Страница 6: ...Speaker Stand manual 2 POWER CORD SOCKET This Monitor operates on an AC power The voltage is indi cated on the Specifications page Never attempt to operate the Monitor on DC power 3 AUDIO VIDEO INPUT...

Страница 7: ...PUT 8 EXTERNAL SPEAKER COMPONENT DVD DTV INPUT RGB1 OUTPUT PC DTV OUTPUT LOCK REMOTE CONTROL CONTROL RGB1 INPUT PC DTV INPUT INPUT AUDIO INPUT AUDIO INPUT AUDIO INPUT VIDEO RGB2 INPUT DIGITAL RGB INPU...

Страница 8: ...dio Right red 1 Use the INPUT SELECT button on the remote control to select VIDEO 2 Operate the corresponding external equipment See external equipment operating guide After subscribing to a cable TV...

Страница 9: ...the signal cable from the DVI output port of the PC to the RGB2 INPUT DIGITAL RGB INPUT port on the Monitor Connect the audio cable from the PC to the Audio input on the Monitor Audio cables are not...

Страница 10: ...uency KHz 31 468 37 861 31 469 37 927 31 469 35 000 37 861 37 500 43 269 35 156 37 879 48 077 46 875 53 674 70 09 85 08 70 08 85 03 59 94 66 66 72 80 75 00 85 00 56 25 60 31 72 18 75 00 85 06 o o o o...

Страница 11: ...creen menus one by one Exits the current menu Memorizes menu changes NUMBER buttons WIN SIZE Adjusts the sub picture size WIN POSITION Moves the sub picture SPLIT ZOOM Enlarge the screen with regular...

Страница 12: ...OOM VOL SUB INPUT Remote Control DVI Cable Accessories 2 inches 4 inches 2 36 inches 4 inches 4 inches 4 inches 4 inches 4 inches 4 inches 2 inches To Mount on a Wall Wall mount minimum allowable clea...

Страница 13: ...turned off with the remote control or the ON OFF button on the Monitor Press the ON OFF button on the Monitor and then press the INPUT SELECT button on the Monitor or press the POWER INPUT SELECT but...

Страница 14: ...USER in the VIDEO menu Picture options CLEAR and SOFT are preset and programmed for good picture quality at the factory and cannot be changed Each press of D E button changes the screen display as sh...

Страница 15: ...menu FLAT SPORTS CINEMA MUSIC USER This function lets you enjoy the best sound without any special adjustment because the Monitor automatically selects the appropriate sound option based on the progr...

Страница 16: ...ton to select the number of minutes The display MIN will appear on the screen fol lowed by 10 20 30 60 90 120 180 and 240 The timer begins to count down from the number of minutes selected When the sl...

Страница 17: ...e G button and then use D E button to select ORBITER 3 Press the G button and then use D E button to select ON or OFF 4 Press the MENU button White W White Wash ash White Wash removes permanent images...

Страница 18: ...screen for a long time that fixed image may remain visible 1 Press the ARC button to select a desired picture format Each press of ARC button changes the screen display as shown below You can also sel...

Страница 19: ...t jittering or picture instability while viewing a video tape This function operates in every mode To initialize the adjusted value 1 Press the MENU button and then use D E button to select the SCREEN...

Страница 20: ...exchange the main and sub pictures Selecting a Input Signal Source for the PIP Selecting a Input Signal Source for the PIP Press the SUB INPUT button to select the input source for the sub picture In...

Страница 21: ...ously Using WIN SIZE function in PIP mode sub picture is adjust ed WIN POSITION is not functional in twin picture mode Swapping the Swapping the T Twin Picture win Picture Use the SWAP button to switc...

Страница 22: ...D DTR DSR RTS CTS TXD RXD GND DSR DTR CTS RTS PC 7 wire configuration Standard RS 232C cable D Sub 9 Control line 3 2 5 6 4 8 7 PDP D Sub 9 2 3 5 4 6 7 8 RXD TXD GND DTR DSR RTS CTS TXD RXD GND DTR DS...

Страница 23: ...his format when receiving normal data At this time if the data is data read mode it indicates present status data If the data is data write mode it returns the data of the PC computer Command2 Set ID...

Страница 24: ...knowledgement Data 0 Volume mute on Volume off 1 Volume mute off Volume on e Set ID OK Data x 03 Aspect Ratio Command c Main picture format G To adjust the screen format You can also adjust the screen...

Страница 25: ...st treble You can also adjust treble in the Audio menu Transmission Data Min 0 Max 64 Refer to Real data mapping1 See page 24 k r Set ID Data Cr Acknowledgement Data Min 0 Max 64 r Set ID OK Data x 16...

Страница 26: ...just red in color temperature Transmission Data Min 0 Max 64 Refer to Real data mapping 2 See page 24 Data Min 0 Max 64 k v Set ID Data Cr Acknowledgement v Set ID OK Data x 22 Green Adjustment Comman...

Страница 27: ...gh custom code Data code Data code TC Tf T1 C0 Carrier frequency FCAR 1 TC fOSC 12 Duty ratio T1 TC 1 3 Repeat frame C1 C2 C3 C4 C5 C6 C7 C0 C1 C2 C3 C4 C5 C6 C7 D0 D1 D2 D3 D4 D5 D6 D7 D0 D1 D2 D3 D4...

Страница 28: ...ton R C Button R C Button R C Button R C Button Power On Off Discrete IR Code Only Power On Discrete IR Code Only Power Off R C Button R C Button R C Button R C Button R C Button R C Button R C Button...

Страница 29: ...with a soft dry lint free cloth Please be sure not to use a wet cloth If you leave your Monitor dormant for a long time such as a vacation it s a good idea to unplug the power cord to protect against...

Страница 30: ...or Poor picture Select COLOR in the VIDEO menu and press the VOLUME G button Refer to p 14 Keep a certain distance between the Monitor and the VCR Activate any function to restore the brightness of th...

Страница 31: ...irement Resolution Color Operating Temperature Range Operating Humidity Range P50W26 P50W26B 48 2 1223 28 9 734 4 1 105 99 2 45 AC120V 60Hz 1366 x 768 Dot 16 770 000 256 steps of each R G and B 32 104...

Страница 32: ...P N 3828VA0352E RF02CA 206 3786 a...

Отзывы: