


11
Remote Control Key Functions
- When using the remote control, aim it at the remote control sensor of the Monitor.
- Under certain conditions or if the IR code from remote is interrupted, function may not occur. Repeat key presses if
necessary.
• Open the battery compartment cover on the back side and
insert the batteries with correct polarity.
• Install two AAA 1.5V alkaline batteries. Don’t mix used batteries
with new batteries.
Installing Batteries
Installing Batteries
1
2
3
4
5
6
7
8
0
9
POWER
SLEEP
INPUT SELECT
APC
DASP
ARC
AUTO CONFIG.
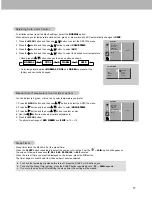
ZOOM -
ZOOM +
SPLIT ZOOM
MENU
MUTE
OK
VOL
POWER
STOP
PLAY
FF
REC
REW
P/STILL
PIP
TWIN PICTURE
PIP POSITION
PIP STILL
SOUND SELECT
PIP INPUT
VOL
KEY LOCK
POWER
Switches the Monitor on from
standby or off to standby.
SLEEP
Sets the sleep timer.
(Refer to p.17)
APC
Adjusts the factory preset picture
according to the room.
(Refer to p.14)
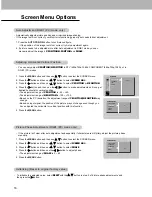
ARC
Changes the picture format.
(Refer to p.20)
ZOOM-
Reduces the main picture size.
(Refer to p. 20)
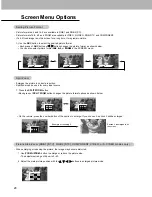
SPLIT ZOOM
Enlarges a screen section.
(Refer to p. 20)
MENU
Displays on screen menus.
Exits the current menu.
Memorizes menu changes.
NUMBER buttons
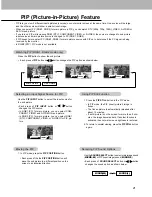
PIP
Switches the sub picture on and off.
(Refer to p. 21)
TWIN PICTURE
(Refer to p. 22)
PIP INPUT
Selects the input source for the sub
picture. (Refer to p. 21, 22)
SOUND SELECT
Selects main picture sound or sub
picture sound for PIP.
(Refer to p. 21, 22)
PIP POSITION
Changes the sub picture position.
(Refer to p. 21)
PIP STILL
Freeze sub picture motion.
(Refer to p. 21, 22)
VCR BUTTONS
Control some video cassette recorders.
OK
D
/
E
Select menu options.
F
/
G
(Volume button)
Increases/decreases sound level.
Adjusts menu settings.
INPUT SELECT
Selects:
VIDEO
,
S-VIDEO
,
RGB1-2
or
COMPONENT
mode.
DASP
Selects the sound appropriate to
your viewing program character:
FLAT
,
SPORTS
,
CINEMA
,
MUSIC
,
or
USER
(Refer to p.15)
AUTO CONFIG
(Refer to p.18)
KEY LOCK
To operate the monitor with remote
control only. (Refer to p. 16)
MUTE
Switches the sound on or off.
ZOOM+
Enlarges the main picture size.
(Refer to p. 20)
Содержание P42W24B
Страница 32: ...P N 3828VA0361D RF02RA 206 3849...


