background image

P A G E   4 0

206-3687-O

LT2000 Cloning Procedures

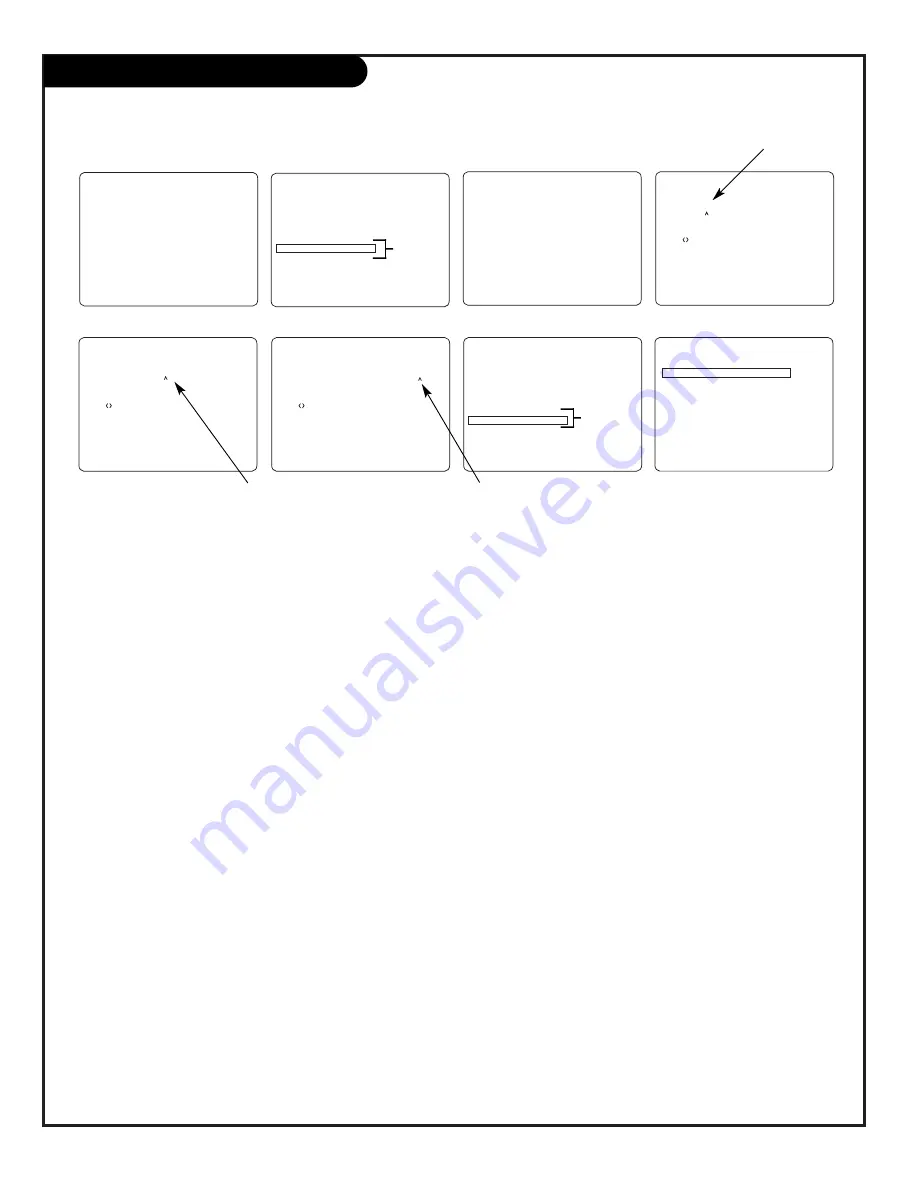
Typical Edit Channel Labels on-screen menus

CLONE SELECTION MENU

(1) LEARN FROM TV
(2) TEACH TO TV
(3) SET CLONE CLOCK FROM TV
(4) SET TV CLOCK FROM CLONE
(5) DISPLAY TV SETUP
(6) DISPLAY CLONE SETUP
(7) EDIT CHANNEL LABELS
(8) SEND CHANNEL LABELS

-TO CHANGE MENU ITEMS,  PRESS 
 CHANNEL KEYS OR DIGITS.
-TO EXECUTE ITEM, PRESS ON/OFF,
 POWER, OR ENTER

THE CLONE HAS CONTROL OF THE TV

THE CLONE IS VERSION

XX

THE TV IS VERSION

XX

THE SW IS REVISION

XX

CLONE CLOCK=

XX:XX

TV 

   CLOCK=

XX:XX

-PRESS ANY KEY TO CONTINUE.

-DISCONNECT CLONE WHEN DONE.

SELECT CLONE MEMORY CONTAINING
THE LABELS TO BE EDITED.

(1) CHANNEL LABELS FOR MEMORY  1
(2) CHANNEL LABELS FOR MEMORY  2
(3) CHANNEL LABELS FOR MEMORY  3
(4) CHANNEL LABELS FOR MEMORY  4
(5) RETURN TO CLONE MENU

-TO CHANGE MENU ITEMS,  PRESS 
 CHANNEL KEYS OR DIGITS.

-TO EXECUTE ITEM,  PRESS ON/OFF,
  POWER, OR ENTER.

EDIT CHANNEL LABELS FOR MEMORY

1

LABEL

1:

LAB 1 FOR CHANNEL - - -

*EDITING LABEL NUMBER*

-VOL      TO SELECT ITEM TO EDIT
-CH UP/DOWN CHANGE ITEM VALUE
-MUTE TO CLEAR THIS PROG. LABEL
-CC TO CLEAR ALL PROG. LABELS
-PRESS ENTER TO STORE THIS LABEL
-PRESS POWER OR ON/OFF WHEN DONE

EDIT CHANNEL LABELS FOR MEMORY

1

LABEL

1:

WABC FOR CHANNEL  20

*EDITING CHANNEL NUMBER*

-VOL      TO SELECT ITEM TO EDIT
-CH UP/DOWN CHANGE ITEM VALUE
-MUTE TO CLEAR THIS PROG. LABEL
-CC TO CLEAR ALL PROG. LABELS
-PRESS ENTER TO STORE THIS LABEL
-PRESS POWER OR ON/OFF WHEN DONE

EDIT CHANNEL LABELS FOR MEMORY

1

LABEL

1:

WYC  1 FOR CHANNEL - - -

*EDITING LABEL CONTENT*

-VOL      TO SELECT ITEM TO EDIT
-CH UP/DOWN CHANGE ITEM VALUE
-MUTE TO CLEAR THIS PROG. LABEL
-CC TO CLEAR ALL PROG. LABELS
-PRESS ENTER TO STORE THIS LABEL
-PRESS POWER OR ON/OFF WHEN DONE

SEND SELECTED CHANNEL LABEL 
MEMORY TO TV

(1) CHANNEL LABELS FOR MEMORY  1
(2) CHANNEL LABELS FOR MEMORY  2
(3) CHANNEL LABELS FOR MEMORY  3
(4) CHANNEL LABELS FOR MEMORY  4
(5) RETURN TO CLONE MENU

-TO CHANGE MENU ITEMS,  PRESS 
 CHANNEL KEYS OR DIGITS.

-TO EXECUTE ITEM,  PRESS ON/OFF,
  POWER, OR ENTER.

CLONE SELECTION MENU

(1) LEARN FROM TV
(2) TEACH TO TV
(3) SET CLONE CLOCK FROM TV
(4) SET TV CLOCK FROM CLONE
(5) DISPLAY TV SETUP
(6) DISPLAY CLONE SETUP
(7) EDIT CHANNEL LABELS
(8) SEND CHANNEL LABELS

-TO CHANGE MENU ITEMS,  PRESS 
 CHANNEL KEYS OR DIGITS.
-TO EXECUTE ITEM, PRESS ON/OFF,
 POWER, OR ENTER

Editing Channel Label Number

Editing Channel Label Content

Editing Channel Number

C. Learn Setup from Master TV

Press 1 to select the “Learn From TV” option, then press ON/OFF,
POWER, or ENTER to go to the Memory Bank Selection Menu. 
Pick the Memory ”Bank” (1, 2, 3, or 4) you want to store this
master TV’s Setup in by pressing either Channel key repeatedly to
pick Memory 1, 2, 3, or 4. (If you choose a Memory “Bank” that
already has a master TV’s setup already in it, it will be overwritten
by this master TV’s setup.) Once the Clone memory bank is select-
ed, press ON/OFF, POWER, or ENTER. The Clone memory bank you
have selected will be shown. Press ON/OFF or POWER to begin
copying the master TV’s setup.

Ca. 34, 35, 50 Chassis Series TVs Special Edit
Channel Labels Feature

Use the Clone’s EDIT CHANNEL LABELS option to create channel
labels for the master TV. (It may be helpful to create a list of the
available channels and write them down on paper. Alongside the
channels numbers, write in your custom labels. See the Edit
Channel Labels menus on the previous page.  With the Clone
Selection Menu on-screen, press 7, then ENTER to go to the
Channel Labels Edit Menu. Edit the channel labels by following the
on-screen instructions. When finished go back to the Clone
Selection Menu and choose (8) SEND CHANNEL LABELS, then press
ON/OFF, POWER, or ENTER. Pick the Clone memory bank where the
channel labels will be stored. (Should be the same Clone memory
bank 1, 2, 3, or 4 where you want to store the same TV setup.)

Cb. Set the Clock (Optional) 

Set the time on the master TV’s Clock. (If the time has already
been copied from another TV into the Clone programmer, you can

set the Master TV’s clock by copying the time from the Clone pro-
grammer.) The Clone Programmer can copy the current time to
both a master TV and to the Clone’s internal clock; accurate to
within one minute. (Another reason that the Clone programmer
should be equipped with fresh, high-quality alkaline batteries is
for it to keep the time as accurately as possible.)
Since the Clone Programmer’s time cannot be set directly, the time
needs to be copied from a Zenith TV equipped with MPI input
capability.  

Once the time is copied to the Clone programmer, the current time
can then be transferred to another TV. (This can be a master TV, or
another TV which has had the features already set up.)

D. Teach Master TV’s Setup to Other TV

Once Learning is complete, remove the MPI cable from the master
TV and connect it to the TV that you want to copy the master TV’s
setup to. With the “TV is Controlled by Clone” message displayed,
press 2 or use either Channel key to go to the “Teach to TV”
option, press ON/OFF, POWER, or ENTER.  Follow on-screen instruc-
tions to transfer the Setup and other information to the “Learn-
ing” TV. After the “Teach to TV is Complete” message is displayed,
press any key to return to the Clone menus option, then press
ON/OFF, POWER, or ENTER. If finished, remove MPI cable from the
TV.

E. Disconnect TV Power for 5 Seconds

Remove the TV power cord of the newly “Cloned TV” from the
power outlet for about 5 seconds to activate the newly copied
setup.

See *Note

*Note: Menu items 7 - 8 only appear when applicable to TV being cloned.

See *Note

Содержание Concierge H20E35DT

Страница 1: ...Copyright 2002 Zenith Electronics Corporation Installation Operating Guide Warranty Model Numbers H20E35DT H25E35DT ConciergeTM TVs with FM Radio t a b l e o f c o n t e n t s p a g e 5...

Страница 2: ...to the point of the cable entry as practical REGULATORY INFORMATION This equipment has been tested and found to comply with the limits for a Class B digital device pursuant to Part 15 of the FCC Rule...

Страница 3: ...by placing the product on a bed sofa rug or other similar surface This product should not be placed in a built in installation such as a bookcase or rack unless proper ventilation is provided or the m...

Страница 4: ...d service person nel 20 Damage Requiring Service Unplug this product from the wall outlet and refer servicing to qualified service personnel under the following condi tions a If the power supply cord...

Страница 5: ...8 Antenna with VCR 9 Cable service with VCR 10 External Speaker 11 Step 2 Channel Search and Reception Setup Auto Program 12 Select Antenna or cable service and perform channel search Front Panel Con...

Страница 6: ...eaker go to page 11 206 3489 O P A G E 6 Basic Hook Up Directory This page will direct you to which page to go to for proper hook up of the TV IMPORTANT Use this page to decide where you need to begin...

Страница 7: ...on the back of your TV A small device that connects a two wire 300 ohm antenna to a 75 ohm RF jack They are usually about an inch long with two screws on one end and a round opening with a wire stick...

Страница 8: ...E M P I Cable TV Wall Jack Cable Box In Out RF Coaxial Wire 75ohm 3 4 output switch TV Back R AUDIO L VIDEO IN MATRIX OUT IN ANTENNA CABLE M P I Locate the Antenna Cable jack on the back of the TV Con...

Страница 9: ...ABLE M P I A V cables not included with TV In Out Audio Video 3 4 VCR Back VCR Back AV panel output switch TV Back Connections Panel Expanded View R AUDIO L VIDEO IN MATRIX OUT IN TV Back RF Coaxial W...

Страница 10: ...Box In Out 3 4 output switch ANTENNA CABLE M P I ANTENNA CABLE M P I Cable TV Wall Jack Round Wire 75ohm A V cables not included with TV In Out R L Audio Video 3 4 VCR Back VCR Back AV Panel output sw...

Страница 11: ...ect a standard audio cable from the Matrix Out jack on the TV to the Audio In jack on the external speaker A V cables not included with TV R AUDIO L VIDEO IN MATRIX OUT IN Audio In Speaker back TV Bac...

Страница 12: ...ogram menu Using SELECT choose either Cable TV or Off Air Antenna on your screen Press the Right or Left ADJ arrow to begin the Channel Search Press ENTER when finished 1 2 3 4 5 6 7 TIMER CH PREVIEW...

Страница 13: ...he Front Audio Video jacks are a direct source connec tion If you have a device plugged into the front Video jack you will not be able to change channels until you have unplugged the front Video jack...

Страница 14: ...NEL PREVIEW Displays the available TV channels including access to Guest s Parental Control menu if active Allows guest to select the Video source Use the Audio Video jacks on the back of the TV as th...

Страница 15: ...ED CAPTIONING Direct access to closed captions Press ENTER to exit A quick list of the keys on the LP702 installer s remote control and their function ALARM Press to go to the Alarm menu Set a time fo...

Страница 16: ...r to block program content for up to 12 hours with the use of a password CONTROL MENU 17 OTHER MENUS AND ON SCREEN DISPLAYS Channel Time Shows the current time channel or video source type of incoming...

Страница 17: ...lf on FM Mode Sets a time the FM radio will turn itself on VOLUME Press the remote keys indicated below to access these menus and displays CHANNEL BANK BANK 3 CAPTION 1 IS ON CC Ch Preview Menu Press...

Страница 18: ...otes Selectable viewing sources vary depending on the installation setup for Auto Sense sources in the Service menu Auto Sense sources appear on the TV screen automatically when they are connected Min...

Страница 19: ...lnk option Use Channel Up Down to select the option and choose Added Note If the option was turned off in the Service menu you will have to reinstate it before it can appear as an option in the Channe...

Страница 20: ...the Installer s remote control To select a deleted channel use the NUMBER keypad and ENTER To program a channel label go to the Setup menu and select CH LABELS Press the Right Left ADJ Adjust arrow t...

Страница 21: ...PROGRAM ADD DEL BLNK CH LABELS CLOCK SET TIMER CAPTIONS LANGUAGE SETUP MENU TO SET CLOCK Clock Auto Manual Operating Modes Setup Use MENU SELECT and ADJ Left Right to choose the Clock menu and to set...

Страница 22: ...t AM PM Press ENTER to remove menu and return to TV viewing Your options are On Time Sets a time that the TV will turn itself On each day Off Time Sets a time that the TV will turn itself Off each day...

Страница 23: ...hat scroll across the bottom of your TV screen usually the audio portion of the program provided for the hearing impaired TEXT The term for the words that appear in a large black frame and almost cove...

Страница 24: ...M CC MENU ALARM ADJ ADJ SELECT 2 1 4 Choose the language for the on screen menus Press the MENU key on the remote control several times until the Setup menu appears Press SELECT on the remote control...

Страница 25: ...ntrol highlight the option you want to change Choose from Bass Increases decreases lower end sounds Treble Increases decreases higher end sounds Balance Allows you to put the sound more to the left or...

Страница 26: ...e the way you want Preset moves all the above options back to their original factory set levels Use SELECT on the installer s remote control to choose the Contrast option on the screen Use the Right L...

Страница 27: ...e specified Block program Content based on individual parameters such as Strong Dialog Bad Language Sex Scenes Violence Scenes or Fantasy Violence Scenes in the Content Blk option How many hours do yo...

Страница 28: ...tions below to set up and activate Parental Control TO BLOCK MPAA RATING CONTENT BLOCK DIALOG LANGUAGE SEX SCENES VIOLENCE FV VIOLENCE NO RATING From TV PG AUDIO PREF CUSTOM TIMER Note Use the install...

Страница 29: ...R Restricted viewing Not for children under age 17 Strong elements of sex and or violence NC 17 Restricted Viewing Not for children under age 17 under any circumstances Strong sexual content X Hard C...

Страница 30: ...the FM Radio stations search Press ENTER when search is finished 1 2 3 4 5 6 TIMER CH PREVIEW ENTER 1 2 3 4 5 6 7 8 9 0 POWER FLSHBK MUTE VOLUME CHANNEL TV FM CC MENU ALARM ADJ ADJ SELECT 4 SETUP MENU...

Страница 31: ...Set the clock in this menu the same way as described on page 21 To manually set the clock highlight the Clock Set option then use the num bers on the remote to enter the current time directly Press T...

Страница 32: ...hange Choose from Bass Increases decreases lower end sounds Treble Increases decreases higher end sounds Balance Allows you to put the sound more to the left or right channel Audio Mode Choose from St...

Страница 33: ...nd 4 Note Be advised that running Auto Program overwrites any custom channel setups removes Blanked Deleted 2 Select a channel bank with an installer remote press SOURCE BANK and repeat CHANNEL BANK a...

Страница 34: ...O PROGRAM removes any channels previously customized with ADD DEL BLNK The channels available on your antenna cable will be entered and any channels previously entered but not currently available will...

Страница 35: ...36 37 38 39 40 41 42 43 44 45 46 47 48 49 50 N K 1 2 3 4 B Purpose Channel Number A 101 102 103 104 105 106 107 108 109 110 111 112 113 114 115 116 117 118 119 120 121 122 123 124 125 FM N K 1 2 3 4 B...

Страница 36: ...justments Accessing the Installer s Menu Installer s menus can be accessed by using the installer s remote control Just press and hold MENU about 8 seconds until the display changes then press 9 8 7 6...

Страница 37: ...es are used The AFC search modes should only be used when some channels are not on nominal frequencies NOTE BAND is automatically set by AUTO PROGRAM If some channels were not found by AUTO PROGRAM se...

Страница 38: ...t VCR3 4 AUX and TV turns off 2 Channel down below the lowest channel or up higher than the highest VCR3 4 AUX and TV goes to FM radio Channel down below lowest FM station or Channel up higher than th...

Страница 39: ...lay Before you begin The master TV should be connected to a good stable signal from an over the air antenna or cable service and turned on Teaching and Learning is only possible between identical mode...

Страница 40: ...choose a Memory Bank that already has a master TV s setup already in it it will be overwritten by this master TV s setup Once the Clone memory bank is select ed press ON OFF POWER or ENTER The Clone...

Страница 41: ...er Use the printed menu illustrations on the quick setup sheet supplied with the Clone as an aid to making your programming choices Although the menus are not all displayed the clone functions all ope...

Страница 42: ...the cabinet again 3 Let the cabinet air dry before turning the TV on Use a quality wood cleaner and polish This will protect the TV from dirt and dust as well as keep the cabinet looking new If the T...

Страница 43: ...talled Are the wires for external speakers if you have external speakers properly installed If the audio mode is set to SAP the channel may not have a SAP program Make sure output channels on all A V...

Страница 44: ...al piece of equipment does not always have to be visible for the lodge to be using an antenna AUTO PROGRAM Auto Program has the TV automatically find all the channels available in the lodge area CAMPO...

Страница 45: ...o to new channel Use to key in numbers on menus SLEEP TIMER Press repeatedly to choose a TV turn off time up to 4 hours Use to pick AM PM on the Alarm menu VOLUME LEFT RIGHT Adjusts the sound level CH...

Страница 46: ...ntrol will restrict the video picture and sound based on the restrictions you have specified Block program Content based on individual parameters such as Strong Dialog Bad Language Sex Scenes Violence...

Страница 47: ...E Up Down to choose Unblocked TV PG AND ABOVE TV 14 AND ABOVE or TV MA AND ABOVE means more restrictive headings are automatically included when you choose a low restriction setting like TV PG See the...

Страница 48: ...UME Shows currently set sound level Ch Preview Menu Press CH PREVIEW Displays list of the available TV Channels Guest Parental Control menu if active and AUX Video Channel access Use CHANNEL Up Down t...

Страница 49: ...GHT Adjusts the FM radio sound level Guest Remote key functions in FM Radio mode ALARM Press to go to FM radio turn on time menu to set a time for the FM radio to turn itself on Use number keypad to s...

Страница 50: ...P A G E 5 0 206 3749 Notes...

Страница 51: ...P A G E 5 1 206 3749 Notes...

Страница 52: ...abuse negligence acts of God or other causes beyond the control of Zenith Any alteration of the product after manufacture voids this warranty in its entirety THIS WARRANTY IS IN LIEU OF ANY OTHER WAR...

Отзывы: