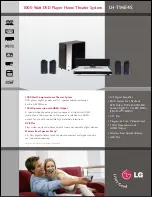
Connect all wires and plugs that
are required for your system setup
to the ZE-NC3810, keeping an eye
on the last page of this manual
that shows the wiring diagram
applicable to this particular model.
5
Verbinden Sie nun alle
benötigten Anschlusskabel mit
dem ZE-NC3810, exakt so wie im
Anschlussdiagramm auf der letzten
Seite beschrieben ist.
7
Nun kann das ZE-NC3810 mit den
Befestigungsschrauben des original
verbauten Radios fest verschraubt
werden.
Now you can fix the ZE-NC3810 into
place using the original screws of
the preinstalled factory unit.
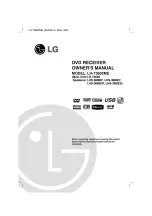
6
Wenn Sie alle Anschlusskabel
verstaut und angeschlossen haben,
können Sie den ZE-NC3810 in
den Einbauschacht einsetzen. Um
Schäden an den hinter dem Gerät
befindlichen Kabeln zu vermeiden,
schieben Sie den ZE-NC3810
langsam und vorsichtig in den
Einbauschacht. Wenden Sie keine
Gewalt an!
Once all the wires have been properly
connected and stowed away in the
mounting slot, you can push back
the ZE-NC3810 to see, if anything
gets in the way. If there is enough
room available – never apply brute
force – push the unit back gently until
it’s flush with the surface.
8
Setzen Sie nun die originale
Einbaublende wieder auf. Fertig!
Put the original cover of your
original radio or sat nav system
back in place. Done!
7
6
8
5