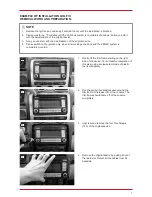
background image

8

5

9

INSTALLATION:

5.    (No picture)

    Fit the GPS antenna (No. 3) at a suitable place, 

and make sure that the GPS reception is not 

adversely affected due to shadowing by metallic 

vehicle parts (thermal glazing etc.). Next run the 

connecting cable to the radio slot.

6.    (No picture)

    If you wish to use it, now fit the external Blue-

tooth microphone (No. 4) supplied, and run the 

connecting cable to the radio slot. Depending 

on preference and on choice of an external or 

device-internal microphone, the microphone 

source for the Bluetooth mode must be corre-

spondingly changed in the device menu.


7.    (No picture)

    Run the USB extension cable (No. 9) from the 

radio slot to the position you want.


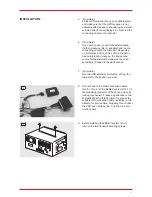
8.    Connect one of the main connection cables 

(No. 5 or No. 6) of the ZENEC system (No. 1) to 

the Quadlock connector of the car and close its 

locking mechanism. Please pay attention to the 

compatibility list in this document to choose the 

suitable main connection cable, including in the 

delivery, for your vehicle. Following this, connect 

the CAN bus interface (No. 7) to the main con-

nection cable.


9.    Before installing the ZENEC system (No. 1) 

remove the two transport securing screws.  


Содержание Z-E2026

Страница 1: ...Z E2026 DEVICE INSTALLATION MANUAL EN ...

Страница 2: ...2 VW Touran 1T 2003 2015 VW Sharan 7N from 2010 VW Tiguan 5N 2007 2016 Model Model Version Model Year VW Amorak 2H from 2010 VW Caddy 2K 2C 2003 2015 VW Caddy SA from 2015 VW T5 7E 7J 2010 2015 VW T6 SG SF from 2015 SEAT Leon 1P 2005 2012 SEAT Toledo 5P 2004 2009 SEAT Toledo KG 2012 2015 SEAT Altea 5P from 2004 SEAT Altea XL 5P from 2006 SEAT Altea Freetrack 5P from 2007 SEAT Alhambra 71 from 2010...

Страница 3: ... Please pay attention that the device does not have a phantom power for the voltage supply of an active DAB antenna If the target vehicle is already equipped with an original DAB antenna it is still possible to use it in combination with the ZENEC system Please use the DAB antenna connector Nr 8 which is include in the kit for connection The ZENEC system is equipped with a AM FM dual tuner system ...

Страница 4: ... console The trim frame should come off of the console completely 4 Remove the original device by pulling it out of the radio slot Detach all the cables from its backside 1 Remove the ignition key and keep it outside the car until the installation is finished 2 Please wait for ca 10 minutes until the CAN bus system is completely shut down before you start with the deinstallation of the original de...

Страница 5: ...microphone the microphone source for the Bluetooth mode must be corre spondingly changed in the device menu 7 No picture Run the USB extension cable No 9 from the radio slot to the position you want 8 Connect one of the main connection cables No 5 or No 6 of the ZENEC system No 1 to the Quadlock connector of the car and close its locking mechanism Please pay attention to the compatibility list in ...

Страница 6: ...so ensure that no fault warnings appear on the vehicle side 12 Press the trim frame back on to make the instal lation complete Make sure that all connectors at the rear of the ZENEC system have sufficient room and are not bent Connectors without a retaining mechanism must be additionally secured with insulating tape If the navigation arrows are not present in the multi functional display MFA altho...

Страница 7: ... B3 B8 B7 C1 C2 C5 C6 C4 C3 C8 C7 Speaker Front Left A1 B12 B15 C15 C16 QII QIII QII QIII KL 31 Power GND A2 KL 30 Constant 12V PWR A3 KL 15 Switched 12V PWR A4 A5 Switched 12V amplifier PWR A6 A7 A8 Reverse Serial No EU Legal Representative ACR S V GmbH Industriestr 35 D 79787 Lauchringen Germany Manufactured under license from Dolby laboratories Dolby and the double D symbol are trademarks of Do...

Отзывы: