Zektor HDS4.1 Скачать руководство пользователя страница 8

2

HDS4.1 Component Video Switch 

HDS4.1 Component Video Switch

1                        2                        3                        4

ZEKTOR

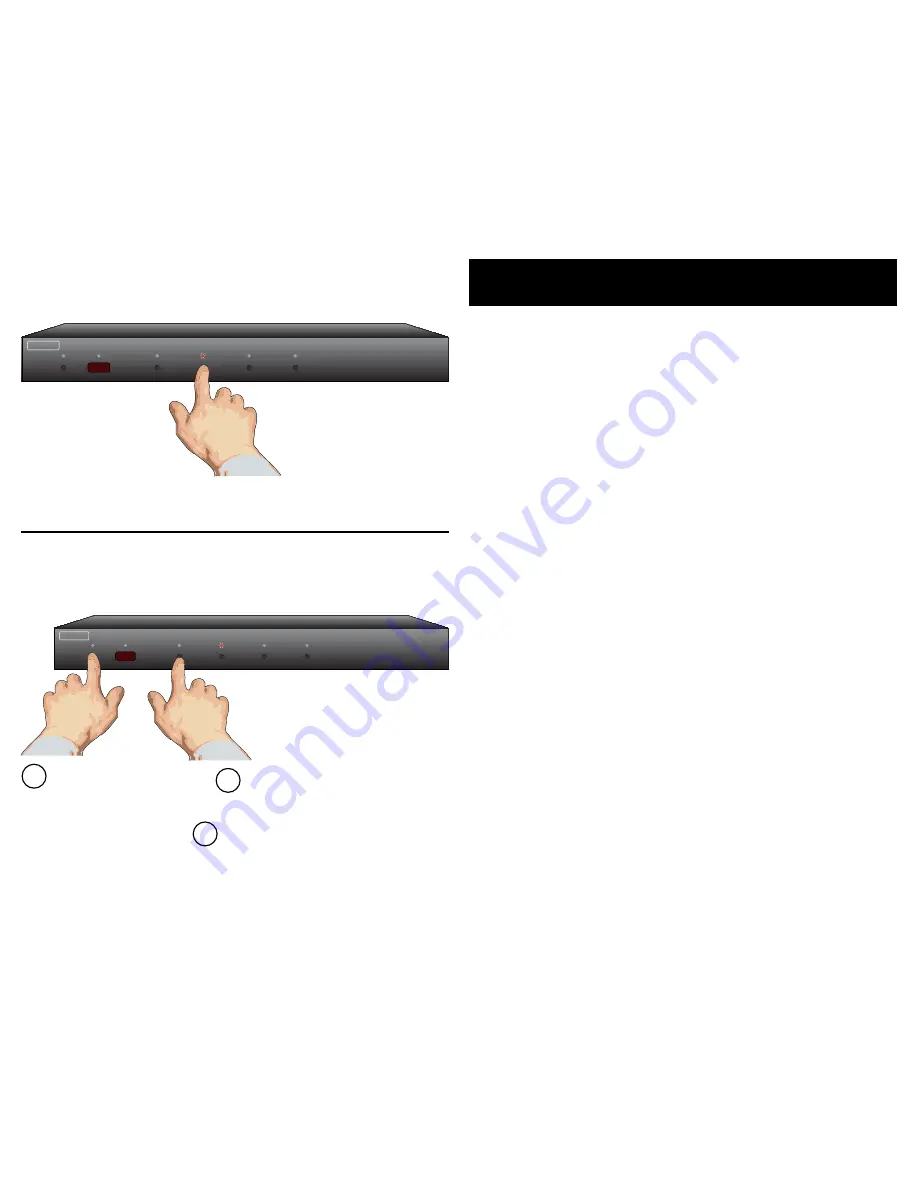
Step 1: Set the HDS4.1 to the preferred initial power on state

Setup the HDS4. to 
the initial power on 
state you’d prefer.

Step 2: Save the new initial power on state

1                        2                        3                        4

ZEKTOR

Start by pressing and 
holding the Power 
button...

Setting the Initial Power On State

As long as the HDS4. is plugged in, it will remember the previously 
selected input in standby mode. When powered up by pressing the 
Power button, it will return to that previously selected channel.

However, if power is removed (for instance a plug strip used to 
power the HDS4. is turned off ), and then re -applied, the HDS4.’s 
default behavior is to enter into the standby mode.

I t is possible to change the power on behavior of the HDS4..

To change the power on defaults...

Step 1: Setup the HDS4.1 to your preferred power on state

.

Use the front panel buttons to setup the HDS4. to the op -

erating settings you’d like at initial power up.

Step 2: Save the new initial power on state.

First press and hold the Power button.
While continuing to hold the Power button, press and hold 

the ‘’ button.
After holding both buttons for about ‘4’ seconds, the dis-

play will blink indicating the new power on defaults have 

been accepted.

Test the new initial power on state

You can test the new defaults by either disconnecting the 

power supply from the back of the HDS4. or by unplug-

ging the power supply from the wall.
Reconnect power. The HDS4. will power up into your new 

power on default state.

1.
2.

3.

1

2

...while continuing to hold the Power 
button, press and hold the ‘’ button.

After about 4 seconds, the display will 
flash indicating the new power on state 
has been accepted.

3

Содержание HDS4.1

Страница 1: ...Z E K T O R Home Theater Switches Digital Video Component Video Multichannel Audio Rev 2 02 22 2006 High Definition Component Video Switch 1 2 3 4 ZEKTOR HDS4 1 ...

Страница 2: ...ake this time to verify the contents of the HDS4 1 box The following should be included HDS4 1 Power Supply Module This User s Manual If anything is missing please get in touch with us as soon as possible so that we can correct the situation 1 2 3 What s Inside Contents What s Inside 1 An Overview of the HDS4 1 3 Easy Simple Instructions 5 Three Simple Steps to a Remote 7 Controlling the Front Pan...

Страница 3: ... both a Coax and an Optical connection Only one of the two types of inputs can be active at any time The HDS4 1 will auto select between the two types of signals If a signal is supplied to both the Coax and Optical inputs the Coax signal is given priority DC Power Jack Connector Plug in the supplied power adapter into this jack Digital Audio Outputs All digital audio inputs are automat ically conv...

Страница 4: ...ly any remote to control your HDS4 1 Using any remote to operate the HDS4 1 is a simple mat ter of pairing up the HDS4 1 with the remote The remote doesn t have to be a universal remote although it can be any remote from an old TV or VCR will work just fine Using Zektor s exclusive Intelligent IR setup is easy The HDS4 1 does all the work Turn to the next chapter for simple instructions on how to ...

Страница 5: ...l turn off The HDS4 1 is now waiting for new IR codes to be sent from your remote control Step 3 Teach the HDS4 1 your new remote control codes On your remote control press the following buttons in the following order Power 1 2 3 4 8 9 That s it The HDS4 1 will return to the state it was in before setup and will now work with your new remote The new control buttons on your remote are Power Toggles...

Страница 6: ...ected light mode as follows If 1 is lit then front panel lights are always off If 2 is lit then front panel lights are always dim If 3 is lit then front panel lights are always bright If 4 is lit then front panel lights auto fade from bright to dim after 4 seconds of inactivity Step 3 Choose a new lighting mode Choose a new light control mode by pressing the associ ated selection button Press the ...

Страница 7: ... Enter the Setup Mode The HDS4 1 is placed into the setup mode by pressing and holding the Power button for about 4 seconds Step 2 Select the Front Panel Intensity option Press the 4 button to select Front Panel Intensity option The front panel selection LEDs now indicate the front panel intensity settings If 1 is lit then the DIM level is being adjusted If 2 is lit then the BRIGHT level being adj...

Страница 8: ...power on behavior of the HDS4 1 To change the power on defaults Step 1 Setup the HDS4 1 to your preferred power on state Use the front panel buttons to setup the HDS4 1 to the op erating settings you d like at initial power up Step 2 Save the new initial power on state First press and hold the Power button While continuing to hold the Power button press and hold the 1 button After holding both but...

Страница 9: ...r holding both buttons for about 4 seconds the stand by LED will start flashing quickly indicating you are now able to enable disable front panel buttons and IR control functions The front panel selection LEDs now indicate the state of the front panel and IR control settings If 3 is lit then the Front Panel buttons are ENABLED If 4 is lit then the IR remote functions are ENABLED Step 2 Enable or D...

Страница 10: ...l parameters have been restored to their factory programmed values 3 Resetting to Factory Defaults If for whatever reason you d like to reset your HDS4 1 back to its factory condition this is easily done Step 1 Reset All Parameters to Factory Defaults First press and hold the Power button While continuing to hold the Power Button press and hold both the 2 and 3 buttons After holding all buttons fo...

Страница 11: ...Range Coax Output Level Power Requirements Optional International Power Supply Dimensions Warranty 0Hz 70MHz All channels Greater than 200MHz All channels 480i 1080p All HDTV modes D C D C 4 Coax 4 Optical Auto conversion between formats 2 Coax 1 Optical Simultaneous 13 2Mb S PCM DD5 1 DTS All modes 200mV 7 0V PC Soundcard Compatible 500mV Nominal 90 120VAC 60Hz 15W 90 264VAC 47 63Hz 15W Wall Moun...

Страница 12: ...ship under normal use and service for two years from the origi nal date of purchase ZEKTOR at its option shall repair or replace the defective unit covered by this warranty In order to keep this warranty in effect the product must have been handled and used as prescribed in the instructions accompanying this warranty This warranty does not cover any damage due to acci dent misuse abuse or negligen...

Страница 13: ...Z E K T O R Z E K T O R 12675 Danielson Ct Suite 401 Poway CA 92064 858 748 8250 www zektor com ...

Отзывы: