background image

31

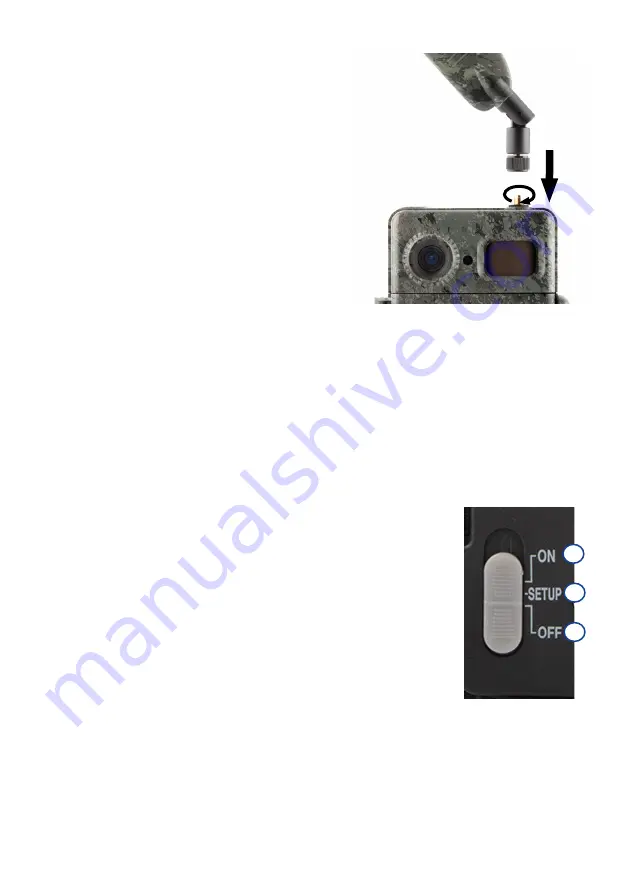
3.4  Fitting the antenna

To access the mobile functions, the antenna must be fitted. 

Remove the yellow protective cap and then screw the 

antenna onto the top of the camera housing.

Note: 

To position the antenna as inconspicuously as 

possible, it can be angled and rotated at the joint. The 

reception and transmission of data is not affected by the 

positioning.

3.5  Inserting the SIM

The ZEISS Secacam uses a SIM card for mobile radio 

transmission.

Note:

 The camera’s mobile function works exclusively with 

the already inserted ZEISS Secacam SIM card. SIM cards from 

other providers are not compatible.

Note:

 Please do not take out the SIM card or switch it for another SIM – not even for one from another 

ZEISS Secacam.

The slot for the SIM card is located on the right side of the opened housing. Insert the SIM card with the 

contacts facing down and the slanted corner facing to the front left until it audibly clicks into place.

4.  Getting started

4.1  Switch settings

If you have equipped the ZEISS Secacam with antenna, batteries and memory card as described above, you 

can basically start using the camera immediately with our factory settings.

1. 

Set the OFF/SETUP/ON switch to the “ON” position:


The camera is turned on and ready to use after a few seconds.

2. 

Set the OFF/SETUP/ON switch to the “SETUP” position:


The camera’s display is now on so you can check the camera’s capturing 

area, preview photos, or make adjustments.

3. 

Set the OFF/SETUP/ON switch to the “OFF” position: 


The camera is completely switched off.

1

2

3

Содержание Secacam 7

Страница 1: ...ZEISS Secacam 7 Instruction manual Patents www zeiss com cop patents DE EN FR ES IT...

Страница 2: ...2...

Страница 3: ...EISS Secacam 7 Gebrauchsanleitung 5 EN ZEISS Secacam 7 Instruction manual 25 FR ZEISS Secacam 7 Manuel d utilisation 45 ES ZEISS Secacam 7 Instrucciones de uso 65 IT ZEISS Secacam 7 Istruzioni per l u...

Страница 4: ...haltuhr 15 5 9 Zeitraffer 15 5 10 Aufnahmepause 15 5 11 Mobilfunk 15 5 12 Mobil Versand 16 5 13 Sendungen Std 16 5 14 Standortdaten 16 5 15 Batterie Akku 16 5 16 Datum Uhrzeit 16 5 17 Sprache 16 5 18...

Страница 5: ...Kamera einmal defekt sein sollte ben tigen Sie Ihren Kaufbeleg Hinweis Entfernen Sie ggf die Schutzfolie vom Monitor der Kamera indem Sie diese an der berstehenden Lasche abziehen Dazu ben tigen Sie e...

Страница 6: ...nde LED Feld 60 LEDs Infrarotsensor Statusanzeige Lichtsensor Verschlussklammer se zur Anbringung von Schl ssern 2 Ihre ZEISS Secacam 7 Objektiv Die ZEISS Secacam 7 verwendet ein Objektiv mit einem Bi...

Страница 7: ...nzeige Leuchtet rot Monitor eingeschaltet Blinkt rot bis 10 Sekunden Nach Erl schen ist die Kamera aufnahmebereit Farb LCD Monitor Mit Einstellen der Taste auf SETUP schaltet sich der Monitor ein Jetz...

Страница 8: ...ra zu und legen Sie die Verschlussklammer auf die beiden seitlichen Haken Anschlie end dr cken Sie die Verschlussklammer nach hinten 3 2 Einsetzen der Batterien ACHTUNG Die Kamera muss zum Einlegen de...

Страница 9: ...fach wieder komplett in die Kamera bis dieses einrastet 3 3 Einsetzen der Speicherkarte Die ZEISS Secacam speichert die Fotos und Videos auf handels blichen SD bzw SDHC Speicherkarten garantiert bis z...

Страница 10: ...arte befindet sich ein kleiner Schieber f r den Schreibschutz Stellen Sie vor dem Einsetzen der Speicherkarte sicher dass der Schieber in Richtung Kartenkontakte steht Nur dann kann die Speicherkarte...

Страница 11: ...h nicht gegen die SIM Karte einer anderen ZEISS Secacam Der Schlitz f r die SIM Karte befindet sich auf der rechten Seite des aufgeklappten Geh uses Die SIM Karte wird mit den Kontakten nach unten und...

Страница 12: ...punkt zu gelangen und nderungen vorzunehmen Zum Verlassen des Men s dr cken Sie die MENU Taste 3 OFF Zum Ausschalten der Kamera stellen Sie den Schalter auf OFF 4 ON Zum Starten der berwachungsfunkti...

Страница 13: ...n die entsprechend mehr Platz auf der Speicherkarte ben tigen Da die Kamera einen 5 0 MP CMOS Bildsensor besitzt werden die Aufl sungen 12 MP und 8 MP durch Interpolation erzeugt Die Fotos werden im S...

Страница 14: ...werden in Aufl sung und Aufnahmel nge beschr nkt und richten sich nicht nach den Ger teeinstellungen im Men 5 6 Empfindlichkeit Die ZEISS Secacam verf gt ber einen sogenannten passiven Infrarotsensor...

Страница 15: ...nzahl Fotos bei Serienaufnahmen auf 1 zu stellen so dass je Ausl sung jeweils nur ein Foto aufgenommen wird 5 10 Aufnahmepause Die Aufnahmepause ist eine von Ihnen festgesetzte Zwangspause nach erfolg...

Страница 16: ...unk eingeschaltet ist Hier k nnen Sie einstellen ob die ZEISS Secacam ihre GPS Position bestimmen soll Dadurch k nnen Sie sich den Standort Ihrer Kamera in der ZEISS Secacam App anzeigen lassen Um Str...

Страница 17: ...Sie die PIN Abfrage auch ber die ZEISS Secacam App deaktivieren 5 20 SD berschreiben Indem Sie diesen Men punkt auf Ein setzen verhindern Sie dass bei einer vollen Speicherkarte keine neuen Aufnahmen...

Страница 18: ...it Ihrem Nutzerkonto zu koppeln Diesen Code m ssen Sie auf der beigelegten Schnellanleitung freirubbeln Sie k nnen so viele ZEISS Secacams mit Ihrem Account verbinden wie Sie wollen Hinweis Bewahren S...

Страница 19: ...verf gbaren Netz eingew hlt Sollte es kein st rkeres Netz im Umkreis geben bleibt die ZEISS Secacam im selben Netz wie vor dem Scan 8 Testaufnahme manuell ausl sen Um den Bildausschnitt oder die Aufn...

Страница 20: ...Sie wirklich alle Dateien l schen m chten Erst wenn Sie dann auf Ja gehen und mit OK best tigen wird die L schung durchgef hrt ACHTUNG Best tigen Sie an dieser Stelle die Auswahl Alle l schen Sie unwi...

Страница 21: ...e zur Positionierung einer Wildkamera ist etwa h fthoch und ein wenig nach unten gerichtet 11 Technische Daten Element Beschreibung Bildsensor 5 0 Megapixel Foto Ratio 4 3 Video Ratio 16 9 Fotoaufl su...

Страница 22: ...efindet sich der Ordner 100MEDIA mit den aufgenommenen Foto und Video Dateien Nach 1 000 Aufnahmen wird ein weiterer Ordner angelegt dieser tr gt den Namen 101MEDIA 102MEDIA usw Die Aufnahmen werden j...

Страница 23: ...gen zu Ihrem Produkt haben wenden Sie sich an uns Telefon Innerhalb Deutschlands 0 800 460 70 60 International 49 221 59 68 60 60 Service Webseite www zeiss ly secacam service FAQ www zeiss ly secacam...

Страница 24: ...h mode 34 5 8 Timer 34 5 9 Time lapse 35 5 10 Pause capture 35 5 11 Mobile 35 5 12 Transmission 35 5 13 Sent shots h 36 5 14 GPS data 36 5 15 Battery type 36 5 16 Date time 36 5 17 Language 36 5 18 Fo...

Страница 25: ...a should ever be faulty you will need your proof of purchase Note You might need to remove the protective film from the camera display by pulling it off using the protruding tab This may require some...

Страница 26: ...hing locks 2 Your ZEISS Secacam 7 Lens The ZEISS Secacam 7 uses a lens with a 60 angle of view This allows you to keep an optimal view of gardens or hunts ON SETUP OFF switch The camera is ready to us...

Страница 27: ...t goes out the camera is ready to record Color LCD display Setting the button to SETUP turns on the display You can now check the capturing area view images or make menu settings after pressing the ME...

Страница 28: ...he locking clip on the two hooks on the side Then press the locking clip backwards 3 2 Inserting the batteries CAUTION The camera must be turned off before inserting new batteries Please use either di...

Страница 29: ...attery compartment completely back into the camera until it clicks into place 3 3 Inserting the memory card The ZEISS Secacam stores the photos and videos on commercially available SD or SDHC memory c...

Страница 30: ...the side of each memory card to enable or disable the write protection Before inserting the memory card make sure that the slider is facing the card contacts Only in this position can the camera write...

Страница 31: ...r another SIM not even for one from another ZEISS Secacam The slot for the SIM card is located on the right side of the opened housing Insert the SIM card with the contacts facing down and the slanted...

Страница 32: ...3 OFF To turn off the camera set the switch to OFF 4 ON To start the surveillance function set the button to ON As soon as the LED light is no longer on the camera is ready for use The screen does not...

Страница 33: ...ed by interpolation Photos are taken in a 4 3 aspect ratio and saved in the JPEG format Note This setting only affects the images saved on the SD card not the images sent via mobile see 5 12 5 3 Multi...

Страница 34: ...the possibility of false triggering for example when the camera recognizes moving branches that have been warmed up by sunlight and are now moving in the wind In this case we recommend gradually reduc...

Страница 35: ...st identical images To prevent the ZEISS Secacam from taking hundreds of unwanted images in such cases and possibly sending them via mobile you can define a delay between two motion activated images T...

Страница 36: ...the battery display may differ from the actual charge status 5 16 Date time When the Automatic setting is selected the camera loads the date and time from the mobile network If necessary you can adjus...

Страница 37: ...orks as desired you can take a test photo Note We recommend that you familiarize yourself with the Pause capture Time lapse and Timer functions mentioned above when using mobile mode The functions wil...

Страница 38: ...he battery memory or camera status The ZEISS Secacam app is very user friendly allowing you to easily access and manage all your cameras It also allows you to manage multiple ZEISS Secacams easily and...

Страница 39: ...ded Test videos are limited to a maximum of 15 seconds Note To test your camera s mobile connection you can also have a test image sent to your user account or the ZEISS Secacam app via the camera men...

Страница 40: ...release the mounting strap press the clip and pull out the strap end 1 2 10 2 Fitting with tripod tree mount The ZEISS Secacams has a threaded bushing on the top and bottom for a inch tripod socket di...

Страница 41: ...econds Image information stamp Footer cam name Time Date Moon phase guide value Temperature guide value Number of LEDs flash type 60 black LEDs 940 nm Trigger time 0 35 0 45 seconds Flash range Up to...

Страница 42: ...computer To do this connect the memory card reader to your computer and insert the camera s memory card into the slot If necessary please consult the manufacturer s operating instructions 13 External...

Страница 43: ...9 221 59 68 60 60 Service website www zeiss ly secacam service FAQ www zeiss ly secacam faq If you want to download the current warranty conditions visit our website www zeiss com cop warranty We rese...

Страница 44: ...55 5 9 Acc l rateur 55 5 10 Pause photo 55 5 11 Radio mobile 55 5 12 Envoi mobile 55 5 13 Envois h 56 5 14 Localisation 56 5 15 Batterie Accu 56 5 16 Date Heure 56 5 17 Langue 56 5 18 Nom dans image...

Страница 45: ...it tre d fectueuse vous aurez besoin du justificatif d achat pour pouvoir activer la garantie Remarque si n cessaire retirez la feuille de protection du moniteur de la cam ra en tirant sur la languett...

Страница 46: ...m 7 Objectif la ZEISS Secacam 7 utilise un objectif dot d un angle de vue de 60 Vous pouvez ainsi surveiller les jardins ou les agrainages de mani re optimale Commutateur ON SETUP OFF la cam ra est pr...

Страница 47: ...r te prendre des clich s Moniteur LCD couleur avec le bouton sur SETUP le moniteur s allume Vous pouvez maintenant contr ler la zone de l image visionner les clich s ou apr s avoir appuy sur le bouton...

Страница 48: ...uvre Fermeture fermez la cam ra et placez le clip de l obturateur sur les deux crochets lat raux Poussez ensuite le clip de l obturateur vers l arri re 3 2 Insertion des piles ATTENTION La cam ra doit...

Страница 49: ...partiment des piles dans la cam ra jusqu ce qu il s enclenche 3 3 Insertion de la carte m moire La ZEISS Secacam stocke les photos et vid os sur des cartes m moire SD ou SDHC standard garanties jusqu...

Страница 50: ...arte m moire se trouve un curseur de protection en criture Avant d ins rer la carte m moire assurez vous que le curseur est orient vers les contacts de la carte Ce n est qu alors que la cam ra peut pr...

Страница 51: ...la carte SIM et ne la remplacez pas pas m me par une carte SIM d une autre ZEISS Secacam La fente pour carte SIM est situ sur le c t droit du bo tier ouvert La carte SIM s ins re avec les contacts ver...

Страница 52: ...3 OFF pour teindre la cam ra placez le commutateur sur OFF 4 ON pour d marrer la fonction de surveillance placez le bouton sur ON D s que le voyant LED est teint la cam ra est op rationnelle L cran ne...

Страница 53: ...il en r sulte des fichiers photo plus volumineux qui n cessitent davantage d espace sur la carte m moire Comme la cam ra poss de un capteur d image CMOS de 5 0 MP les r solutions 12 MP et 8 MP sont g...

Страница 54: ...voy es sont limit es en r solution et en dur e d enregistrement et ne d pendent pas des r glages dans le menu de l appareil 5 6 Sensibilit La ZEISS Secacam dispose d un capteur dit capteur infrarouge...

Страница 55: ...ous apr s une s rie de prises de vue Durant l intervalle choisi la cam ra ne prend pas de photos ou de vid os m me si des mouvements se produisent devant la cam ra Cela emp che de saturer la carte m m...

Страница 56: ...position peut ne pas appara tre sur les premi res photos 5 15 Batterie Accu La ZEISS Secacam peut galement fonctionner avec des accumulateurs de type LR6 AA 1 5 V Pour que l indicateur de batterie fo...

Страница 57: ...s confirmez la s lection avec OK tous les param tres sont r initialis s l tat de livraison La date et l heure ne sont pas impact es par cette op ration 5 22 Env photo test Cette rubrique de menu ne pe...

Страница 58: ...us pouvez nommer vos ZEISS Secacams et afficher l tat de la batterie de la m moire ou de la cam ra L application ZEISS Secacam est tr s facile utiliser et vous permet d acc der vos cam ras de mani re...

Страница 59: ...maximum Remarque pour tester la connexion radio mobile de votre cam ra vous pouvez galement faire envoyer une image de test votre compte utilisateur ou l application ZEISS Secacam via le menu de la c...

Страница 60: ...pas visible Pour desserrer la sangle de fixation il suffit d appuyer sur le clip et de tirer sur l extr mit de la sangle 1 2 10 2 Montage avec tr pied support pour arbre La ZEISS Secacam poss de une d...

Страница 61: ...640 x 480 pixels Dur e vid o 5 59 secondes Tampon info sur image Nom de la cam ra Heure Date Phase lunaire indicative Temp rature indicative Nombre de LED type de flash 60 LED noires 940 nm Temps de r...

Страница 62: ...et des vid os directement de la carte m moire de la cam ra votre ordinateur Connectez le lecteur de carte m moire votre ordinateur et ins rez la carte m moire de la cam ra dans la fente Si n cessaire...

Страница 63: ...ice apr s vente www zeiss ly secacam service FAQ www zeiss ly secacam faq Si vous souhaitez t l charger les conditions actuelles de garantie rendez vous sur notre site Web www zeiss com cop warranty S...

Страница 64: ...o de r faga c mara r pida 75 5 10 Pausa de grabaci n 75 5 11 Telefon a m vil 75 5 12 Env o inal mbrico 75 5 13 Env os hora 76 5 14 Datos de ubicaci n 76 5 15 Pilas des recarg 76 5 16 Fecha hora 76 5 1...

Страница 65: ...a durante ese periodo necesitar su comprobante de compra Nota en caso necesario retire la l mina protectora de la pantalla de la c mara tirando de la pesta a que sobresale Para ello puede ser necesar...

Страница 66: ...ona de ledes 60 ledes Sensor infrarrojo Indicador de estado y sensor de luminosidad Pinza de cierre Ojal para candados 2 Su ZEISS Secacam 7 Objetivo la ZEISS Secacam 7 utiliza un objetivo con un ngulo...

Страница 67: ...ndicador de estado luz roja permanente pantalla encendida Luz roja parpadeante hasta 10 segundos tras apagarse la c mara est lista para la toma de im genes Pantalla LCD en color la pantalla se enciend...

Страница 68: ...cierre sobre los dos ganchos laterales Presione a continuaci n la pinza hacia atr s 3 2 Inserci n de las pilas ATENCI N Para introducir las pilas la c mara tiene que estar apagada Utilice solamente pi...

Страница 69: ...la c mara por completo hasta que quede enclavado 3 3 Inserci n de la tarjeta de memoria La ZEISS Secacam guarda las fotos y los v deos en tarjetas de memoria SD o SDHC convencionales almacenamiento g...

Страница 70: ...lleva una peque a pesta a de protecci n contra escritura en un lateral Antes de introducir la tarjeta de memoria aseg rese de que la pesta a est colocada en direcci n a los contactos de la tarjeta So...

Страница 71: ...eta SIM ni la cambie por otra ni siquiera por una tarjeta SIM de otra c mara ZEISS Secacam La ranura para la tarjeta SIM se encuentra en el lado derecho de la carcasa abierta La tarjeta SIM debe intro...

Страница 72: ...r la c mara coloque el interruptor en OFF 4 ON para iniciar la funci n de vigilancia coloque el interruptor en ON La c mara estar lista para el uso en cuanto la luz led se apague La pantalla no se enc...

Страница 73: ...n un sensor de imagen CMOS de 5 0 MP las fotos con resoluciones de 12 MP y 8 MP se crean por interpolaci n Las fotos se toman con una relaci n de aspecto de 4 3 y se guardan en formato JPEG Nota este...

Страница 74: ...oma de im genes incorrecta p ej por ramas calentadas por el sol movidas por el viento recomendamos reducir la sensibilidad gradualmente 5 7 Modo flash La ZEISS Secacam dispone de tres opciones de ajus...

Страница 75: ...cas repetidamente Para evitar en esos casos que la ZEISS Secacam realice cientos de tomas no deseadas y tambi n que las env e por telefon a m vil puede definir una pausa entre dos tomas activadas por...

Страница 76: ...s desechables o recargables Nota cuando se utilizan pilas recargables el indicador de bater a puede diferir del estado real de carga 5 16 Fecha hora En el ajuste Autom tico la c mara obtiene la fecha...

Страница 77: ...mente puede hacer una foto de prueba Nota para la utilizaci n del modo de telefon a m vil le recomendamos que se familiarice antes con las funciones indicadas anteriormente de Pausa de grabaci n Modo...

Страница 78: ...ISS Secacam y ver el estado de las pilas las memorias y las c maras La aplicaci n ZEISS Secacam es muy f cil de usar y le permite acceder de forma sencilla y r pida a sus c maras Adem s le permite ges...

Страница 79: ...o Los v deos de prueba est n limitados a un m ximo de 15 segundos Nota para comprobar la conexi n de telefon a m vil de su c mara puede enviar tambi n una foto de prueba a su cuenta de usuario o a la...

Страница 80: ...ra soltar la correa presione el clip y extraiga el extremo de la correa 1 2 10 2 Montaje con tr pode soporte de rbol La ZEISS Secacam lleva un conector roscado en las partes superior e inferior para e...

Страница 81: ...xeles Duraci n de v deo De 5 a 59 segundos Informaci n en la imagen Nombre en imagen Hora Fecha Fase lunar valor orientativo Temperatura valor orientativo Cantidad de ledes Tipo de flash 60 ledes negr...

Страница 82: ...ecte el lector de tarjetas a su ordenador e inserte la tarjeta de memoria de la c mara en el lector Tenga en cuenta las instrucciones del fabricante 13 Alimentaci n el ctrica externa Fuente de aliment...

Страница 83: ...t cnico www zeiss ly secacam service Preguntas frecuentes www zeiss ly secacam faq Visite nuestro sitio web si desea descargar las condiciones de garant a actuales www zeiss com cop warranty Nos reser...

Страница 84: ...Modalit del flash 94 5 8 Timer 94 5 9 Time lapse 95 5 10 Pausa in riprese 95 5 11 Rete mobile 95 5 12 Invio mobile 95 5 13 Trasmissioni ora 96 5 14 Dati posizione 96 5 15 Pile batterie 96 5 16 Data o...

Страница 85: ...n caso di problemi con la fotocamera necessario presentare la ricevuta d acquisto Nota per rimuovere la pellicola protettiva dallo schermo della fotocamera tirare la linguetta sporgente Potrebbe voler...

Страница 86: ...nna Campo LED 60 LED Sensore a infrarossi Indicatore di stato e sensore di luce Gancio di chiusura Foro per inserire lucchetti 2 ZEISS Secacam 7 Obiettivo la ZEISS Secacam 7 ha un obiettivo con un ang...

Страница 87: ...nu Indicatore di stato illuminato di rosso schermo acceso Lampeggia di rosso fino a 10 secondi una volta spento la fotocamera pronta a registrare Schermo LCD a colori posizionando il tasto su SETUP lo...

Страница 88: ...la fotocamera e riposizionare il gancio di chiusura sui due supporti laterali In seguito spingere indietro il gancio di chiusura 3 2 Inserimento delle batterie ATTENZIONE Quando si inseriscono le bat...

Страница 89: ...nte nella fotocamera finch scatta in sede 3 3 Inserimento della scheda di memoria La ZEISS Secacam salva foto e video su comuni schede di memoria SD SDHC garantite fino a 32 GB non su schede Micro SD...

Страница 90: ...ogni scheda di memoria si trova un piccolo cursore per la protezione da scrittura Quando si inserisce la scheda di memoria accertarsi che il cursore sia rivolto verso i contatti della scheda Solo cos...

Страница 91: ...irla nemmeno con quella di un altra ZEISS Secacam Lo slot della scheda SIM si trova sul lato destro del corpo aperto della fotocamera La scheda SIM va inserita con i contatti rivolti verso il basso e...

Страница 92: ...e modifiche Per uscire dal menu premere il tasto MENU 3 OFF per spegnere la fotocamera impostare l interruttore su OFF 4 ON per avviare la modalit di sorveglianza posizionare il tasto su ON Non appena...

Страница 93: ...alit delle foto ma i file sono pi grandi e quindi necessitano di pi spazio sulla scheda di memoria Poich la fotocamera ha un sensore d immagine CMOS da 5 0 MP le risoluzioni di 12 MP e 8 MP sono gener...

Страница 94: ...ensore a infrarossi passivo PIR che reagisce alle fonti di calore in movimento La sensibilit del sensore pu essere impostata su elevata media e bassa Si consiglia di selezionare elevata Solo nel caso...

Страница 95: ...onda del posizionamento pu succedere ad es che un topo o un ramo che si muove alla luce del sole facciano attivare ripetutamente delle registrazioni pressoch identiche Per evitare che in questi casi l...

Страница 96: ...potrebbe differire dal reale livello di carica 5 16 Data ora Con l impostazione Automatico la fotocamera acquisisce la data e l ora dalla rete mobile Se necessario con e si pu modificare l ora in base...

Страница 97: ...le funziona come desiderato si pu scattare una foto di prova Nota nel caso si usi la rete mobile si consiglia di fare pratica con le funzioni sopra descritte Pausa in riprese Time lapse e Timer Queste...

Страница 98: ...lizzare lo stato delle batterie della scheda di memoria e della fotocamera L app ZEISS Secacam facilissima da usare e permette di accedere in modo semplice e intuitivo alle proprie fotocamere Inoltre...

Страница 99: ...di prova sono limitati a un massimo di 15 secondi Nota per testare la connessione della fotocamera alla rete mobile si pu inviare una foto di prova al proprio account utente o all app ZEISS Secacam an...

Страница 100: ...siano visibili parti di cinghia Per allentare la cinghia di montaggio premere sul fermaglio e tirare l estremit della cinghia 1 2 10 2 Montaggio con treppiede supporto da albero Sul lato superiore e s...

Страница 101: ...480p 640 x 480 pixel Durata dei video Da 5 a 59 secondi Stampa info sull immagine Nome su foto Ora Data Fase lunare valore indicativo Temperatura valore indicativo Numero di LED tipo di flash 60 Black...

Страница 102: ...dalla scheda di memoria della fotocamera al computer A tale scopo collegare il lettore di schede di memoria al computer e inserire la scheda di memoria della fotocamera nell apposito slot Se necessar...

Страница 103: ...221 59 68 60 60 Sito web per l assistenza www zeiss ly secacam service FAQ www zeiss ly secacam faq Per scaricare le attuali condizioni di garanzia visitare il sito web www zeiss com cop warranty Ci...

Страница 104: ...Carl Zeiss AG Consumer Products Carl Zeiss Strasse 22 73447 Oberkochen Germany www zeiss com consumer products 05 2023...

Отзывы: