27
B
C
A
B
C
A
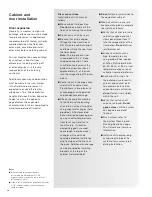
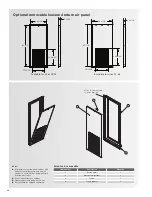
Table 11: Dimensional data
Unit size
A
B
C
09, 12
16-1/32"
37"
16-3/32"
15, 18
44"
24-36
22-1/32"
46"
23"
Chassis installation
■
■
Open the unit water valves and
check piping for leaks.
■
■
Complete electrical connections
between cabinet and chassis by
mating the quick-connect plugs
on the chassis cable to the plugs
located in the bottom surface of
the blower deck, directly under the
control box.
■
■
Before installing the return panel,
perform the following checks:
■
■
Ensure that fan wheel rotates
freely and does not rub against
housing. If rough handling during
shipping has caused fan wheel to
shift, adjust as necessary.
■
■
Verify that water piping
connections to the chassis are
complete and that unit service
valves, which were closed during
flushing, have been opened.
■
■
Verify that power between the
cabinet and chassis is properly
connected.
■
■
After the system has been filled
and system pump is started,
all connections should be re-
checked for water leaks. Zehnder
Rittling will not be responsible or
liable for damage caused by any
water leaks from a field installed
water connection(s).
■
■
Re-attach the upper electrical
access panel. Do not start the unit
with access panel removed, system
lockout and possible equipment
damage can occur.
Installation


