background image

7

9.

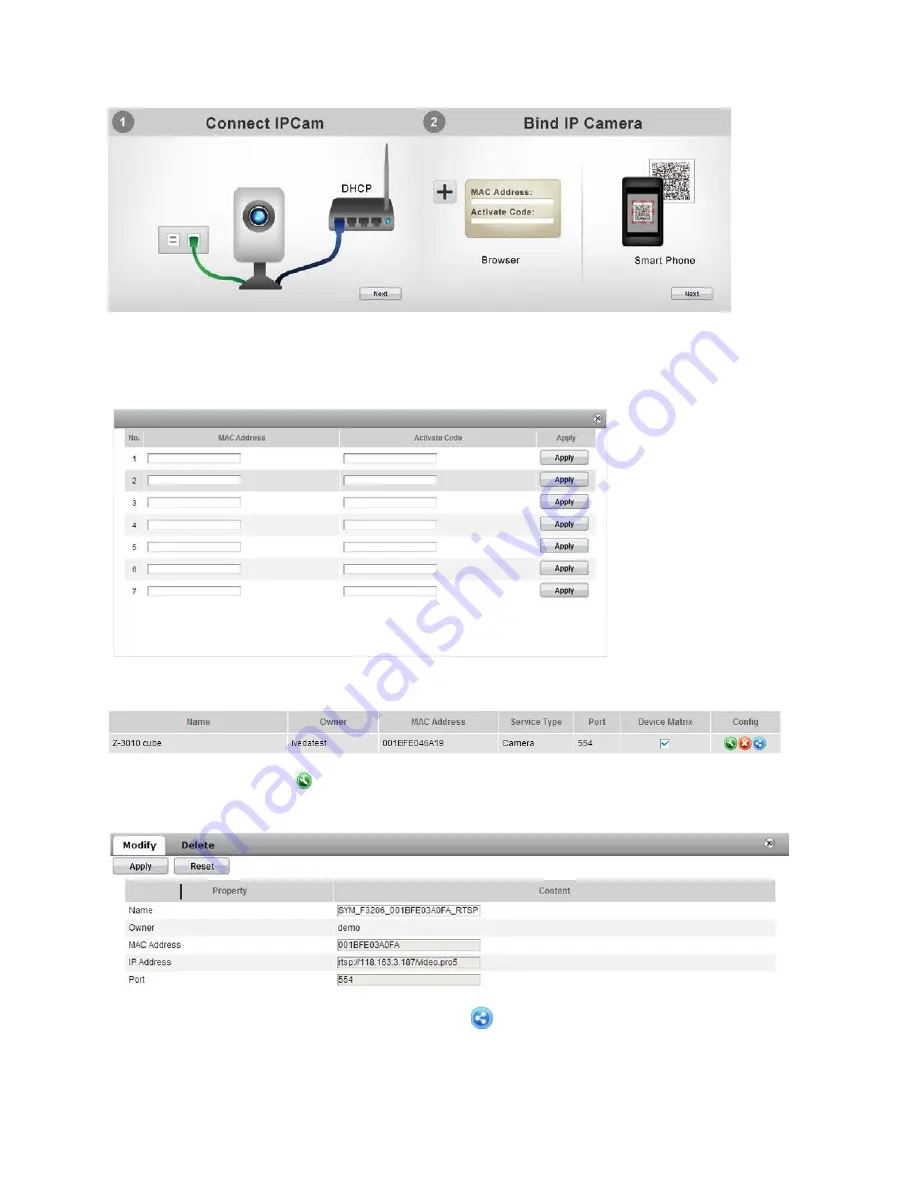
A table will then display for filling in the IP camera’s MAC address and activation code after clicking
“Next”. Click “Apply” when finished providing required information.

Cameras can also be added by

using the Smart phone APP provided by your service provider.

10. “Success” shows when finished adding properly. The IP camera is now displayed on the setting table.

11. Clicking “Config” button

will lead to a “Modify” page which listed each device’s registration

information where users can alter its device name for easy recognition.

12. Sharing your Camera. Clicking the “Share” button

. In the “Share” field, type in the user account

name that the camera will be shared with. If the individual you are sharing the camera with does not
already have an account, they can create one on the home page.

Содержание Z-3020

Страница 1: ...1 Z 3020 Installation Guide and User Manual...

Страница 2: ...chors and 1 camera bracket Accessory 4 pin terminal block for DI DO antenna for connection of IEEE 802 11 b g n wireless network Adaptor 5V DC 1A Ethernet Cable 1 meter 3 feet Physical Overview Focus...

Страница 3: ...ed 30 seconds when WPS configure Blue Steady blue for booting up completion Purple Flash purple then steady Red during firmware upgrading or when wireless is connecting Unlit When reset button pressed...

Страница 4: ...ghten the lock ring Connect cables and power supply 1 Connect the power adapter to the IP Camera 2 Use a standard RJ 45 network cable to connect the IP Camera to the Network connector port on the came...

Страница 5: ...nsure your router s DHCP is activated 3 Visit the hosting URL of your service provider given when you purchased your camera 4 If you do not have an account click on Create Account 5 After filling out...

Страница 6: ...se click Settings at the bottom of the page 8 Clicking will pop up a reminder to ensure the IP camera you are going to bind has already been connected to the network properly Then follow the binding m...

Страница 7: ...d adding properly The IP camera is now displayed on the setting table 11 Clicking Config button will lead to a Modify page which listed each device s registration information where users can alter its...

Страница 8: ...at the bottom of the screen will show all cameras that belong to other accounts that are shared with your account 13 Watching your Cameras Click the Matrix at the bottom of the page and you will view...

Страница 9: ...n is blank 2 Full Screen The Full screen button is to lead you to a new screen layer where the video is displayed in full screen for larger image and event play back function Control buttons When view...

Страница 10: ...screen Otherwise the panel will be displayed in grey to indicate it is not functioning Each angle adjustment requires one click to make Clicking takes you back to the original setting position while i...

Страница 11: ...trol whether the users would like to hear the audio via the camera or not 5 Refresh The refresh button is for you to refresh or reload the IP camera s video Direct Access to Camera To set your wireles...

Страница 12: ...n 3 After you set the WLAN setting and a pop up window says Savings Applied Successfully please unplug the network and power cable first Then plug the power cable back to do a HW reset so WLAN can be...

Страница 13: ...13...

Отзывы: