background image

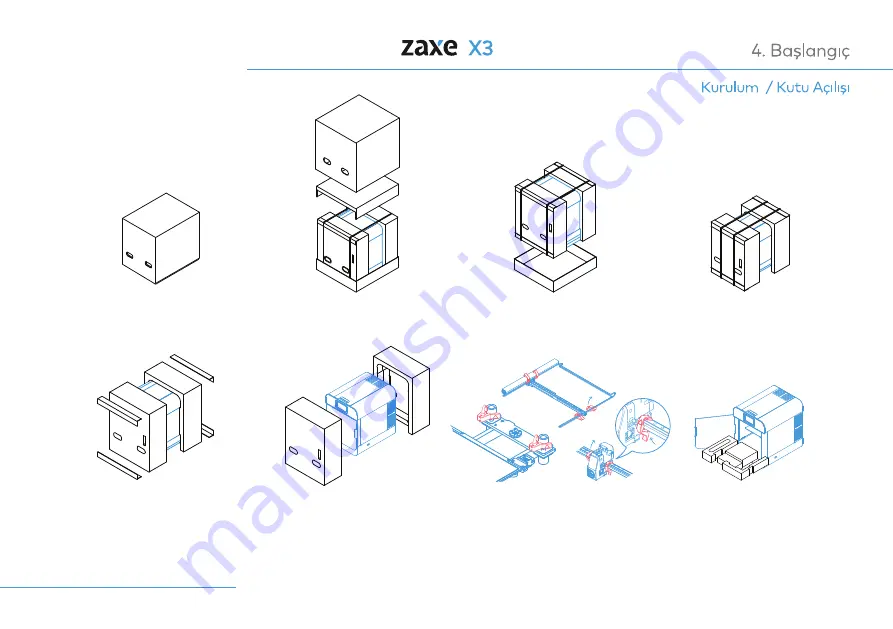
Önce üstteki karton yukarıya 

doğru kaldırılarak açılır.

Ürün el yerlerinden tutarak 

kullanılması planlanan yere 

konulur.

Kemerleri kesilir.

Ürünün köpükleri, önce öndeki 

sonra arkadaki olmak üzere 

sırası ile çıkarılır.

Köşebentlerin daha sonra 

taşımada kullanılmak üzere 

koli malzemeleri ile saklanması 

önerilir.

Tablayı ve eksenleri kilitleyen 

parçalar sökülür.

Tabla el ile yukarıya 

kaldırılarak altındaki gereçler 

çıkartılır ve ürün kuruluma 

hazır hale gelir.

35

1

2

3

4

5

6

7

8

Содержание X3

Страница 1: ...User Manual EN 1 26 TR 26 54...

Страница 2: ...he Model Slicing Uploading via Wi Fi Uploading via USB Removing the Print From the Bed 2 Inside the Box 3 Technical Information 6 Support Dear User Thank you for choosing Zaxe 3D printers Before using...

Страница 3: ...ious harm to on your device We recommend you set up a well ventilated room that is dedicated only to 3D printing Please try not to stay in the same room with the devices for a long period of time Vapo...

Страница 4: ...0 C 68 86 F While printing with PLA FLEX and PETG half opening the HEPA filter according to the picture above will improve your printing quality When printing ABS or ASA Hepa Filter should always be c...

Страница 5: ...1 Parts of the Product Exterior View 5 Front Doors Top Lid Touch Screen Side Window USB Ports...

Страница 6: ...1 Parts of the Product 6 On Off Button Spool Holder HEPA Filter Detailed View Ethernets Port...

Страница 7: ...1 Parts of the Product 7 Step Motor Cooling Block Fan Fan Duct Fan Channel Inductive Sensor Heating Block Heat Break Silicon Sock Nozzle Extrusion Gear Printing Head...

Страница 8: ...Printing Technology Fused Filament Fabrication FFF Printing Area 220 X 230 X 250 mm Connection Type Wifi USB Ethernet Device Dimensions 410 x 532 x 546 mm With Spool Holder 410 x 612 x 546 mm Printer...

Страница 9: ...the dedicated spot for your printer Cut the belts First remove the front protective foam than the rear one Remove the front protective foam first then remove the one Remove the parts that locks the ta...

Страница 10: ...t will be carried out Set your device on a firm and well balanced surface Concussions or uneven leveling can cause your print quality to decrease Plug the cord into the socket shown in the image secur...

Страница 11: ...the tip of your filament with an angle of 45 degrees Extend your spool holder by gently pulling it and place your spool on the spool holder Load your filament from the filament entry point right unde...

Страница 12: ...4 Introduction 12 Filament Loading Press Setting from the main menu Go to the Filament Settings For your first installation choose the Install Filament option and follow the steps...

Страница 13: ...er and feed the filament to the print head Filament will be ready for installation after the print head is heated up Follow the steps and wait for the filament installation If the installation was suc...

Страница 14: ...bration is correct If the print doesn t stick to the printing surface or if there isn t any extrusion on the first layer while it prints it is generally because of bad table calibration In case of suc...

Страница 15: ...arrows on screen to be sure that your print sticks to print bed according to the picture on screen If you set the Z offset too close or too far from the bed it will decrease your print quality Print h...

Страница 16: ...settings on your computer and connect to your X3 After the access point is connected go to the 192 168 0 1 IP address on your browser Change the Radio Mode setting to Client Mode in the Network Settin...

Страница 17: ...I Surface there is no need to apply glue stick but if there is an adhesion problem do not hesitate to apply it After a while glue will lose it s function Do not reapply it without cleaning the PEI Sur...

Страница 18: ...r When the setup wizard is completed you can start getting your first print Welcome to the xDesktop Setup Wizard Installation Folder This will install xDesktop on your computer It is recommended that...

Страница 19: ...int Firstly choose X3 from the top right corner of the xDesktop xDesktop is compatible with formats such as stl obj and amf You can upload your 3D model by pressing the open model button at the top le...

Страница 20: ...cating duplicating scaling re orientin mirroring adding and removing support manually from the menu at the left hand side With xDesktop you are in full control File Edit Settings Help Open File Center...

Страница 21: ...Adjusting the Model Centering Editting Mirroring Duplicating Scaling Moving With the tools on the left hand side menu you can easily make small adjustments to your model and speed up your printing pr...

Страница 22: ...adjustments on the model proceed to slicing via the menu on your right hand side Select Prepare the Model Choose your filament layer height support settings infill and other parameters When you picked...

Страница 23: ...ess 23 Uploading via Wi Fi If the xDesktop and your Zaxe X3 3D Printer are in the same network you can upload your print simply by picking it from the right hand side menu and selecting Print File Edi...

Страница 24: ...n t in the same network you can proceed by selecting the Upload to Flash Disc button It will automatically upload the sliced model to a plugged USB Disc on your computer Plug the USB Disc into your Za...

Страница 25: ...rom the PEI plate by simply bending it While placing the felxible PEI plate to the bed be careful not to damage the electronic traces It might cause some serious harm on your device Please place the P...

Страница 26: ...ng the setup of your Zaxe X3 3D Printer or if you are having a problem with it you can always contact support zaxe com to get detailed information and get in contact with one of our technical support...

Страница 27: ...EN 1 26 TR 27 52...

Страница 28: ...28 31 32 33 35 36 36 37 40 42 43 44 45 46 48 49 50 51 34 34 52...

Страница 29: ...toz par ac klar ile birle tirildi inde olumsuz etkileri olabilir Ba lang seti kutusunda ki aletler ve aksesuarlar ama lanan kullan m i in dikkatle kullan lmal d r Yanl kullan m ciddi yaralanmalara ne...

Страница 30: ...30 Hareketli par alardan elinizi uzak tutunuz...

Страница 31: ...31...

Страница 32: ...32...

Страница 33: ...33...

Страница 34: ...Bask Teknolojisi Fused Filament Fabrication FFF Bask Alan 220 X 230 X 250 mm Ba lant Tipi Wifi USB Ethernet Boyutlar 410 x 532 x 530 mm Spool Holder A k 410 x 612 x 546 mm A rl k 28 3 KG Yaz l m xDesk...

Страница 35: ...silir r n n k p kleri nce ndeki sonra arkadaki olmak zere s ras ile kar l r K ebentlerin daha sonra ta mada kullan lmak zere koli malzemeleri ile saklanmas nerilir Tablay ve eksenleri kilitleyen par a...

Страница 36: ...36...

Страница 37: ...amenti vakumlu po etinden kar n z U k sm n 45 derece sivri bir ekilde kesiniz Filament koruyucu borunun u k sm ndan kt ktan sonra ittirmeyi durdurunuz Filamenti NFC etiketi cihaza bakacak ekilde yerle...

Страница 38: ...38 Ana ekrandan Ayarlar men s ne giriniz Men i erisinde yer alan Filament Ayarlar na giriniz lk y klemede Filament Y kle men s n se erek ad mlar takip ediniz...

Страница 39: ...yol boyunca kafaya getiriniz Bask kafas s nd ktan sonra filamenti y klemeye haz r hale gelecektir Ad mlar takip ederek filament y klenmesini bekleyiniz Filamentiniz ba ar l bir ekilde y klenmi se noz...

Страница 40: ...40...

Страница 41: ...41...

Страница 42: ...ne gidin ve bilgisayar n z orada bulunan Zaxe X3 eri im noktas na ba lay n Eri im noktas na ba land ktan sonra taray c zerinden 192 168 0 1 ip adresine gidin A b l m alt nda Radyo Modu stemci Moduna a...

Страница 43: ...43...

Страница 44: ...44...

Страница 45: ...45...

Страница 46: ...46...

Страница 47: ...47...

Страница 48: ...48...

Страница 49: ...49...

Страница 50: ...50...

Страница 51: ...51...

Страница 52: ...52...

Страница 53: ...53...

Страница 54: ...54...

Страница 55: ...55...

Страница 56: ......

Отзывы: