background image

• The electrical installation must have an isolation device

which lets you disconnect the appliance from the

mains at all poles. The isolation device must have a

contact opening width of minimum 3 mm.

• The shock protection parts must be fixed in such a way

that they cannot be undone without tools.

• Always use a correctly installed shockproof socket.
• When you connect electrical appliances to mains sock-

ets, do not let cables touch or come near the hot appli-

ance door.

• Do not use multi-way plugs, connectors and extension

cables. There is a risk of fire.

• Make sure not to squash or cause damage to the mains

plug (if applicable) and cable behind the appliance.

• Make sure that the mains connection is accessible after

the installation.

• Do not pull the mains cable to disconnect the appli-

ance. Always pull the mains plug (if applicable).

• Do not replace or change the mains cable. Contact the

service centre.

Use

• Only use the appliance for domestic cooking tasks. Do

not use the appliance for commercial and industrial

use. This is to prevent physical injury to persons or

prevent damage to property.

• Always monitor the appliance during operation.
• Always stay away from the appliance when you open

the door while the appliance is in operation. Hot steam

can release. There is a risk of burns.

• Do not use this appliance if it is in contact with water.

Do not operate the appliance with wet hands.

• Do not use the appliance as a work surface or storage

surface.

• The cooking surface of the appliance becomes hot dur-

ing use. There is a risk of burns. Do not put metallic

objects, for example cutlery or saucepans lids, on the

surface, as they can become hot.

• The interior of the appliance becomes hot during use.

There is a risk of burns. Use gloves when you insert or

remove the accessories or pots.

• The appliance and its accessible parts become hot dur-

ing use. Take care to avoid touching the heating ele-

ments. Young children must be kept away unless con-

tinuously supervised.

• Open the door carefully. The use of ingredients with al-

cohol can cause a mixture of alcohol and air. There is

the risk of fire.

• Do not let sparks or open flames come near the appli-

ance when you open the door.

• Do not put flammable products or items that are wet

with flammable products, and/or fusible objects (made

of plastic or aluminium) in, near or on the appliance.

There is a risk of explosion or fire.

• Set the cooking zones to "off" after each use.
• Do not use the cooking zones with empty cookware or

without cookware

• Do not let cookware boil dry. This can cause damage to

the cookware and hob surface.

• If an object or cookware falls on the hob surface, the

surface can be damaged.

• Do not put hot cookware near to the control panel be-

cause the heat can cause a damage to the appliance.

• Be careful when you remove or install the accessories

to prevent damage to the appliance enamel.

• Cookware made of cast iron, cast aluminium or with

damaged bottoms can scratch the hob surface if you

move them on the surface.

• Discoloration of the enamel has no effect on the per-

formance of the appliance.

• To prevent damage or discoloration to the enamel:

– do not put any objects directly on the appliance

floor and do not cover it with aluminium foil;

– do not put hot water directly into the appliance;
– do not keep moist dishes and food in the appliance

after you finish the cooking.

• Do not apply pressure on the open door.
• Do not put flammable materials in the compartment be-

low the oven. Keep there only heat-resistant accesso-

ries (if applicable).

• Do not cover oven steam outlets. They are at the rear

side of the top surface (if applicable).

• Do not put anything on the hob that is liable to melt.
• If there is a crack on the surface, disconnect the power

supply. There is a risk of electric shock.

• Do not put heat-conducting materials (e.g. thin metal

mesh or metal-plated heat conductors) under the cook-

ware. Excessive heat reflection can damage the cooking

surface.

• Do not use the appliance during a power cut.


3

Содержание ZCV662

Страница 1: ...EN User manual Cooker ZCV662 ...

Страница 2: ...packaging away from children There is the risk of suffocation or physical injury Keep children and animals away from the appliance when the door is open or the appliance is in operation There is the risk of injury or other permanent disability If the appliance has Child lock or Key lock function use it It prevents children and animals from accidental operation of the appliance General safety Do no...

Страница 3: ... heating ele ments Young children must be kept away unless con tinuously supervised Open the door carefully The use of ingredients with al cohol can cause a mixture of alcohol and air There is the risk of fire Do not let sparks or open flames come near the appli ance when you open the door Do not put flammable products or items that are wet with flammable products and or fusible objects made of pl...

Страница 4: ...e door glass panels are damaged they become weak and can break You must replace them Contact the service centre Be careful when you remove the door from the appli ance The door is heavy Bulb lamps used in this appliance are special lamps selected for household appliances use only They can not be used for the full or partial illumination of a household room If it becomes necessary to replace the la...

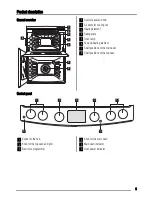
Страница 5: ...fan 3 Heating element 4 Rating plate 5 Oven lamp 6 Fan and heating element 7 Shelf positions of the main oven 8 Shelf positions of the top oven Control panel 1 2 4 5 6 3 1 1 Knobs for the hob 2 Knob for the top oven and grill 3 Electronic programmer 4 Knob for the main oven 5 Main oven indicator 6 Oven power indicator 5 ...

Страница 6: ... the surface Refer to chapter Care and Cleaning Setting the time The oven only operates after time set When you connect the appliance to the electrical supply or in case of a power cut the Time function indicator flashes automatically To set the current time use or button After approximately 5 seconds the flashing stops and the display shows the time of day set For time change you must not set an ...

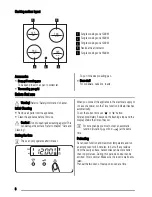
Страница 7: ... use residual heat The bottom of pans and cooking zones must have the same dimension Examples of cooking applications Heat set ting Use to 1 Keeping warm 2 Gentle simmering 3 Simmering 4 Frying browning 5 Bringing to the boil 6 Bringing to the boil quick frying deep frying Hob Care and cleaning Warning Refer to Safety information chapter Clean the appliance after each use Always use cookware with ...

Страница 8: ...ppliance turn the knob for the main oven functions and the knob for the main oven temperature to the Off position The main oven indicator switches to OFF when the set temperature will be reached Top oven functions Oven function Application OFF position The appliance is OFF Oven lamp To light up the oven interior 100 250 Conventional Cook ing Particularly suitable for cooking larger quantities of f...

Страница 9: ... Setting the clock functions 1 Push the Selection button again and again until nec essary function indicator flashes 2 To set the time for Minute minder Duration or End use or button The related function indicator comes on When the time period is completed the function in dicator flashes and an acoustic signal sounds for 2 minutes With the functions Duration and End the oven switches off automatic...

Страница 10: ... cook smaller quantities of food It gives especially good results when used to cook fruitcakes sweets and savoury flants or quiche Main oven The main oven is particularly suitable for cooking larger quantities of food Baking General instructions Your new oven may bake or roast differently to the ap pliance you had before Adapt your usual settings temperature cooking times and shelf levels to the v...

Страница 11: ...aking time Cake does not brown equally Oven temperature too high and baking time too short Set a lower oven temperature and a longer baking time Cake does not brown equally No equal mixture Put the mixture equally on the baking tray Cake does not cook in the baking time set Temperature too low Use a slightly higher oven temperature setting Top Oven Shelf Positions are not critical but ensure that ...

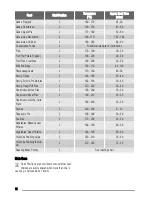
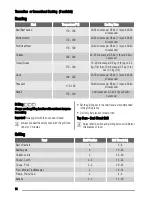
Страница 12: ...0 190 30 40 Pastry Eclairs Profiteroles 2 180 190 30 40 Pastry Flaky Puff Pies 2 210 220 30 40 Shortcrusts Mince Pies 2 190 200 15 20 Shortcrusts Meat Pies 2 190 210 25 35 Shortcrusts Quiche Tarts Flans 2 180 200 25 50 Scones 3 220 230 8 12 Shepard s Pie 2 190 200 30 40 Souffles 2 170 180 20 30 Vegetables Baked Jacket Potatos 2 180 190 60 90 Vegetables Roast Potatos 2 180 190 60 90 Yorkshire Puddi...

Страница 13: ...stry Flaky 180 190 30 40 3 Pastry Puff Follow manufacturer s instructions Reduce the tempera ture for Fan oven by 20 C 3 Plate Tarts 180 190 25 45 3 Quiches Flans 170 180 25 45 3 Scones 210 230 8 12 1 3 Roasting Meat Poultry 160 180 see Roasting Chart 2 Roasting Roasting dishes Use heat resistant ovenware to roast please read the instructions of the manufacturer Large roasting joints can be roaste...

Страница 14: ...sant 170 190 35 40 minutes per 0 5 kb 1 lb and 35 40 minutes over Rabbit 170 190 20 minutes per 0 5 kb 1 lb and 20mi nutes over Grilling Always use the grilling function with maximum tempera ture setting Important Always grill with the oven door closed Always pre heat the empty oven with the grill func tions for 5 minutes Set the grilling set in the shelf level as recommended in the grilling table...

Страница 15: ... using an aggressive agents sharp edged objects or dishwasher It can destroy nonstick coating Stainless steel or aluminium appliances Clean the oven door with a wet sponge only Dry it with a soft cloth Do not use steel wool acids or abrasive materials as they can damage the oven surface Clean the oven control pan el with the same precautions Catalytic walls selected models only The walls with a ca...

Страница 16: ...what you see in diagrams The number of glasses can be different Removing the glass 1 Open the door 2 Push the door trim at both sides to release the clips Refer to the picture 3 Remove the glass panels 1 2 1 To replace the glass obey the procedure in opposite sequence Cleaning the oven door The door glass on your product can be different in type and shape from what you see in diagrams The number o...

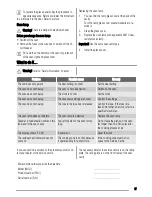
Страница 17: ...on the oven The oven does not heat up The clock is not set Set the clock The oven does not heat up The necessary settings are not set Control the settings The oven does not heat up The fuse in the fuse box is released Control the fuse If the fuse is re leased more than one time refer to a qualified electrician The oven lamp does not operate The oven lamp is defective Replace the oven lamp Steam an...

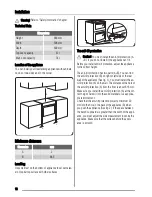
Страница 18: ...djust the appliance to the correct height The anti tilt protection has two parts A B You can find the anti tilt protection B on right or left side of the rear wall of the appliance See fig 1 You must install the an ti tilt protection A on the wall The distance of the hole of the anti tilt protection A from the floor is about 816 mm Make sure you install the anti tilt protection A at the cor rect h...

Страница 19: ...e blanking plates Environment concerns The symbol on the product or on its packaging indicates that this product may not be treated as household waste Instead it should be taken to the appropriate collection point for the recycling of electrical and electronic equipment By ensuring this product is disposed of correctly you will help prevent potential negative consequences for the environment and h...

Страница 20: ...ut an engineer please ensure you have read the details under the heading What to do if When you contact the Service Force Centre you will need to give the following details Your name address and postcode your telephone number clear concise details of the fault model and serial number of the appliance found on the rating plate the purchase date Please note a valid purchase receipt or guarantee docu...

Страница 21: ...www electrolux fr Great Britain 44 8445 616 616 Addington Way Luton Bedfordshire LU4 9QQ Hellas 30 23 10 56 19 70 4 Limnou Str 54627 Thessaloniki Hrvatska 385 1 63 23 338 Slavonska avenija 3 10000 Zagreb Ireland 353 1 40 90 753 Long Mile Road Dublin 12 Italia 39 0 434 558500 C so Lino Zanussi 26 33080 Porcia PN Latvija 371 67313626 Kr Barona iela 130 2 LV 1012 Riga Lietuva 370 5 278 06 03 Ozo 10a ...

Страница 22: ...lava Suomi www electrolux fi Sverige 46 0 771 76 76 76 Electrolux Service S t Göransgatan 143 S 105 45 Stockholm Türkiye 90 21 22 93 10 25 Tarlabaşı caddesi no 35 Taksim İs tanbul Россия 8 800 200 3589 129090 Москва Олимпийский проспект 16 БЦ Олимпик Україна 380 44 586 20 60 04074 Київ вул Автозаводська 2а БЦ Алкон 22 ...

Страница 23: ...23 ...

Страница 24: ...www zanussi com shop 892937845 N 302011 ...

Отзывы: