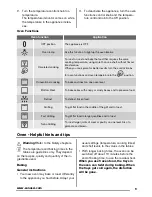
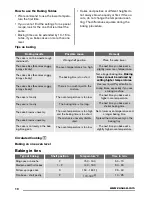
background image

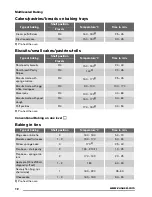
Type of baking

Shelf positions

Temperature °C

Time in min.

Biscuits made with yeast
dough

3

170 - 190

20 - 40

Puff pastries

3

190 - 210 

1)

20 - 30

Rolls

3

190 - 210

1)

10 - 55

Small cakes (20per tray)

3 - 4

170 

1)

20 - 30

1) 

Pre-heat the oven

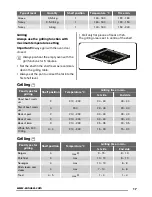
Bakes and gratins table

Dish

Shelf positions

Temperature °C

Time in min.

Pasta bake

1

180 - 200

45 - 60

Lasagne

1

180 - 200

35 - 50

Vegetables au gratin

1

180 - 200 

1)

15 - 30

Baguettes topped with
melted cheese

1

200 - 220 

1)

15 - 30

Sweet bakes

1

180 - 200

40 - 60

Fish bakes

1

180 - 200

40 - 60

Stuffed vegetables

1

180 - 200

40 - 60

1) 

Pre-heat the oven

Roasting

Roasting dishes

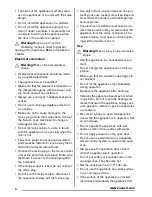
• Use heat-resistant ovenware to roast

(please read the instructions of the manu-
facturer).

• Large roasting joints can be roasted directly

in the deep pan (if present) or on the wire
shelf above the deep pan.

• Roast lean meats in a roasting tin with a lid.

This will keep the meat more succulent.

• All types of meat, that can be browned or

have crackling, can be roasted in the roast-
ing tin without the lid.

Roasting with Conventional Cooking 

Beef

Type of meat

Quantity

Shelf position

Temperature °C

Time in min.

Pot roast

1-1.5 kg

1

200 - 230

105 - 150

Roast beef or fillet:
rare

per cm. of thick-

ness

1

230 - 250

1)

6 - 8

Roast beef or fillet:
medium

per cm. of thick-

ness

1

220 - 230

8 - 10

Roast beef or fillet:
well done

per cm. of thick-

ness

1

200 - 220

10 - 12

1) 

Pre-heat the oven

14


www.zanussi.com

Содержание ZCV65020WA

Страница 1: ...EN User manual 2 DE Benutzerinformation 24 Cooker Herd ZCV65020WA ...

Страница 2: ...ation and use causes injuries and damages Always keep the instructions with the appliance for future reference Children and vulnerable people safety Warning Risk of suffocation injury or permanent disability This appliance can be used by children aged from 8 years and above and persons with reduced physical sensory or mental ca pabilities or lack of experience and knowledge if they are super vised...

Страница 3: ...ace is cracked switch off the appliance to avoid the possibility of electric shock Ensure that the appliance is switched off before replacing the lamp to avoid the possibility of electric shock The means for disconnection must be incorporated in the fixed wiring in accordance with the wiring rules If the supply cord is damaged it must be replaced by the manu facturer an authorized Service or simil...

Страница 4: ...g Do not pull the mains cable to disconnect the appliance Always pull the mains plug Use only correct isolation devices line pro tecting cut outs fuses screw type fuses re moved from the holder earth leakage trips and contactors The electrical installation must have an iso lation device which lets you disconnect the appliance from the mains at all poles The isolation device must have a contact ope...

Страница 5: ...rranty law Use a deep pan for moist cakes Fruit juices cause stains that can be permanent Do not keep hot cookware on the control panel Do not let cookware to boil dry Be careful not to let objects or cookware fall on the appliance The surface can be dam aged Do not activate the cooking zones with empty cookware or without cookware Do not put aluminium foil on the appliance Cookware made of cast i...

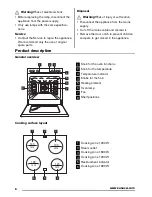
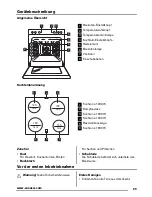
Страница 6: ...Cut off the mains cable and discard it Remove the door catch to prevent children and pets to get closed in the appliance Product description General overview 5 4 3 2 1 1 3 2 5 4 6 7 8 1 Knob for the oven functions 2 Knob for the temperature 3 Temperature indicator 4 Knobs for the hob 5 Heating element 6 Oven lamp 7 Fan 8 Shelf positions Cooking surface layout 180 mm 180 mm 145 mm 145 mm 6 5 1 3 2 ...

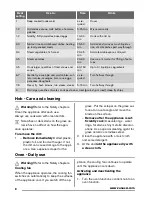
Страница 7: ... settings Control knob Function Off position 1 9 Heat settings 1 lowest heat setting 9 highest heat setting 1 Turn the control knob to a necessary heat setting 2 To complete the cooking process turn the control knob to the position Residual heat indicator The residual heat indicator comes on when a cooking zone is hot Warning Risk of burns from residual heat Hob Helpful hints and tips Warning Refe...

Страница 8: ... to the Safety chapters Clean the appliance after each use Always use cookware with clean bottom Scratches or dark stains on the glass ce ramic have no effect on how the appli ance operates To remove the dirt 1 Remove immediately melted plastic plastic foil and food with sugar If not the dirt can cause damage to the appli ance Use a special scraper for the glass Put the scraper on the glass sur fa...

Страница 9: ... bases and to preserve food Defrost To defrost frozen food Grilling To grill flat food in the middle of the grill and to toast Fast Grilling To grill flat food in large quantities and to toast Turbo Grilling To roast larger joints of meat or poultry on one level Also to gratinate and brown Oven Helpful hints and tips Warning Refer to the Safety chapters The temperature and baking times in the tabl...

Страница 10: ...r temperatures The cake sinks becomes soggy lumpy streaky There is too much liquid in the mixture Use less liquid Pay attention to mixing times especially if you use a mixing machine The cake is too dry The oven temperature is too low The next time you bake set a higher oven temperature The cake is too dry The baking time is too long The next time you bake set a shorter baking time The cake browns...

Страница 11: ...deep pan Biscuits Type of baking Shelf position Temperature C Time in min Short pastry biscuits 3 150 160 10 20 Short bread Pastry Stripes 3 140 20 35 Biscuits made with sponge mixture 3 150 160 15 20 Pastries made with egg white meringues 3 80 100 120 150 Macaroons 3 100 120 30 50 Biscuits made with yeast dough 3 150 160 20 40 Puff pastries 3 170 180 1 20 30 Rolls 3 160 1 10 35 Small cakes 20per ...

Страница 12: ...cuits made with egg white meringues 2 4 80 100 130 170 Macaroons 2 4 100 1201 40 80 Biscuits made with yeast dough 2 4 160 1701 30 60 Puff pastries 2 4 170 1801 30 50 1 Pre heat the oven Conventional Baking on one level Baking in tins Type of baking Shelf position Temperature C Time in min Ring cake or brioche 2 160 180 50 70 Madeira cake fruit cakes 1 2 150 170 50 90 Fatless sponge cake 3 170 1 2...

Страница 13: ... flans made with yeast dough sponge mixture 2 3 170 35 55 Fruit flans made with short pastry 3 170 190 40 60 Yeast cakes with deli cate toppings e g quark cream custard 3 160 180 1 40 80 Pizza with a lot of top ping 2 1 2 190 210 1 30 50 Pizza thin crust 1 2 220 250 1 15 25 Unleavened bread 1 230 250 10 15 Tarts CH 1 210 230 35 50 1 Pre heat the oven 2 Use deep pan Biscuits Type of baking Shelf po...

Страница 14: ...s Use heat resistant ovenware to roast please read the instructions of the manu facturer Large roasting joints can be roasted directly in the deep pan if present or on the wire shelf above the deep pan Roast lean meats in a roasting tin with a lid This will keep the meat more succulent All types of meat that can be browned or have crackling can be roasted in the roast ing tin without the lid Roast...

Страница 15: ...n min Leg of lamb roast lamb 1 1 5 kg 1 210 220 90 120 Saddle of lamb 1 1 5 kg 1 210 220 40 60 Game Type of meat Quantity Shelf position Temperature C Time in min Saddle of hare leg of hare up to 1 kg 1 220 240 1 30 40 Saddle of venison 1 5 2 kg 1 210 220 35 40 Haunch of venison 1 5 2 kg 1 200 210 90 120 1 Pre heat the oven Poultry Type of meat Quantity Shelf position Temperature C Time in min Pou...

Страница 16: ...1 5 kg 1 160 180 90 120 Chop spare rib 1 1 5 kg 1 170 180 60 90 Meat loaf 750 g 1 kg 1 160 170 50 60 Porkknuckle pre cooked 750 g 1 kg 1 150 170 90 120 Veal Type of meat Quantity Shelf position Temperature C Time min Roast veal 1 kg 1 160 180 90 120 Knuckle of veal 1 5 2 kg 1 160 180 120 150 Lamb Type of meat Quantity Shelf position Temperature C Time min Leg of lamb roast lamb 1 1 5 kg 1 150 170 ...

Страница 17: ...evel Grill only flat pieces of meat or fish The grilling area is set in centre of the shelf Grilling Food types for grilling Shelf position Temperature C Grilling time in min 1st side 2nd side Roast beef medi um 2 210 230 30 40 30 40 Filet of beef medi um 3 230 20 30 20 30 Back of pork 2 210 230 30 40 30 40 Back of veal 2 210 230 30 40 30 40 Back of lamb 3 210 230 25 35 20 35 Whole fish 500 1000g ...

Страница 18: ...one litre jars stop the oven or decrease the temper ature to 100 C see the table Soft fruit Preserve Temperature in C Cooking time until simmering in min Continue to cook at 100 C in mis Strawberries blueber ries raspberries ripe gooseberries 160 170 35 45 Stone fruit Preserve Temperature in C Cooking time until simmering in min Continue to cook at 100 C in min Pears guinces plums 160 170 35 45 10...

Страница 19: ...rm water and cleaning agent after each use and let them dry If you have nonstick accessories do not clean them using an aggressive agents sharp edged objects or dishwasher It can destroy nonstick coating Stainless steel or aluminium appli ances Clean the oven door with a wet sponge only Dry it with a soft cloth Do not use steel wool acids or abrasive mate rials as they can damage the oven surface ...

Страница 20: ... 1 You can find the lamp glass cover at the back of the cavity Turn the lamp glass cover counterclock wise to remove it 2 Clean the glass cover 3 Replace the oven lamp with applicable 300 C heat resistant oven lamp Important Use the same oven lamp type 4 Install the glass cover Removing the drawer The drawer below the oven can be removed for cleaning 1 Pull the drawer out until it stops 1 2 2 Lift...

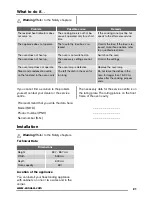
Страница 21: ...is defective Replace the oven lamp Steam and condensation settle on the food and in the oven cavity You left the dish in the oven for too long Do not leave the dishes in the oven for longer than 15 20 mi nutes after the cooking process ends If you cannot find a solution to the problem yourself contact your dealer or the service centre The necessary data for the service centre is on the rating plat...

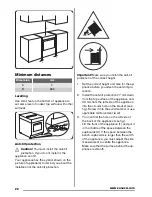
Страница 22: ...and area for the ap pliance before you attach the anti tilt pro tection 2 Install the anti tilt protection 77 mm down from the top surface of the appliance and 49 mm from the left side of the appliance into the circular hole on the bracket see fig Screw it into the solid material or use applicable reinforcement wall 3 You can find the hole on the left side at the back of the appliance see fig Lift...

Страница 23: ...rs to recycle it Help protect the environment and human health and to recycle waste of electrical and electronic appliances Do not dispose appliances marked with the symbol with the household waste Return the product to your local recycling facility or contact your municipal office Packaging material The packaging material is environmental ly friendly and recyclable Plastic parts are marked with i...

Страница 24: ...nleitung Der Hersteller haftet nicht für Verletzun gen oder Schäden die durch eine fehlerhafte Montage entstehen Bewahren Sie die Anleitung zum Nachschlagen auf Sicherheit von Kindern und schutzbedürftigen Personen Warnung Es besteht Erstickungsgefahr das Risiko von Verletzungen oder permanenten Behinderungen Dieses Gerät kann dann von Kindern ab 8 Jahren von Personen mit eingeschränkten körperlic...

Страница 25: ...r Legen Sie keine Metallgegenstände wie Messer Gabeln Löffel oder Topfdeckel auf die Oberfläche des Kochfelds da diese heiß werden können Benutzen Sie keine Scheuermittel oder Metallschwämmchen zum Reinigen der Ofenglastür sie können die Glasfläche ver kratzen und zum Zersplittern der Scheibe führen Seien Sie beim Anfassen der Aufbewahrungsschublade vorsich tig Sie kann heiß werden Schalten Sie da...

Страница 26: ...her dass die elektrischen Da ten auf dem Typenschild den Daten Ihrer Stromversorgung entsprechen Wenden Sie sich andernfalls an eine Elektrofachkraft Das Gerät darf ausschließlich an eine ord nungsgemäß installierte Schutzkontakts teckdose angeschlossen werden Verwenden Sie keine Mehrfachsteckdosen oder Verlängerungskabel Achten Sie darauf Netzstecker und Netzka bel nicht zu beschädigen Wenden Sie...

Страница 27: ...t umgehend von der Spannungsversorgung Dies dient zur Ver meidung eines Stromschlags Warnung Es besteht Explosions und Brandgefahr Erhitzte Öle und Fette können brennbare Dämpfe freisetzen Halten Sie Flammen und erhitzte Gegenstände beim Kochen mit Fet ten und Ölen von diesen fern Die von sehr heißem Öl freigesetzten Dämpfe können eine Selbstzündung verur sachen Bereits verwendetes Öl kann Lebensm...

Страница 28: ...n Sie die Glasscheiben der Tür um gehend wenn sie beschädigt sind Wenden Sie sich hierzu an den Kundendienst Gehen Sie beim Aushängen der Tür sorg sam vor Die Tür ist schwer Reinigen Sie das Gerät regelmäßig um eine Abnutzung des Oberflächenmaterials zu verhindern Fett oder Speisereste im Gerät können ei nen Brand verursachen Reinigen Sie das Geräts mit einem weichen feuchten Tuch Verwenden Sie nu...

Страница 29: ...nordnung 180 mm 180 mm 145 mm 145 mm 6 5 1 3 2 4 1 Kochzone 1200 W 2 Dampfauslass 3 Kochzone 1800 W 4 Kochzone 1200 W 5 Restwärmeanzeige 6 Kochzone 1800 W Zubehör Rost Für Geschirr Kuchenformen Braten Backblech Für Kuchen und Plätzchen Schublade Die Schublade befindet sich unterhalb des Backraums Vor der ersten Inbetriebnahme Warnung Siehe Sicherheitshinweise Erstes Reinigen Entfernen Sie alle Tei...

Страница 30: ...n Einstellknopf auf die ge wünschte Kochstufe 2 Zum Beenden des Kochvorgangs muss der Knopf in die Position gedreht wer den Restwärmeanzeige Die Restwärmeanzeige leuchtet auf wenn eine Kochzone heiß ist Warnung Es besteht Verbrennungsgefahr durch Restwärme Kochfeld Praktische Tipps und Hinweise Warnung Siehe Sicherheitshinweise Kochgeschirr Der Boden des Kochgeschirrs sollte so dick und flach wie ...

Страница 31: ...teaks 5 15 Min Nach der Hälfte der Zeit wenden 9 Aufkochen großer Mengen Wasser Kochen von Nudeln Anbraten von Fleisch Gulasch Schmorbraten Frittieren von Pommes Frites Kochfeld Reinigung und Pflege Warnung Siehe Sicherheitshinweise Reinigen Sie das Gerät nach jedem Ge brauch Achten Sie immer darauf dass der Boden des Kochgeschirrs sauber ist Kratzer oder dunkle Flecken in der Glas keramik beeintr...

Страница 32: ...erät ist ausgeschaltet Backofenlampe Mit dieser Funktion können Sie den Backofeninnenraum be leuchten Heißluft Bei dieser Einstellung können Sie Speisen mit der gleichen Gartemperatur auf mehreren Ebenen gleichzeitig braten bzw braten und backen ohne dass es zu einer Geschmacksübertra gung kommt Für optimale Ergebnisse beim Backen von Pizza stellen Sie den Backofen Einstellknopf und den Temperatur...

Страница 33: ...inn zu unterschiedlicher Bräunung führen Verändern Sie in diesem Fall nicht die Temperatureinstellung Die Bräunungsunterschiede gleichen sich wäh rend des Backvorgangs aus Tipps zum Backen Backergebnis Mögliche Ursache Abhilfe Der Kuchen ist unten nicht ausrei chend gebräunt Falsche Einschubebene Setzen Sie den Kuchen tiefer ein Der Kuchen fällt zusammen wird feucht klumpig streifig Die Backofente...

Страница 34: ...Sandkuchen Früchteku chen 1 2 140 160 50 90 Fatless sponge cake 3 150 160 1 25 40 Tortenboden Mürbe teig 2 170 180 1 10 25 Tortenboden Rührteig 2 150 170 20 25 Apple pie 2 Formen Ø 20 cm diagonal ver setzt 2 3 160 60 90 1 Backofen vorheizen Kuchen Gebäck Brot auf Backblechen Backware Einschubebene Temperatur in C Zeit in Min Streuselkuchen tro cken 3 150 160 20 40 Obstkuchen auf Hefe teig Rührteig...

Страница 35: ...äck Brot auf Backblechen Backware Einschubebene Temperatur in C Zeit in Min 2 Ebenen Windbeutel Eclairs 2 4 160 1801 25 45 Streuselkuchen trocken 2 4 150 1601 30 45 1 Backofen vorheizen Plätzchen kleine Kuchen Gebäck Brötchen Backware Einschubebene Temperatur in C Zeit in Min 2 Ebenen Mürbeteigplätzchen 2 4 150 1601 20 40 Short bread Pastry Stripes 2 4 1401 20 45 Rührteigplätzchen 2 4 160 1701 25 ...

Страница 36: ...bene Temperatur in C Zeit in Min Hefezopf Hefekranz 2 170 190 40 50 Christstollen 2 160 180 1 50 70 Brot Roggenbrot 1 Erster Teil des Backvorgangs 2 Zweiter Teil des Backvorgangs 1 2 1 230 1 2 160 180 1 1 20 2 30 60 Windbeutel Eclairs 3 190 210 1 20 35 Biskuitrolle 3 180 200 1 10 20 Streuselkuchen tro cken 3 160 180 20 40 Mandel Zuckerkuchen 3 190 210 1 20 30 Obstkuchen mit Hefe teig Rührteig 2 3 ...

Страница 37: ...e Einschubebenen Temperatur in C Zeit in Min Nudelauflauf 1 180 200 45 60 Lasagne 1 180 200 35 50 Gemüsegratin 1 180 200 1 15 30 Überbackene Baguettes 1 200 220 1 15 30 Süße Aufläufe 1 180 200 40 60 Fischaufläufe 1 180 200 40 60 Gefülltes Gemüse 1 180 200 40 60 1 Backofen vorheizen Braten Bratgeschirr Benutzen Sie zum Braten hitzebeständiges Geschirr Beachten Sie die Angaben des Herstellers Große ...

Страница 38: ...20 90 120 Kotelett Schälripp chen 1 1 5 kg 1 180 190 60 90 Hackbraten 750 g 1 kg 1 170 190 50 60 Schweinshaxe vorgegart 750 g 1 kg 1 200 220 90 120 Kalbfleisch Fleischart Menge Einschubebene Temperatur in C Zeit in Min Kalbsbraten1 1 kg 1 210 220 90 120 Kalbshaxe 1 5 2 kg 1 200 220 150 180 1 im geschlossenen Bräter Lammfleisch Fleischart Menge Einschubebene Temperatur in C Zeit in Min Lammkeule La...

Страница 39: ... Fleischart Menge Einschubebene Temperatur in C Zeit in Min Ganzer Fisch 1 1 5 kg 1 210 220 40 70 Braten mit Heißluft Grillen Rindfleisch Fleischart Menge Einschubebene Temperatur in C Zeit Min Roastbeef oder Fi let Englisch je cm Höhe 1 190 200 1 5 6 Roastbeef oder Fi let Medium je cm Höhe 1 180 190 6 8 Roastbeef oder Fi let durchgebraten je cm Höhe 1 170 180 8 10 1 Backofen vorheizen Schweinefle...

Страница 40: ... Truthahn Pute 2 5 3 5 kg 1 160 180 120 150 Truthahn Pute 4 6 kg 1 140 160 150 240 Grillen Benutzen Sie die Grill Funktion immer mit der höchsten Temperatureinstellung Wichtig Grillen Sie immer bei geschlossener Backofentür Heizen Sie den leeren Backofen mit den Grill Funktionen immer 5 Minuten vor Schieben Sie den Rost gemäß den Empfeh lungen in der Grilltabelle in die entsprechen de Einsatzebene...

Страница 41: ...en vorheizen Einkochen Hinweise Verwenden Sie nur handelsübliche Ein weckgläser gleicher Größe Verwenden Sie keine Gläser mit Schraub oder Bajonettdeckeln oder Metalldosen Verwenden Sie für diese Funktion die erste Einschubebene von unten Stellen Sie nicht mehr als sechs 1 Liter fas sende Einweckgläser auf das Backblech Füllen Sie alle Gläser gleich hoch und ver schließen Sie sie fest mit dem Glas...

Страница 42: ...l 160 170 50 60 15 20 1 Nach dem Ausschalten im Backofen stehen lassen Auftauen Entfernen Sie die Verpackung Das Gericht auf einem Teller anrichten Nicht mit einer Schüssel oder einem Teller ab decken Dadurch wird die Auftauzeit verlän gert Nutzen Sie die erste Einschubebene von un ten Speise Auftauzeit in Min Zusätzliche Auftau zeit in Min Bemerkung Hähnchen 1000 g 100 140 20 30 Hähnchen auf eine...

Страница 43: ...ln scharfkantigen Gegenständen oder im Geschirrspüler Die Antihaftbe schichtung kann zerstört werden Geräte mit Edelstahl oder Alumini umfront Reinigen Sie die Backofentür nur mit einem nassen Schwamm Trocknen Sie sie hinterher mit einem weichen Tuch ab Verwenden Sie nie Stahlwolle ätzende Reini gungsmittel oder Scheuermittel da diese die Oberfläche des Backofens beschädigen kön nen Reinigen Sie d...

Страница 44: ...halten Sie den Backofen aus Nehmen Sie die Sicherungen aus dem Si cherungskasten oder legen Sie den Schutz schalter um Legen Sie ein Tuch auf den Boden des Backofens um die Backofenlampe und die Glasabdeckung zu schützen Backofenlampe auswechseln 1 Die Glasabdeckung der Backofenlampe befindet sich an der Rückwand des Back ofeninnenraums Drehen Sie die Glasabdeckung gegen den Uhrzeigersinn und nehm...

Страница 45: ...ten hat ausgelöst Überprüfen Sie die Sicherung Wenn die Sicherung mehrmals ausgelöst hat wenden Sie sich an einen qualifizierten Elektriker Der Backofen heizt nicht auf Der Ofen ist nicht eingeschaltet Schalten Sie den Backofen ein Der Backofen heizt nicht auf Die erforderlichen Einstellungen wurden nicht vorgenommen Kontrollieren Sie die Einstellun gen Die Backofenlampe leuchtet nicht Die Backofe...

Страница 46: ...s könnte das Gerät kippen Ihr Gerät ist mit dem Symbol das in der Abbildung ersichtlich ist gekennzeichnet sofern vorhanden Es soll Sie daran erinnern dass der Kippschutz montiert werden muss Wichtig Achten Sie darauf den Kippschutz in der richtigen Höhe anzubringen 1 Stellen Sie die korrekte Höhe des Geräts ein bevor Sie den Kippschutz anbringen 2 Bringen Sie den Kippschutz in einem Ab stand von ...

Страница 47: ...alien mit dem Symbol Entsorgen Sie die Verpackung in den entsprechenden Recyclingbehältern Recyceln Sie zum Umwelt und Gesundheitsschutz elektrische und elektronische Geräte Entsorgen Sie Geräte mit diesem Symbol nicht mit dem Hausmüll Bringen Sie das Gerät zu Ihrer örtlichen Sammelstelle oder wenden Sie sich an Ihr Gemeindeamt Wohin mit den Altgeräten Überall dort wo neue Geräte verkauft werden o...

Страница 48: ...r documenté au moyen d une facture d un bon de garantie ou d un justificatif d achat Notre garantie couvre les frais de mains d œuvres et de déplacement ainsi que les piè ces de rechange Les conditions de garantie ne sont pas valables en cas d intervention d un tiers non autorisé de l emploi de pièces de re change non originales d erreurs de maniement ou d installation dues à l inobser vation du m...

Страница 49: ...49 www zanussi com ...

Страница 50: ...50 www zanussi com ...

Страница 51: ...51 www zanussi com ...

Страница 52: ...www zanussi com shop 892957517 B 472013 ...

Отзывы: