background image

• Do not use harsh abrasive cleaners or sharp metal scrapers to clean the

glass door since they can scratch the surface, which may result in shattering
of the glass.

• Excess spillage must be removed before the pyrolytic cleaning. Remove all

parts from the oven.

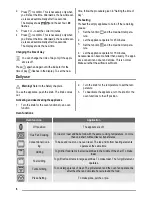
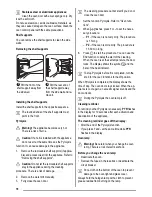
• To remove the shelf supports first pull the front of the shelf support and then

the rear end away from the side walls. Install the shelf supports in the oppo-
site sequence.

 Safety instructions

Installation

Warning!

 Only a qualified person must install this

appliance.

• Remove all the packaging.
• Do not install or use a damaged appliance.
• Obey the installation instruction supplied with the ap-

pliance.

• Always be careful when you move the appliance be-

cause it is heavy. Always wear safety gloves.

• Do not pull the appliance by the handle.
• Keep the minimum distance from the other applian-

ces and units.

• Make sure that the appliance is installed below and

adjacent safe structures.

• The sides of the appliance must stay adjacent to ap-

pliances or to units with the same height.

Electrical connection

Warning!

 Risk of fire and electrical shock.

• All electrical connections should be made by a quali-

fied electrician.

• The appliance must be earthed.
• Make sure that the electrical information on the rat-

ing plate agrees with the power supply. If not, con-
tact an electrician.

• Always use a correctly installed shockproof socket.
• Do not use multi-plug adapters and extension ca-

bles.

• Make sure not to cause damage to the mains plug

and to the mains cable. Contact the Service or an
electrician to change a damaged mains cable.

• Do not let mains cables to come in touch with the ap-

pliance door, specially when the door is hot.

• The shock protection of live and insulated parts must

be fastened in such a way that it cannot be removed
without tools.

• Connect the mains plug to the mains socket only at

the end of the installation. Make sure that there is
access to the mains plug after the installation.

• If the mains socket is loose, do not connect the

mains plug.

• Do not pull the mains cable to disconnect the appli-

ance. Always pull the mains plug.

• Use only correct isolation devices: line protecting

cut-outs, fuses (screw type fuses removed from the
holder), earth leakage trips and contactors.

• The electrical installation must have an isolation de-

vice which lets you disconnect the appliance from
the mains at all poles. The isolation device must
have a contact opening width of minimum 3 mm.

• Fully close the appliance door, before you connect

the mains plug to the mains socket.

Use

Warning!

 Risk of injury, burns or electric shock or

explosion.

• Use this appliance in a household environment.
• Do not change the specification of this appliance.


3

Содержание KOB57602XK

Страница 1: ...User manual Oven Benutzer information Backofen KOB57602 ...

Страница 2: ...tion and use causes injuries and damages Always keep the instructions with the appli ance for future reference Children and vulnerable people safety Warning Risk of suffocation injury or permanent disability This appliance can be used by children aged from 8 years and above and persons with reduced physical sensory or mental capabilities or lack of ex perience and knowledge if they are supervised ...

Страница 3: ... on the rat ing plate agrees with the power supply If not con tact an electrician Always use a correctly installed shockproof socket Do not use multi plug adapters and extension ca bles Make sure not to cause damage to the mains plug and to the mains cable Contact the Service or an electrician to change a damaged mains cable Do not let mains cables to come in touch with the ap pliance door special...

Страница 4: ...d disconnect the mains plug from the mains socket Make sure the appliance is cold There is the risk that the glass panels can break Replace immediately the door glass panels when they are damaged Contact the Service Be careful when you remove the door from the appli ance The door is heavy Clean regularly the appliance to prevent the deterio ration of the surface material Remaining fat or food in t...

Страница 5: ...of electrical shock Before replacing the lamp disconnect the appliance from the power supply Only use lamps with the same specifications Disposal Warning Risk of injury or suffocation Disconnect the appliance from the mains supply Cut off the mains cable and discard it Remove the door catch to prevent children and pets to get closed in the appliance Product description 5 4 9 8 6 7 5 4 1 2 3 2 3 1 ...

Страница 6: ...ance can emit an odour and smoke This is normal Make sure that the airflow is sufficient Daily use Warning Refer to the Safety chapters To use the appliance push the knob The knob comes out Activating and deactivating the appliance 1 Turn the knob for the oven functions to an oven function 2 Turn the knob for the temperature to set the tem perature 3 To deactivate the appliance turn the knob for t...

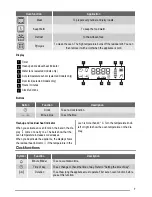
Страница 7: ... Clock To set a clock function Minus plus To set the time Heat up and residual heat indicator When you activate an oven function the bars in the dis play come on one by one The bars show that the oven temperature increases or decreases When you deactivate the appliance the display shows the residual heat indicator if the temperature in the oven is more than 40 C Turn the temperature knob left or r...

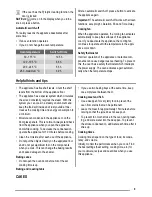
Страница 8: ...ime also if the appliance is off 1 Press again and again until and 00 flash in the display 2 Press or to set the Minute Minder At first the time is calculated in minutes and seconds When the time you set is longer than 60 minutes the symbol comes on in the display The appli ance then calculates the time in hours and mi nutes 3 The Minute Minder starts automatically after five seconds 4 When the se...

Страница 9: ...cycles the steam With this system you can cook in a steamy environment and keep the food soft inside and crusty outside It de creases the cooking time and energy consumption to a minimum Moisture can condense in the appliance or on the door glass panels This is normal Always stand back from the appliance when you open the appliance door while cooking To decrease the condensation operate the applia...

Страница 10: ... mould Christmas cake Rich fruit cake 2 160 2 150 90 120 In a 20 cm cake mould1 Plum cake 1 175 2 160 50 60 In a bread tin1 Small cakes one level 3 170 3 140 150 20 30 In a baking tray Small cakes two levels 2 and 4 140 150 25 35 In a baking tray Small cakes three levels 1 3 and 5 140 150 30 45 In a baking tray Biscuits pastry stripes one level 3 140 3 140 150 30 35 In a baking tray Biscuits pastr...

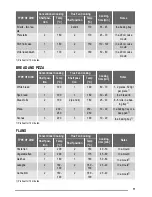
Страница 11: ...posi tion Temp C White bread 1 190 1 190 60 70 1 2 pieces 500 gr per piece1 Rye bread 1 190 1 180 30 45 In a bread tin Bread rolls 2 190 2 2 and 4 180 25 40 6 8 rolls in a bak ing tray1 Pizza 1 230 250 1 230 250 10 20 In a baking tray or a deep pan1 Scones 3 200 3 190 10 20 In a baking tray1 1 Preheat for 10 minutes FLANS TYPE OF DISH Conventional Cooking True Fan Cooking Cooking time min Notes Sh...

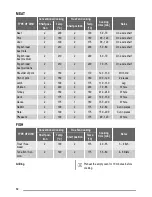
Страница 12: ...er of pork 2 180 2 170 120 150 With rind Shin of pork 2 180 2 160 100 120 2 pieces Lamb 2 190 2 175 110 130 Leg Chicken 2 220 2 200 70 85 Whole Turkey 2 180 2 160 210 240 Whole Duck 2 175 2 220 120 150 Whole Goose 2 175 1 160 150 200 Whole Rabbit 2 190 2 175 60 80 Cut in pieces Hare 2 190 2 175 150 200 Cut in pieces Pheasant 2 190 2 175 90 120 Whole FISH TYPE OF DISH Conventional Cooking True Fan ...

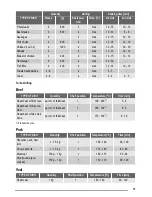
Страница 13: ... 4 max 2 4 2 3 Turbo Grilling Beef TYPE OF DISH Quantity Shelf position Temperature C Time min Roast beef or fillet rare per cm of thickness 1 190 200 1 5 6 Roast beef or fillet me dium per cm of thickness 1 180 190 1 6 8 Roast beef or fillet well done per cm of thickness 1 170 180 1 8 10 1 Preheat the oven Pork TYPE OF DISH Quantity Shelf position Temperature C Time min Shoulder neck ham joint 1 ...

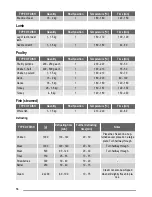
Страница 14: ...1 180 200 80 100 Goose 3 5 5 kg 1 160 180 120 180 Turkey 2 5 3 5 kg 1 160 180 120 150 Turkey 4 6 kg 1 140 160 150 240 Fish steamed TYPE OF DISH Quantity Shelf position Temperature C Time min Whole fish 1 1 5 kg 1 210 220 40 60 Defrosting TYPE OF DISH g Defrosting time min Further defrosting time min Notes Chicken 1000 100 140 20 30 Place the chicken on an up turned saucer placed on a large plate T...

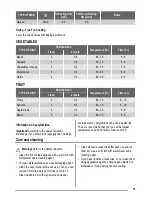
Страница 15: ...ientific knowledge if you brown food specially the one which contains starch acrylamides can pose a health risk Thus we recommend that you cook at the lowest temperatures and do not brown food too much Care and cleaning Warning Refer to the Safety chapters Clean the front of the appliance with a soft cloth with warm water and a cleaning agent To clean metal surfaces use a usual cleaning agent Clea...

Страница 16: ... the function Pyrolysis Refer to Oven func tions 5 When flashes press or to set the neces sary procedure P1 if the oven is not very dirty The procedure is 1 h long P2 if the oven is more dirty The procedure is 1 h 30 min long 6 Press to start the procedure You can use the End function to delay the start of the cleaning When the oven is at the set temperature the door locks The display shows the sy...

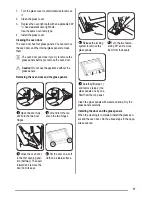
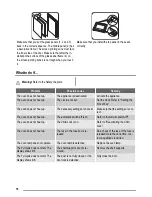
Страница 17: ...glass panels 1 Open the door fully and hold the two door hinges 2 Lift and turn the lev ers on the two hinges 3 Close the oven door to the first opening posi tion halfway Then pull forward and remove the door from its seat 4 Put the door on a soft cloth on a stable surface 5 Release the locking system to remove the glass panels 90 6 Turn the two fasten ers by 90 and remove them from their seats 2 ...

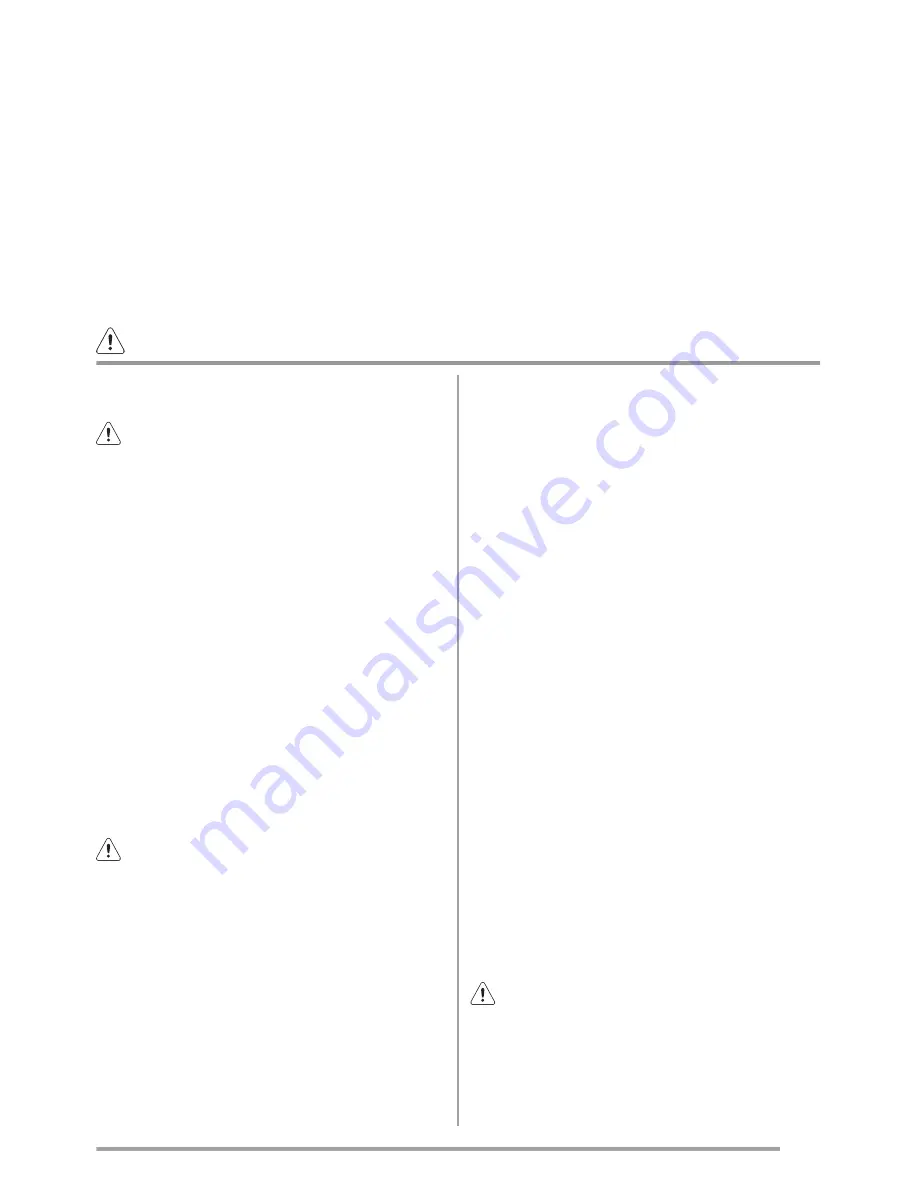
Страница 18: ...the clock Refer to Setting the time of day The oven does not heat up The necessary settings are not set Make sure that the settings are cor rect The oven does not heat up The automatic switch off is on Refer to Automatic switch off The oven does not heat up The Child Lock is on Refer to Deactivating the Child Lock The oven does not heat up The fuse in the fuse box is re leased Do a check of the fu...

Страница 19: ...a ture clockwise three times The acoustic signal sounds three times The demo mode is deactivated The display shows an error code that is not on this list There is an electronic fault 1 Deactivate the appliance with the house fuse or the safety switch in the fuse box and ac tivate it again 2 If the display shows the error code again contact the serv ice centre Steam and condensation collect on the ...

Страница 20: ...in 560 min 550 min 560 600 20 A B Electrical installation Warning Only a qualified person must do the electrical installation The manufacturer is not responsible if you do not follow the safety precautions from the chapter Safety Information This appliance is supplied with a main plug and a main cable 20 ...

Страница 21: ...tead it should be taken to the appropriate collection point for the recycling of electrical and electronic equipment By ensuring this product is disposed of correctly you will help prevent potential negative consequences for the environment and human health which could otherwise be caused by inappropriate waste handling of this product For more detailed information about recycling of this product ...

Страница 22: ... Der Hersteller haftet nicht für Verletzungen oder Schäden die durch eine fehlerhafte Montage entstehen Bewahren Sie die Anleitung zum Nachschlagen auf Sicherheit von Kindern und schutzbedürftigen Personen Warnung Es besteht Erstickungsgefahr das Risiko von Verletzungen oder permanenten Behinderungen Dieses Gerät kann dann von Kindern ab 8 Jahren von Personen mit einge schränkten körperlichen sens...

Страница 23: ...i tung Seien Sie beim Umsetzen des Geräts vorsichtig denn es ist schwer Tragen Sie stets Sicherheits handschuhe Ziehen Sie das Gerät nicht am Türgriff Die Mindestabstände zu anderen Geräten und Kü chenmöbeln sind einzuhalten Stellen Sie sicher dass das Gerät unterhalb von bzw zwischen sicheren Konstruktionen montiert wird Die Seiten des Geräts dürfen nur an Geräte oder Einheiten in gleicher Höhe a...

Страница 24: ...tre ten Bedienen Sie das Gerät nicht mit feuchten oder nas sen Händen oder wenn es mit Wasser in Kontakt ge kommen ist Üben Sie keinen Druck auf die geöffnete Gerätetür aus Benutzen Sie das Gerät nicht als Arbeits oder Ab stellfläche Halten Sie die Tür immer geschlossen wenn das Gerät in Betrieb ist Öffnen Sie die Gerätetür vorsichtig Wenn Sie Zuta ten mit Alkohol verwenden kann ein Alkohol Luftge...

Страница 25: ...bedingt Folgendes Sorgen Sie während und nach der pyrolytischen Reinigung für eine gute Belüftung Sorgen Sie während des ersten Gebrauchs bei Verwendung der Höchsttemperatur für eine gute Belüftung Halten Sie während und nach der pyrolytischen Reinigung Tiere besonders Vögel vom Gerät fern und stellen Sie die Höchsttemperatur erst ein wenn der Bereich ausreichend gelüftet ist Im Gegensatz zu Mensc...

Страница 26: ...ird die neue Zeit automatisch nach fünf Sekunden ge speichert Im Display wird und die eingestellte Stun de angezeigt 00 blinkt 3 Drücken Sie oder um die gewünschten Minu ten einzustellen 4 Mit bestätigen Dies ist nur bei der ersten Ein stellung der Uhrzeit erforderlich Danach wird die neue Zeit automatisch nach fünf Sekunden ge speichert Das Display zeigt die neue Uhrzeit an Ändern der Uhrzeit Sie...

Страница 27: ...tze Zum Backen und Braten auf einer Ebene Die Heizelemente für Ober und Unterhitze sind gleichzeitig eingeschaltet Grillstufe 1 Zum Grillen flacher Lebensmittel in kleinen Mengen in der Mitte des Rostes Zum Toasten Grillstufe 2 Zum Grillen flacher Lebensmittel in größeren Mengen Zum Toasten Das ge samte Grillelement ist eingeschaltet Heißluftgrillen Zum Garen größerer Fleischstücke Das Grillelemen...

Страница 28: ...it Wecker Einstellen einer Countdownzeit Tageszeit Einstellen Ändern oder Abfragen der Tageszeit Siehe Einstellen der Tages zeit Dauer Einstellen der Betriebsdauer Stellen Sie zunächst die gewünschte Ofenfunkti on ein bevor Sie Einstellungen für diese Funktion vornehmen Ende Einstellen der Abschaltzeit für das Gerät Stellen Sie zunächst die gewünschte Ofenfunktion ein bevor Sie Einstellungen für d...

Страница 29: ...kofens überwacht werden Der Garzeitmesser wird gleichzeitig mit dem Backofen eingeschaltet Halten Sie die Tasten und gleichzeitig gedrückt um den Garzeitmesser zurückzusetzen Der Garzeitmesser wird erneut aktiviert Der Garzeitmesser kann nicht verwendet werden wenn die Funktionen Dauer oder Ende eingeschaltet sind Zusatzfunktionen Kindersicherung Wenn die Kindersicherung aktiviert ist kann der Bac...

Страница 30: ...en Back ofenboden und bedecken Sie das Kochgeschirr nicht mit Alu Folie Dies könnte das Garergebnis beein trächtigen und die Emailbeschichtung beschädigen Backen von Kuchen Die Backofentür nicht öffnen bevor 3 4 der Backzeit abgelaufen ist Wenn Sie zwei Backbleche gleichzeitig nutzen las sen Sie eine Ebene dazwischen frei Garen von Fleisch und Fisch Setzen Sie beim Garen von Speisen mit hohem Fett...

Страница 31: ...nenkuchen 1 175 2 160 50 60 Brotform 1 Kleine Kuchen eine Ebene 3 170 3 140 150 20 30 Backblech Kleine Kuchen zwei Ebenen 2 und 4 140 150 25 35 Backblech Kleine Kuchen drei Ebenen 1 3 und 5 140 150 30 45 Backblech Plätzchen Fein gebäck eine Ebene 3 140 3 140 150 30 35 Backblech Plätzchen Fein gebäck zwei Ebenen 2 und 4 140 150 35 40 Backblech Plätzchen Fein gebäck drei Ebenen 1 3 und 5 140 150 35 ...

Страница 32: ...Tempe ratur C Ein schub ebene Tempe ratur C Weißbrot 1 190 1 190 60 70 1 2 Stück 500 g pro Stück1 Roggenbrot 1 190 1 180 30 45 Brotform Brötchen 2 190 2 2 und 4 180 25 40 6 8 Brötchen auf Backblech1 Pizza 1 230 250 1 230 250 10 20 Backblech oder tiefe Bratpfan ne1 Mürbeteigplätz chen 3 200 3 190 10 20 Backblech1 1 10 Minuten vorheizen AUFLÄUFE GERICHT Ober und Unter hitze Heißluft mit Ring heizkör...

Страница 33: ...weinefleisch 2 180 2 180 90 120 Kombirost Kalbfleisch 2 190 2 175 90 120 Kombirost Roastbeef eng lisch rosa 2 210 2 200 50 60 Kombirost Roastbeef eng lisch medium 2 210 2 200 60 70 Kombirost Roastbeef eng lisch durchgebra ten 2 210 2 200 70 75 Kombirost Schweineschulter 2 180 2 170 120 150 mit Schwarte Schweinshaxe 2 180 2 160 100 120 2 Stk Lammfleisch 2 190 2 175 110 130 Keule Hähnchen 2 220 2 20...

Страница 34: ...aks 4 600 4 max 10 12 6 8 Bratwürste 8 4 max 12 15 10 12 Schweinskotelett 4 600 4 max 12 16 12 14 Hähnchen in zwei Hälften 2 1000 4 max 30 35 25 30 Spieße 4 4 max 10 15 10 12 Hähnchenbrustfilet 4 400 4 max 12 15 12 14 Hamburger 6 600 4 max 20 30 Fischfilet 4 400 4 max 12 14 10 12 Belegte Toastbrote 4 6 4 max 5 7 Toast 4 6 4 max 2 4 2 3 Heißluftgrillen Rindfleisch GERICHT Menge Einschubebene Temper...

Страница 35: ...50 Lamm GERICHT Menge Einschubebene Temperatur C Dauer min Lammkeule Lamm braten 1 1 5 kg 1 150 170 100 120 Lammrücken 1 1 5 kg 1 160 180 40 60 Geflügel GERICHT Menge Einschubebene Temperatur C Dauer min Geflügelteile je 200 250 g 1 200 220 30 50 Hähnchenhälften je 400 500 g 1 190 210 35 50 Hähnchen Poularde 1 1 5 kg 1 190 210 50 70 Ente 1 5 2 kg 1 180 200 80 100 Gans 3 5 5 kg 1 160 180 120 180 Pu...

Страница 36: ...n 300 30 40 10 20 Butter 250 30 40 10 15 Sahne 2 x 200 80 100 10 15 Sahne lässt sich auch mit noch leicht gefrorenen Stellen gut aufschlagen Kuchen 1400 60 60 Dörren Heißluft mit Ringheizkörper Backbleche mit Backpapier abdecken GEMÜSE GERICHT Einschubebene Temperatur C Dauer Std 1 Ebene 2 Ebenen Bohnen 3 1 4 60 70 6 8 Paprika 3 1 4 60 70 5 6 Suppengemüse 3 1 4 60 70 5 6 Pilze 3 1 4 50 60 6 8 Kräu...

Страница 37: ... aggressiven Reinigungsmitteln scharfkantigen Gegenständen oder im Geschirrspüler gereinigt wer den Die Antihaftbeschichtung kann dadurch zerstört werden Geräte mit Edelstahl oder Aluminiumfront Reinigen Sie die Backofentür nur mit einem nas sen Schwamm und trocknen Sie sie mit einem weichen Tuch ab Verwenden Sie keine Stahlwolle Säuren oder Scheuer mittel da diese die Oberflächen beschädigen könn...

Страница 38: ...tion Reinigen Durch ein 10 Sekunden langes Blinken von PYR im Display nach jedem Ein und Ausschalten des Geräts werden Sie auf die Notwendigkeit einer Pyrolysereini gung hingewiesen Die Erinnerungsfunktion erlischt im Display Nach Ende der Pyrolose Wenn Sie und gleichzeitig drücken während PYR im Display blinkt Backofenlampe Warnung Gehen Sie beim Austauschen der Backofenlampe sorgsam vor Es beste...

Страница 39: ...in weiches Tuch 5 Lösen Sie das Verrie gelungssystem um die Glasscheiben zu entfer nen 90 6 Drehen Sie die 2 Be festigungselemente um 90 und nehmen Sie sie aus der Halterung 2 1 7 Heben Schritt 1 und entfernen Schritt 2 Sie nacheinander die Glas scheiben Beginnen Sie mit der obersten Glas scheibe Reinigen Sie die Glasscheiben mit Wasser und Spül mittel Trocknen Sie die Glasscheiben sorgfältig ab E...

Страница 40: ...cht Die erforderlichen Einstellungen wurden nicht vorgenommen Vergewissern Sie sich dass die Einstellungen richtig sind Der Backofen heizt nicht Die Abschaltautomatik ist einge schaltet Siehe Abschaltautomatik Der Backofen heizt nicht Die Kindersicherung ist eingeschal tet Siehe Ausschalten der Kindersi cherung Der Backofen heizt nicht Die Sicherung im Sicherungskasten hat ausgelöst Prüfen Sie die...

Страница 41: ...emperatur wahlknopf dreimal im Uhrzei gersinn Ein Signalton ertönt dreimal Der Demo Betrieb ist ausgeschaltet Im Display wird ein Fehlercode an gezeigt der nicht in der Liste steht Ein Elektronikfehler ist aufgetreten 1 Schalten Sie das Gerät über die Haussicherung oder den Schutzschalter im Sicherungs kasten aus und wieder ein 2 Wenn der Fehlercode immer noch angezeigt wird wenden Sie sich an den...

Страница 42: ...ontage Warnung Siehe Sicherheitshinweise Einbau 573 594 5 589 558 548 20 min 550 20 590 min 560 min 550 min 560 600 20 A B Elektroinstallation Warnung Der elektrische Anschluss muss von einer qualifizierten Fachkraft vorgenommen werden 42 ...

Страница 43: ...ipps Das Symbol auf dem Produkt oder seiner Verpackung weist darauf hin dass dieses Produkt nicht als normaler Haushaltsabfall zu behandeln ist sondern an einem Sammelpunkt für das Recycling von elektrischen und elektronischen Geräten abgegeben werden muss Durch Ihren Beitrag zum korrekten Entsorgen dieses Produkts schützen Sie die Umwelt und die Gesundheit Ihrer Mitmenschen Umwelt und Gesundheit ...

Страница 44: ...www electrolux com shop 397292101 B 342012 ...

Отзывы: