background image

2. Wait until the indicator 

 goes off. The indicator 

 is off. The acoustic signal is off.

3. Press programme button to change the setting. The indicator 

 is on. The acoustic signal is on.

4. Press on/off button to confirm the setting.

Before first use

1. Make sure that the current level of the water

softener agrees with the hardness of the water

supply. If not, adjust the level of the water

softener.

2. Fill the salt container.

3. Fill the rinse aid dispenser.

4. Open the water tap.

5. Start a programme to remove any processing

residuals that can still be inside the appliance. Do

not use detergent and do not load the baskets.

When you start a programme, the appliance can take up

to 5 minutes to recharge the resin in the water softener.

It seems that the appliance is not working. The washing

phase starts only after this procedure is completed. The

procedure will be repeated periodically.

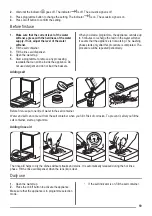
Adding salt

Before first use put one litre of water in the salt container.
Water and salt can come out from the salt container when you fill it. Risk of corrosion. To prevent it, after you fill the

salt container, start a programme.

Adding rinse aid

2

1


1

2

3

4

A

2

1

The rinse aid helps to dry the dishes without streaks and stains. It is automatically released during the hot rinse

phase. Fill the rinse aid dispenser when the lens (A) is clear.

Daily use

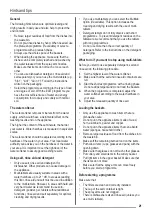
1. Open the water tap.

2. Press the on/off button to activate the appliance.

Make sure that the appliance is in programme selection

mode.

• If the salt indicator is on, fill the salt container.

19

Содержание KDT10001FB

Страница 1: ...KDT10001FB Gebruik saanwijzing Afwasauto maat User Manual Dishwasher Notice d utili sation Lave vais selle...

Страница 2: ...inderen van 8 jaar en ouder en door mensen met beperkte lichamelijke zintuiglijke of verstandelijke vermogens of een gebrek aan ervaring en kennis indien zij onder toezicht staan of instructies hebben...

Страница 3: ...at Aansluiting op het elektriciteitsnet WAARSCHUWING Gevaar voor brand en elektrische schokken Dit apparaat moet worden aangesloten op een geaard stopcontact Controleer of de elektrische informatie op...

Страница 4: ...producten of items die vochtig zijn door ontvlambare producten in bij of op het apparaat Servicedienst Contact opnemen met de klantenservice voor reparatie van het apparaat Wij raden uitsluitend het...

Страница 5: ...oer de opties en de hoeveelheid vaat kan de verbruiks waarden veranderen 2 Dit programma biedt het meest effici nte water en energieverbruik voor normaal bevuild serviesgoed en bestek Dit is het stand...

Страница 6: ...je uit gaat en het indicatielampje gaat knipperen De huidige instelling wordt aangegeven door het aantal knipperen van het indicatielampje einde bijv 5 knipperen pauze 5 knipperen niveau 5 2 Druk op p...

Страница 7: ...tergebleven Gebruik geen afwasmiddel en gebruik de mandjes niet Als u een programma start doet het apparaat er ongeveer 5 minuten over om de hars in de waterontharder te herladen Het lijkt alsof het a...

Страница 8: ...ring van het glansmiddel in op de laagste stand Een programma instellen en starten Een programma starten 1 Laat de deur op een kier staan 2 Druk op de aan uit toets om het apparaat te activeren Zorg d...

Страница 9: ...araat beschadigen Multitabletten zijn doorgaans geschikt voor een waterhardheid tot 21 dH Bij een hogere waterhardheid moet zout glansmiddel en vaatwasmiddel worden gebruikt naast het gebruik van mult...

Страница 10: ...aan de zijkanten en de deur van het apparaat achterblijven Onderhoud en reiniging WAARSCHUWING Schakel het apparaat uit en trek de stekker uit het stopcontact voordat u onderhoudshandelingen verricht...

Страница 11: ...st is doorge brand Het programma start niet Zorg dat de deur van het apparaat is gesloten Het apparaat is begonnen met de oplaadprocedure van de hars in de waterontharder De duur van de procedure is o...

Страница 12: ...orzaak zijn Zie Aanwijzingen en tips voor andere mogelijke oorzaken Technische informatie Afmetingen Breedte hoogte diepte mm 596 818 898 555 Elektrische aansluiting 1 Spanning V 220 240 Frequentie Hz...

Страница 13: ...het te recyclen Help om het milieu en de volksgezondheid te beschermen en recycle het afval van elektrische en elektronische apparaten Gooi apparaten gemarkeerd met het symbool niet weg met het huish...

Страница 14: ...or mental capabilities or lack of experience and knowledge if they have been given supervision or instruction concerning use of the appliance in a safe way and understand the hazards involved Do not...

Страница 15: ...ate agrees with the power supply If not contact an electrician Always use a correctly installed shockproof socket Do not use multi plug adapters and extension cables Make sure not to cause damage to t...

Страница 16: ...pliance Service Contact the Authorised Service Centre to repair the appliance We recommend only the use of original spare parts When you contact the Authorised Service Centre ensure that you have the...

Страница 17: ...hange the values 2 With this programme you have the most efficient use of water and energy consumption for crockery and cutlery with nor mal soil This is the standard programme for test institutes 3 W...

Страница 18: ...dicator e g 5 flashes pause 5 flashes level 5 2 Press the programme button to change the setting Each time you press the button the level increases After level 10 you will start again from level 1 3 P...

Страница 19: ...take up to 5 minutes to recharge the resin in the water softener It seems that the appliance is not working The washing phase starts only after this procedure is completed The procedure will be repea...

Страница 20: ...door ajar 2 Press the on off button to activate the appliance Make sure that the appliance is in programme selection mode 3 Press the programme button until the indicator of the programme you want to...

Страница 21: ...h hard and very hard water we recommend to use solo detergent powder gel tablets without additional functions rinse aid and salt separately for optimal cleaning and drying results If you use multi tab...

Страница 22: ...that there are no residues of food or soil in or around the edge of the sump Put back in place the flat filter C Make sure that it is correctly positioned under the 2 guides Reassemble the filters A...

Страница 23: ...ustic signal sounds 1 time intermittently Make sure that the water tap is open Make sure that the pressure of the water supply is not too low For this information contact your local water authority Ma...

Страница 24: ...ity Place settings 12 Power consumption Left on mode W 0 50 Power consumption Off mode W 0 50 1 Refer to the rating plate for other values 2 If the hot water comes from alternative source of energy e...

Страница 25: ...capacit s physiques sensorielles ou mentales r duites ou d nu es d exp rience ou de connaissance s ils si elles sont correctement surveill e s ou si des instructions relatives l utilisation de l appa...

Страница 26: ...ambiante est inf rieure 0 C Suivez scrupuleusement les instructions d installation fournies avec l appareil Connexion lectrique AVERTISSEMENT Risque d incendie ou d lectrocution L appareil doit tre r...

Страница 27: ...e lavage sur la vaisselle De la vapeur chaude peut s chapper de l appareil si vous ouvrez la porte pendant le d roulement d un programme Ne placez pas de produits inflammables ou d l ments imbib s de...

Страница 28: ...erts Lavage 60 C ou 65 C Rin ages 30 0 8 9 4 Tous Pr lavage 14 0 1 4 1 Les valeurs de consommation peuvent changer en fonction de la pression et de la temp rature de l eau des variations de l alimenta...

Страница 29: ...glages seront sauvegard s jusqu ce que vous les changiez nouveau Fonction Reset Appuyez sur la touche de programme jusqu ce que tous les voyants de programme s allument mode Programmation Avec cette f...

Страница 30: ...uyez sur la touche de programme pour modifier le r glage Le voyant est allum Le signal sonore est activ 4 Appuyez sur la touche Marche Arr t pour confirmer le r glage Avant la premi re utilisation 1 A...

Страница 31: ...Remplissez le distributeur de liquide de rin age lorsque l indicateur A est vide Utilisation quotidienne 1 Ouvrez le robinet d eau 2 Appuyez sur la touche Marche Arr t pour allumer l appareil Assurez...

Страница 32: ...che Arr t au bout de quelques minutes apr s la fin du programme tous les voyants s teignent Cela permet de diminuer la consommation d nergie Conseils Raccordement Les conseils suivants vous garantisse...

Страница 33: ...nt multifonctions Avant de commencer utiliser du produit de lavage du sel r g n rant et du liquide de rin age s par ment effectuez la proc dure suivante 1 R glez l adoucisseur d eau au niveau maximal...

Страница 34: ...e des bras d aspersion Ne retirez pas les bras d aspersion Si des r sidus ont bouch les orifices des bras d aspersion liminez ceux ci l aide d un objet fin et pointu Nettoyage ext rieur Nettoyez l app...

Страница 35: ...vous que le robinet d eau est ouvert Assurez vous que la pression de l eau n est pas trop faible Pour conna tre cette information contactez votre compagnie locale de distribution des eaux Assurez vous...

Страница 36: ...u liquide de rin age soit en cause Pour trouver d autres causes possibles reportez vous au chapitre Conseils Caract ristiques techniques Dimensions Largeur hauteur profondeur mm 596 818 898 555 Branch...

Страница 37: ...les conteneurs pr vus cet effet Contribuez la protection de l environnement et votre s curit recyclez vos produits lectriques et lectroniques Ne jetez pas les appareils portant le symbole avec les ord...

Страница 38: ...38...

Страница 39: ...39...

Страница 40: ...www electrolux com shop 156969811 A 502014...

Отзывы: