ZALMAN RESERATOR1 V2 Скачать руководство пользователя страница 2

RESERATOR 1 V2

2

The specifications of any product may change without prior notice to improve performance.

1. Make sure that the power source’s output voltage and frequency are compatible with

the power input requirements of the water pump before installing(Input voltage and

frequency of the water pump are shown on the box and sink cover).

2. Do not place in dusty or humid conditions, under direct sunlight, or near a heat source

such as a room heater.

3. Do not drop or subject to excessive force.

4. CPU socket compatibility must be checked.

5. Familiarize yourself with this manual.

6. Do not mix any contaminant with the coolant when filling, for it may cause product failure.

7. Check for leaks on water block before the installation.

Installation Notes

1. Use a power strip with a power switch, and connect both PC and Reserator 1 V2 to

the power strip to allow simultaneous power ON/OFF switching.

2. Always turn on the water pump first before using the system.

3. If the coolant isn’t circulating or the pump is making a strange noise, turn the PC OFF 

immediately.

4. Do not place any objects on the product.

5. Install on a flat surface with no vibration or slant, and do not tilt or lay horizontally.

6. Use distilled water for coolant, regularly check the amount of coolant, and replenish

as needed.

7. If a leak is found, turn off the system immediately and examine the problem before

using the system again.

8. If the system will not be used for an extended period of time, turn the Water Pump OFF.

9. When moving the system, separate the reserator from the PC case before moving.

10. Do not let any air bubbles form in the Water Block and tubes during operation.

11. Always check that the water pump is functioning properly.

Operational Notes

Zalman  Tech  Co.,  Ltd.  is  not  responsible  for  any  damages  due  to  external  causes,

including  but  not  limited  to,  improper  use,  problems  with  electrical  power,  accident,

neglect, alteration, repair, improper installation, or improper testing.

Disclaimer

Installation and Operational Notes

Содержание RESERATOR1 V2

Страница 1: ...and watch the RESERATOR 1 V2 installation video for an installation overview Pleasereadthismanualthoroughlybeforeinstallation Thespecificationsofthisproductanditscomponentsmaychangewithoutpriornotice...

Страница 2: ...ys turn on the water pump first before using the system 3 If the coolant isn t circulating or the pump is making a strange noise turn the PC OFF immediately 4 Do not place any objects on the product 5...

Страница 3: ...servoir radiator and water pump into one system for easy operation It is anodized and comes with a custom coolant to prevent corrosion The new CPU Water Block ZM WB4 Gold VGA Water Block ZM GWB3 and t...

Страница 4: ...r allows simple installation 1 4 Northbridge Water Block ZM NWB1 Optional This anodized pure aluminum block is built for high performance cooling and is designedforcompatibilitywithawidevarietyofnorth...

Страница 5: ...mensions 63 L x 63 W x 16 5 H mm 4 Compatibility Intel Pentium 4 Socket 775 478 AMD Sempron AMD64 Athlon 64 Athlon 64 FX Opteron Socket 754 939 940 2 3 VGA Water Block ZM GWB3 1 Weight 100 g 2 Materia...

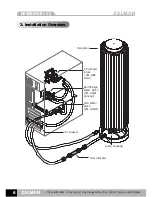
Страница 6: ...f any product may change without prior notice to improve performance 3 Installation Overview Reserator CPU Water Block ZM WB4 Gold VGA Water Block ZM GWB3 I O Bracket Flow Indicator Quick Coupling Nor...

Страница 7: ...k ZM WB4 Gold 1SET Please refer to the separately provided manual for the ZM WB4 Gold 4 3 VGA Water Block ZM GWB3 1SET Please refer to the separately provided manual for the ZM GWB3 4 5 Coolant ZM G20...

Страница 8: ...re aluminum block is built for high performance cooling and is designed for Motherboard compatibility with a wide variety of northbridge chipsets VGA RAM Water Block ZM RWB1 This VGA RAM Water Block i...

Страница 9: ...air pressure may prevent proper initial operation 5 3 Install the CPU Water Block ZM WB4 Gold 1 Refer to the manual included with the ZM WB4 Gold for installation instructions 2 If physical interfere...

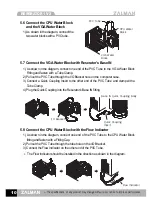
Страница 10: ...omputer case 3 Connect a Quick Coupling Insert to the other end of the PVC Tube and clamp with a Tube Clamp 4 Plug the Quick Coupling into the Reserator s Base IN fitting 5 8 Connect the CPU Water Blo...

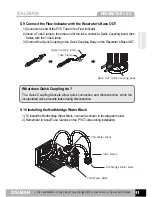
Страница 11: ...the Quick Coupling to the Quick Coupling Body on the Reserator s Base OUT What does Quick Coupling do The Quick Coupling Sockets allow quick connection and disconnection while the incorporated valve p...

Страница 12: ...ose ends 5 12 Fill the Coolant 1 Take off the Sink Cover on top of the Reserator 2 Fill with the provided coolant ZM G200 and two liters of distilled water Note 1 The provided coolant is a concentrate...

Страница 13: ...bubbles 3 Check each fitting for leaks If there is a leak circuitry and other components may short circuit and malfunction so be careful 4 If there is a leak turn the pump off immediately wipe the are...

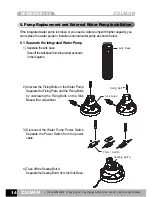
Страница 14: ...Water Pump Separate the Fixing Plate and the Fixing Bolts by unscrewing the Fixing Bolts on the Sink Base with a screwdriver 3 Disconnect the Water Pump Power Switch Separate the Power Switch from th...

Страница 15: ...e the Integrated Water Pump Pull the Water Pump off the Sink Base as shown in the diagram 8 Put on the Sealing Bolt B After removing the Cable Fitting screw on the Sealing Bolt B Fasten tightly If thi...

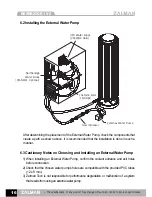
Страница 16: ...e It is recommended that the installation is done in such a manner 1 When installing an External Water Pump confirm the coolant entrance and exit holes before connection 2 Check that the chosen water...

Страница 17: ...osures that operate without the use of a fan TNN Computer Enclosures use the aluminum enclosure itself as a heatsink They are ideal for environments that require silence as well as for home theatre sy...

Страница 18: ......

Отзывы: