ZALMAN RESERATOR1 V2 Скачать руководство пользователя страница 15

15

English

RESERATOR 1 V2

The specifications of any product may change without prior notice to improve performance.

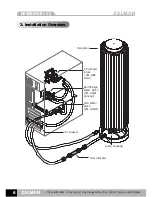
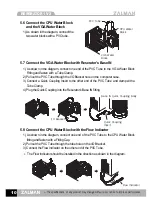
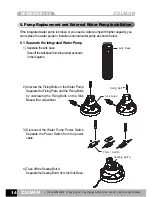
5) Take out the Power Cable  

Pull the Water Pump power cable out 

through the Cable Hole.

6) Remove the Cable Fitting 

Take the Cable Fitting out of the hole as
shown in the diagram by using a screwdriver

or an awl.

7) Remove the Integrated Water Pump 

Pull the Water Pump off the Sink Base

as shown in the diagram.

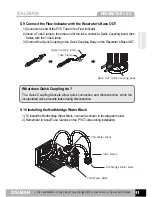
8) Put on the Sealing Bolt B 

After removing the Cable Fitting, screw
on  the  Sealing  Bolt  B.  Fasten  tightly. 

If this is not done properly, it may cause
leakage.

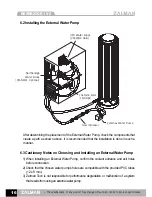
9) Reassemble the Sink Base 

After  all  the  steps  are  taken,  reattach

the Sink Base to the main body firmly.
Take  proper  care  in  doing  this  as

leakage may result if not done correctly.

Sealing Bolt A

Water Pump

Power Cable

Cable Hole

Cable Fitting

Water Pump

Cable Fiting

Sealing Bolt B

Содержание RESERATOR1 V2

Страница 1: ...and watch the RESERATOR 1 V2 installation video for an installation overview Pleasereadthismanualthoroughlybeforeinstallation Thespecificationsofthisproductanditscomponentsmaychangewithoutpriornotice...

Страница 2: ...ys turn on the water pump first before using the system 3 If the coolant isn t circulating or the pump is making a strange noise turn the PC OFF immediately 4 Do not place any objects on the product 5...

Страница 3: ...servoir radiator and water pump into one system for easy operation It is anodized and comes with a custom coolant to prevent corrosion The new CPU Water Block ZM WB4 Gold VGA Water Block ZM GWB3 and t...

Страница 4: ...r allows simple installation 1 4 Northbridge Water Block ZM NWB1 Optional This anodized pure aluminum block is built for high performance cooling and is designedforcompatibilitywithawidevarietyofnorth...

Страница 5: ...mensions 63 L x 63 W x 16 5 H mm 4 Compatibility Intel Pentium 4 Socket 775 478 AMD Sempron AMD64 Athlon 64 Athlon 64 FX Opteron Socket 754 939 940 2 3 VGA Water Block ZM GWB3 1 Weight 100 g 2 Materia...

Страница 6: ...f any product may change without prior notice to improve performance 3 Installation Overview Reserator CPU Water Block ZM WB4 Gold VGA Water Block ZM GWB3 I O Bracket Flow Indicator Quick Coupling Nor...

Страница 7: ...k ZM WB4 Gold 1SET Please refer to the separately provided manual for the ZM WB4 Gold 4 3 VGA Water Block ZM GWB3 1SET Please refer to the separately provided manual for the ZM GWB3 4 5 Coolant ZM G20...

Страница 8: ...re aluminum block is built for high performance cooling and is designed for Motherboard compatibility with a wide variety of northbridge chipsets VGA RAM Water Block ZM RWB1 This VGA RAM Water Block i...

Страница 9: ...air pressure may prevent proper initial operation 5 3 Install the CPU Water Block ZM WB4 Gold 1 Refer to the manual included with the ZM WB4 Gold for installation instructions 2 If physical interfere...

Страница 10: ...omputer case 3 Connect a Quick Coupling Insert to the other end of the PVC Tube and clamp with a Tube Clamp 4 Plug the Quick Coupling into the Reserator s Base IN fitting 5 8 Connect the CPU Water Blo...

Страница 11: ...the Quick Coupling to the Quick Coupling Body on the Reserator s Base OUT What does Quick Coupling do The Quick Coupling Sockets allow quick connection and disconnection while the incorporated valve p...

Страница 12: ...ose ends 5 12 Fill the Coolant 1 Take off the Sink Cover on top of the Reserator 2 Fill with the provided coolant ZM G200 and two liters of distilled water Note 1 The provided coolant is a concentrate...

Страница 13: ...bubbles 3 Check each fitting for leaks If there is a leak circuitry and other components may short circuit and malfunction so be careful 4 If there is a leak turn the pump off immediately wipe the are...

Страница 14: ...Water Pump Separate the Fixing Plate and the Fixing Bolts by unscrewing the Fixing Bolts on the Sink Base with a screwdriver 3 Disconnect the Water Pump Power Switch Separate the Power Switch from th...

Страница 15: ...e the Integrated Water Pump Pull the Water Pump off the Sink Base as shown in the diagram 8 Put on the Sealing Bolt B After removing the Cable Fitting screw on the Sealing Bolt B Fasten tightly If thi...

Страница 16: ...e It is recommended that the installation is done in such a manner 1 When installing an External Water Pump confirm the coolant entrance and exit holes before connection 2 Check that the chosen water...

Страница 17: ...osures that operate without the use of a fan TNN Computer Enclosures use the aluminum enclosure itself as a heatsink They are ideal for environments that require silence as well as for home theatre sy...

Страница 18: ......

Отзывы: