background image

6

2. Unpacking & Assembly Instructions

The boxes and some of the components are heavy.  Two people are required to safely 

complete the assembly process. 

Unpacking 

Do not place painted metal components directly on bricks or concrete as it may scratch 

the paint.  Lay down a sheet of cardboard to sit them on. 

It is recommended to unpack all components and lay them out before beginning 

assembly. 

Assembly Process 

Follow the step by step assembly instructions on the following pages.   

Wear gloves when handling the grease tray and baffle plate as they have a layer of oil to 

prevent rusting during storage in the box. Wipe the excess oil off with paper towel. 

Tools and Fasteners 

All the required fasteners (screws, nuts and bolts) and tools are provided in the shrink-

wrapped package.  Note the letter beside each fastener as they are referred to in the 

assembly instructions.  

Take care when doing up screws so as not to damage the heads as they are made from 

a corrosion resistant metal alloy which is not very hard. 

Always start the thread by hand before final tightening.  If using the electric screwdriver, 

use a low torque, low speed setting to avoid damaging the threads or screw heads. 

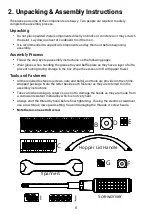
Note there is one extra B screw

B

D

C

G

I

J

700E-XL 2021 Toolkit

F

Hopper Lid Handle

Spanners

Screwdriver

E

Содержание 700E-XL

Страница 1: ...Owner Manual www zgrills com au Z Grills 700E XL Wood Pellet Smoker Grill This owner manual edition is for Z Grills 700E XL V6 with Wireless Controller...

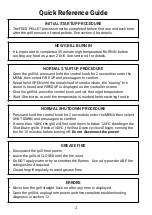
Страница 2: ...and set the target temperature Wait 10 minutes or until the temperature is reached before putting food in NORMAL SHUTDOWN PROCEDURE Press and hold the control knob for 2 seconds to enter the MENU the...

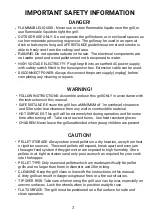
Страница 3: ...UM of 1m overhead clearance and 0 3m side rear clearance from any wall or combustible material HOT SURFACES This grill will be extremely hot during operation and for some time after turning off Take c...

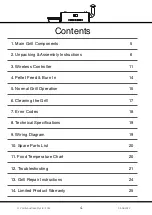
Страница 4: ...ons 6 3 Wireless Controller 11 4 Pellet Feed Burn In 14 5 Normal Grill Operation 15 6 Cleaning the Grill 17 7 Error Codes 18 8 Technical Specifications 19 9 Wiring Diagram 19 10 Spare Parts List 20 11...

Страница 5: ...nsor 7 Thermal Insulating Liner 8 Grill Drum 9 Chimney Cap 10 Chimney Stack 11 Chimney Gasket 12 Grease Bucket 13 Grill Base Cabinet 14 Heat Ba ffl e 15 Vented Grease Tray 16 Bottom Grilling Rack Righ...

Страница 6: ...ate as they have a layer of oil to prevent rusting during storage in the box Wipe the excess oil off with paper towel Tools and Fasteners All the required fasteners screws nuts and bolts and tools are...

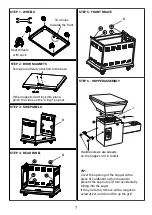
Страница 7: ...cidentally falling into the auger If they do fall in remove with a magnetic screwdriver and do not fi re up the grill STEP 2 DOOR MAGNETS STEP 3 SIDE PANELS Two holes towards the front Rear Wheels wit...

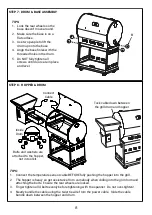
Страница 8: ...Connect the temperature sensor cable BEFORE fully pushing the hopper into the grill 2 The hopper is heavy so get assistance from somebody when sliding into the grill drum and attaching the bolts Ensu...

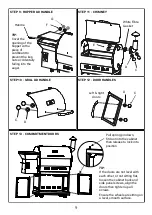
Страница 9: ...i t door into the cabinet then release to lock into position TIP If the doors are not level with each other or not sitting fl at loosen the cabinet back and side panel screws align the doors then tigh...

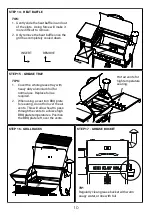
Страница 10: ...y remove the heat ba ffl e once the grill has completely cooled down REMOVE INSERT STEP 15 GREASE TRAY TIPS 1 Cover the whole grease tray with heavy duty aluminium foil for normal use Replace foil as...

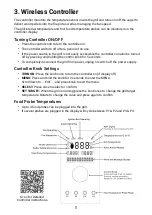
Страница 11: ...essing and holding the control knob for 5 seconds To completely disconnect the grill from power unplug or switch off the power supply Controller Knob Settings TURN ON Press the knob once to turn the c...

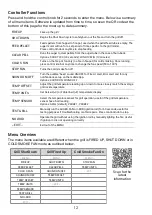
Страница 12: ...Turns on the fi re pot fan only no fi re in fi re pot for cold smoking Once running press control knob at any time to change the fan speed 50 to 100 STOP FAN Turns the cold smoke fan off SOUND ON OFF...

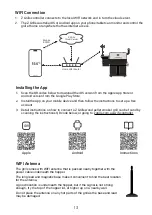
Страница 13: ...llow the instructions to set up a free account 3 Detail instructions on how to connect a Z Grills wood pellet smoker grill can be found by scanning the instructions QR code below or going to zgrills c...

Страница 14: ...lete the New Grill Burn In fi rst time use or normal cooking if already burnt in Burn In This process involves running the grill at a high temperature burning wood pellets for heat to burn o ff any su...

Страница 15: ...on Fire the grill up using the normal process and then set the target temperature If the power is off for more than 30 seconds OPEN THE GRILL LID and FIRE UP using the normal process Once there is smo...

Страница 16: ...h fresh wood pellets High Temperature Searing This Z Grills 700E XL V6 features a vented grease tray that allows for high temperature searing on the left hand side of the grill A BBQ plate or skillet...

Страница 17: ...Ash accumulates in the fi re pot and the base of the grill drum Vacuum out after each long cook or every 5kg of wood pellets used Only vacuum when the grill is cold switched OFF and unplugged from pow...

Страница 18: ...er may not be functioning properly Please contact our support team ERROR 3 FLAME OUT The temperature of the grill has dropped possibly due to the fi re going out Possible reasons include Grill may hav...

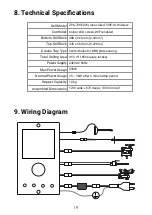
Страница 19: ...8 x 660 mm 0 322m2 Top Grill Rack 345 x 660 mm 0 228m2 Grease Tray Type Vented holes for BBQ plate searing Total Grilling Area 0 55 m2 850 square inches Power Supply 240VAC 50Hz Max Power Usage 250W N...

Страница 20: ...Grill Rack ZG 700 TWIN MGRACK 11 Food Temperature Chart Safe Food Time Guide 2 hours Refrigerate or use immediately 2 4 hours Use immediately 4 hours Throw out Food left sitting between 5 C 60 C for C...

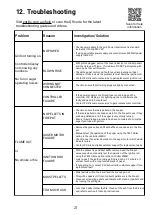
Страница 21: ...f they are being delivered and if the auger is very slowly turning Ensure Initial Startup procedure has been completed to prime the auger feed tube with pellets AUGER MOTOR FAILURE Remove the grease t...

Страница 22: ...Incorrect Grill Temperature DIRTY TEMP SENSOR Clean the Grill Temperature Sensor to ensure accurate temperature readings FAULTY CONTROLLER or FAULTY TEMPERATURE SENSOR If the grill temperature is cons...

Страница 23: ...ER TUBE and HOPPER or HIGH TEMP OPERATION WITH LID OFTEN OPEN or HIGH TEMP OPERATION IN WINDY CONDITIONS or DIRECTLY TURNING FROM HIGH TEMPERATURE TO SHUT DOWN DO NOT pour any water into the Hopper St...

Страница 24: ...type of fuse widely available from electrical suppliers and retailers DANGER HIGH VOLTAGE Unplug the grill from electric power supply before completing any repairs Only plug into power once all repair...

Страница 25: ...ing the ceramic coated grill racks may become cracked or chipped resulting in exposed metal that may show signs of rust This is normal and is not covered under this limited warranty Z Grills shall not...

Страница 26: ...code Or go to zgrills com au help Knowledge Centre To get the most out of your smoker scan the QR code to visit our Knowledge Centre Articles are regularly added and updated covering a wide range of t...

Отзывы: