4
Pairing the wireless 6-in-1 sensor with the console
1 . Unscrew the battery door at the bottom of the unit
and insert the batteries according to the polarity
information marked on the battery compartment .
2 . Screw on tightly .
3 . Once the batteries are installed, the transmission
status LED will begin to flash.
NOTE:
-Ensure the battery door screw locked well .
-
Ensure the transmission status LED is flashing
every 12 seconds .
Installing the wireless outdoor sensor
Install the wireless outdoor sensor to an open location with no obstructions above and around
the sensor for accurate rain and wind measurement .
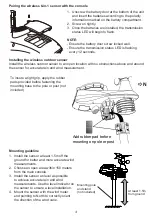
To insure a tight grip, apply the rubber
pads provided before fastening the
mounting base to the pole or post (not
included) .
Add rubber pad before
mounting on pole or post
N
Mounting guideline
1 . Install the sensor at least 1 .5m off the
ground for better and more accurate wind
measurements .
2 . Choose an open area within 150 meters
from the main console .
3 . Install the sensor as level as possible
to achieve accurate rain and wind
measurements . Use the level indicator on
the sensor to ensure a level installation .
4 . Mount the sensor with the wind meter
end pointing to North to correctly orient
the direction of the wind vane .
Mounting pole
and stand
(not included)
At least 1 .5m
from ground


