background image

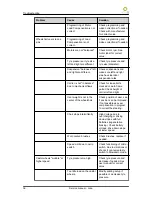
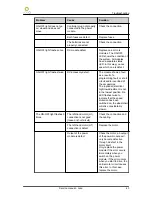
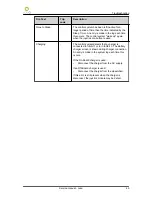
Problem

Cause

Solution

Service indicator flashes
once

User error.
This is probably a 'STALL'
timeout.

Put the joystick in neutral
and try again.

Service indicator flashes
twice

Battery fault.

Check batteries and
cabling. Charge the
batteries or replace them.

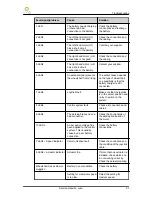
The ON-OFF light flashes 3
times.

The left-hand motor (m1)
connection is not good.

Check the connection and
the cabling.

The left-hand motor (m1) is
defect.

Replace this motor.

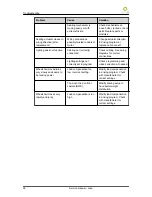
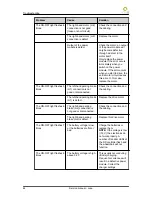
The ON-OFF light flashes 4
times.

The right-hand motor (m2)
connection is not good.

Check the connection and
the cabling.

The m2 motor is defect.

Replace this motor

The ON-OFF light flashes 5
times

The left-hand parking brake
(m1) connection is not
good or disconnected.

Check the connection and
the cabling.

The left-hand parking brake
(m1) is defect.

Replace this motor.

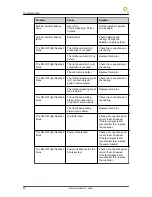
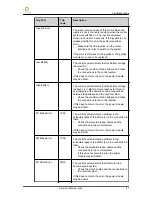
The ON-OFF light flashes 6
times

The right-hand parking
brake (m2) connection is
not good or disconnected.

Check the connection and
the cabling.

The right-hand parking
brake (m2) is defect.

Replace this motor.

The ON-OFF light flashes 7
times

Controller fault

Check all connections and
correct them if needed.
If the fault signal is still
present after this, replace
the controller.

The ON-OFF light flashes 8
times

Power module fault

Check all connections and
correct them if needed.
If the fault signal is still
present after this, replace
the power module.

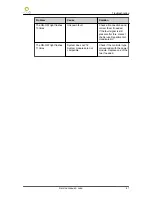
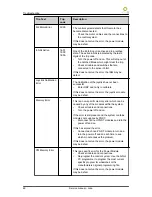
The ON-OFF light flashes 9
times

Communication fault in the
Shark system

Check all connections and
correct them if needed.
If the fault signal is still
present after this, replace
the controller.

Troubleshooting

40

Service manual - Luca

Содержание Luca

Страница 1: ...Service Manual Luca V2 0 from Jan 1st 2015...

Страница 2: ...and modifications The information provided is valid for the product in its standard version Handicare BV cannot be held liable for possible damage resulting from specifications of the product deviatin...

Страница 3: ...aintenance 17 5 2 Carrier 19 5 2 1 Disassemble a motor arm 19 5 2 2 Replace a rubber suspension 19 5 2 3 Replace the carbon brushes 20 5 2 4 Replace a drive motor 20 5 2 5 Install a motor arm 21 5 2 6...

Страница 4: ...e the power module Shark VR2 and R Net 31 6 4 Replace the power module DX2 31 7 Troubleshooting 33 7 1 General diagnostics and faultfinding 34 7 2 Diagnostics and troubleshooting for Shark controls 39...

Страница 5: ...s that are available for this wheelchair User manual wheelchair for general information about the use of the wheelchair User manual for the electronics for detailed information about the use of the co...

Страница 6: ...ir is unattended Service and technical support For information about settings maintenance and repair works please contact you supplier Make sure you have the following information at hand Type Identif...

Страница 7: ...IED BINNEN BUITEN GEBRAUCHSGEBIET INNERHALB AUSSERHALB MAX LOAD MAXBELASTB ZUL GESAMTGEW 160 KG 6002342 A Handicare BV Vossenbeemd 104 5705 CL HELMOND THE NETHERLANDS A C D E B LUQ1400520 A Model B Ye...

Страница 8: ...used Product the electric wheelchair manufactured Handicare BV User the person who actually uses the product Customer the person who obtains the product from Handicare BV Dealer the person company who...

Страница 9: ...d proper maintenance the Customer shall save Handicare BV harmless from and against any claims by Users or other third parties for defects resulting due to improper or careless use of the Product or t...

Страница 10: ...duct in a private capacity provided that such damage is the direct result of a defect in the Product 2 Handicare BV shall indemnify for damage as referred to in article 1 up to the sum covered by its...

Страница 11: ...After use the motors cool down slowly If the wheelchair is not in use make sure that it is not exposed to direct sunlight for lengthy periods of time Some parts of wheelchair such as the seat the bac...

Страница 12: ...lectromagnetic radiation can have influence on the wheelchair For example mobile telephony large scale medical apparatus other sources of electromagnetic radiation it cannot be excluded that the wheel...

Страница 13: ...CL HELMOND THE NETHERLANDS A C D E B LUQ1400520 A check manual before using B Danger of crushing Be careful when swinging the controller aside to avoid getting anything crushed C Battery charging conn...

Страница 14: ...by the user Wheelchair and upholstery Clean Weekly by the user Electrical system Inspection Twice a year every 6 months Batteries Inspection Twice a year every 6 months Drive Inspection Twice a year e...

Страница 15: ...ver Phillips head Rubber mallet Pair of wire cutters Circlip pliers Waterpump pliers Open ended spanner sizes 10 13 17 19 Ring spanner sizes 10 13 17 19 Torque wrench up to 60 Nm with sockets sizes 10...

Страница 16: ...Wizard USB set dealer DWIZ KIT DWD DLR U x x x 9003295 PGDT R Net programmer OEM D50611 x 6000614 GDT VR2 PC Programmer B set D50145 x Universal meter voltage and resistance x x x x x 4 4 Torque tabl...

Страница 17: ...the wheelchair via the button on the controller 2 Set both freewheel switches in Drive mode 3 Remove the covers A and B Low carrier see step 4 High carrier see step 5 4 Low carrier Press down 1 in the...

Страница 18: ...Disconnect the motor cable A from the interconnection of the power module A WARNING After repairing reprogramming or replancing parts always check the functionality of the entire wheelchair Pay speci...

Страница 19: ...rubber suspension E is not screw fixed but may need some help to loosen from the motor arm 5 Take the motor cable out of the carrier E E D C B A A number of parts are now accessible for repairs See t...

Страница 20: ...A 2 Unfold the washer D 3 Remove screw B 4 Remove the drive wheel E from the motor axle Make sure that you do not loose the key I 5 Remove the mudguard G for easy access D C B A E F G H I C 6 Remove t...

Страница 21: ...o the gap on the motor arm 3 Fasten the motor arm to the carrier frame Use some Loctite 648 to secure the screw B 4 Connect the motor cable to the interconnection of the power module E E D C B A 5 2 6...

Страница 22: ...new lock nut A C B 5 2 8 Replace a castor fork Preparation See section 5 1 Procedure 1 Lift the wheelchair until the wheels are free from the floor Use a lifting platform 2 Remove cap A 3 Remove screw...

Страница 23: ...tion 5 1 Procedure 1 Remove the caps B and the old fuses A 2 Put the new fuses in the fuse holders and put the caps on the fuse holders B A 5 3 Interface all types 5 3 1 Adjust the position of the int...

Страница 24: ...he interface can be adjusted in order to achieve the seat height as required for the user Preparation 1 Set the interface in the maximum tilted position for easy access 2 Prepare the wheelchair for ma...

Страница 25: ...ovement of the mechanism but that the cable does not get jammed by the mechanism 8 Check the functionality of the actuator A C B 5 5 Tilt lift interface 5 5 1 Replace the tilt actuator Preparation 1 S...

Страница 26: ...r cable 7 Make sure that the actuator cable can follow the movement of the mechanism but that the cable does not get jammed by the mechanism 8 Check the functionality of the actuator B A C D 5 6 Legre...

Страница 27: ...k the functionality of the actuator B A D C 5 6 3 Replace the actuator of the central legrest Preparation See section 5 1 Procedure 1 Remove the seat cushion for easy access 2 Disconnect the actuator...

Страница 28: ...tuator of the backrest Preparation See section 5 1 Procedure 1 Remove the seat cushion for easy access 2 Make sure that the backrest is kept in the upright position For instance by placing a support 3...

Страница 29: ...that the backrest is in a horizontal position and that is supported in this position Remove the mounting clip B 4 Remove the screw washer and nut C 5 Remove the old actuator A 6 Remove screw washers...

Страница 30: ...3 Disconnect the actuator cable 4 Remove the circlips B from the pivots C and D at both ends of the actuator A 5 WARNING Make sure that the tilted seat is supported safely Remove the old actuator 6 P...

Страница 31: ...the selection and the system will beep when confirmed 5 Switch the controls off and on again to activate the new settings 1 2 3 4 A D B C For REM550 1 Replace the remote control 2 Switch on the contro...

Страница 32: ...drive profile selection bar A for 3 seconds This confirms the selection and the system will beep when confirmed 5 Switch the controls off and on again to activate the new settings 1 2 3 4 A D B C For...

Страница 33: ...for the wheelchair in general the other tables show information about troubleshooting for the available controls systems NOTICE If the problem is not solved with the help of the solutions in the table...

Страница 34: ...ons and restore if needed Battery voltage too low Measure battery voltage and charge batteries Battery defect Measure battery voltage Voltage below 10 V can indicate that one battery is defect Replace...

Страница 35: ...rrectly or is not functioning properly Controllers switch to SystemSlowDown mode Check Gyro cabling and or replace Gyro module Wheelchair only drives well for a short period of time Current limit is s...

Страница 36: ...d or worn frame parts Check height of carrier left and right User weight is not in the center of the wheelchair Check position of user see if position can be improved If not possible use veer compensa...

Страница 37: ...lt status when actuator is operated Actuator has a short circuit that becomes active when the actuator is operated Replace actuator Actuator inhibit is active Check program to see what actuator inhibi...

Страница 38: ...wiring diagrams for correct connections Lighting settings not correctly set in program Check programming and make corrections if needed Wheelchair moves turns very slowly and seems to be lacking power...

Страница 39: ...tteries before you change any cables fuses and or modules This way the power way is disconnected from the wheelchair NOTICE For more detailed information about Shark Controllers specific manuals can b...

Страница 40: ...ed Check the connection and the cabling The left hand parking brake m1 is defect Replace this motor The ON OFF light flashes 6 times The right hand parking brake m2 connection is not good or disconnec...

Страница 41: ...If the fault signal is still present after this contact the Service Department of Handicare BV The ON OFF light flashes 11 times System does not fit System modules are not compatible Check if the con...

Страница 42: ...batteries before you change any cables fuses and or modules This way the power is disconnected from the wheelchair NOTICE For more detailed information about DX2 Controllers specific manuals can be do...

Страница 43: ...ories The optional electrical high low adjustment is not in the lowest position De LED flashes twice to indicate that the speed limitation has been switched on the wheelchair will drive considerably s...

Страница 44: ...not good or disconnected Check the connection and the cabling The left hand parking brake m1 is defect Replace the drive motor The ON OFF light flashes 6 times The right hand parking brake m2 connecti...

Страница 45: ...ervice Department of Handicare BV The ON OFF light flashes 11 times STALL overload error a motor continuously demands too much power Check the drive units Note This error is often caused by taking obs...

Страница 46: ...the batteries before you change any cables fuses and or modules This way the power is disconnected from the wheelchair NOTICE For more detailed information about R Net Controllers specific manuals ca...

Страница 47: ...overcharging of the batteries or bad connections between the batteries and the control system Check the condition of the batteries and check the connections to the control system If this does not solv...

Страница 48: ...is does not solve the error the joystick module may be defect Memory Error This is a non specific memory error which can be caused by any of the modules within the system Check all cables and connecti...

Страница 49: ...The control system detects that a charger is connected to Inhibit 1 or to in Inhibit 3 The Battery charger screen is shown during charger connection An entry is made in the system log each time this o...

Страница 50: ...ables fuses and or modules This way the power way is disconnected from the wheelchair NOTICE For more detailed information about VR2 Controllers specific manuals can be downloaded from the website www...

Страница 51: ...harger is still connected 7 LEDs Joystick fault Make sure that the joystick is in the center position and re try to switch on the system 8 LEDs Control system fault Check all connections and cables 9...

Страница 52: ...r is being limited for safety reasons The extact cause depends on the type of wheelchair most common cause is that the seat is in the elevated position Actuator LED flashes The actuator may be inhibit...

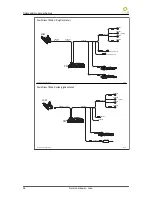
Страница 53: ...rk Battery Motor connections Drive only Shark 1 Cable lenghts are not drawn to scale Shark 2 Batteries Motor Motor 9002473 6000573 6000573 1x 70A JSM PM 6000043 PM 6000759 6000038 6000039 6000038 6000...

Страница 54: ...ecline Lights optional Shark 4 Lighting 6000039 6000038 6000039 6000038 Tilt 45 Inhibit Switch Lift Inhibit Switch Tilt 6000759 1003239 0 6 m 6000215 Lift 6000792 2 5 m JSM PM Tilt 45 6000038 6000039...

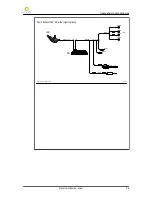
Страница 55: ...to scale Shark EQlass Tilt30 Recline Lights optional JSM Tilt 30 6000038 6000039 6000038 6000039 Lighting Recline 6000759 PM 9002615 1002945 1 5 m 6000215 Shark 5 6000778 6000778 Cable and module sch...

Страница 56: ...tors Gyro optional 6000333 6000333 9002615 6000333 Tilt 45 Recline ACI BUS 1 2 3 4 6000216 00355 0018 1 75 m 00355 0018 1 75 m PM 6000688 ACT4 JSM Legrest Left Legrest Right 9002616 9002616 9001233 90...

Страница 57: ...6000216 6000039 6000038 6000039 6000038 6000333 6000333 Foot Plate Elevation Legrest Angle 9002615 6000333 Tilt 45 Recline Inhibit Switch Lift Inhibit Switch Tilt 6000636 ACI BUS 1 2 3 4 00355 0018 1...

Страница 58: ...16 Legrest Right Legrest Left 6000333 6000333 Gyro Qontroll optional 1 2 BUS ACI REM550 only DX2 5 Lighting 6000216 6000039 6000038 6000039 6000038 9002615 6000333 Tilt 45 Recline Inhibit Switch Lift...

Страница 59: ...01233 9001233 01502 1110 01502 1110 REM550 REM420 DX2 7 6000333 6000333 Lighting 6000216 6000039 6000038 6000039 6000038 Tilt 45 Inhibit Switch Lift Inhibit Switch Tilt 6000636 ACI BUS 1 2 3 4 JSM DX2...

Страница 60: ...ch Lift Inhibit Switch Tilt 6000637 FWD 9002614 1 5 m RWD 9002613 2 1 m 6000423 6000332 6000332 VR2 2 FWD 9002612 0 6 m RWD 9002614 1 5 m 9002258 1 6 m 9002305 0 5 m RWD Only JSM VR2 Battery Motor con...

Страница 61: ...ecline Lights optional Cable lenghts are not drawn to scale 9002615 Recline 9002614 Lighting 6000039 6000038 6000039 6000038 6000332 6000332 6000423 9002614 VR2 3 9002258 1 6 m Cable and module scheme...

Страница 62: ...e not drawn to scale 6000217 Lighting 6000039 6000038 6000038 6000039 6000217 Lighting R Net 2 Batteries Motor Motor 9002774 9002347 2x 50A Cable lenghts are not drawn to scale R Net Battery Motor con...

Страница 63: ...eft 9002616 9001233 01502 1110 9002615 9002612 Recline Lift 9002613 Tilt 45 9003916 R Net 4 9003916 Tilt 45 9002613 Lift Recline 9002612 9002615 9002612 9002612 Cable lenghts are not drawn to scale JS...

Страница 64: ...9 Version history Version Release date Changes V1 0 Oct 22nd 2013 First released version V2 0 Jan 1st 2015 New company name Version history 64 Service manual Luca...

Отзывы: