NOTE: Some electronic thermostats do not have
adjustable heat anticipators. They may have other
type cycle rate adjustments. Follow the thermostat
manufacturer’s instructions.
The 24-volt, 40 VA transformer is sized for the furnace compo-
nents only, and should not be connected to auxiliary devices
such as humidifiers, air cleaners, etc. The transformer may
provide power for an air conditioning unit contactor.
SAFETY CONTROLS
Blower Door Safety Switch
This unit is equipped with an electrical interlock switch mounted
in the blower compartment. This switch interrupts all power at the
unit when the panel covering the blower compartment is removed.
WARNING: Blower and burner must never be oper-
ated without the blower panel in place.
Electrical supply to the unit is dependent upon the panel that
covers the blower compartment being in place and properly
positioned.
CAUTION: Main power supply to the unit must still be
interrupted at the main power disconnect switch be-
fore any service or repair work is to be done to the
unit. Do not rely upon the interlock switch as a main
power disconnect.
Rollout Switch Controls
These controls are mounted on the burner assembly. If the
temperature in the burner compartment exceeds its set point,
the igniter control and the gas valve are de-energized. This is
a manual reset control and must be reset before operation can
continue. The operation of this control indicates a malfunction
in the combustion air blower or a blocked vent pipe connection.
Pressure Switch
This furnace is supplied with a differential pressure switch
which monitors the flow through the furnace and venting sys-
tem. This switch de-energizes the ignition control module and
the gas valve if any of the following conditions are present:
1. Blockage of internal flue gas passageways.
2. Blockage of vent piping.
3. Failure of combustion air blower/motor.
Limit Control
There is a high temperature limit control located on the furnace
vestibule panel just to the right and above the gas valve. This
is an automatic reset control and provides over temperature
protection due to reduced airflow, such as a dirty filter.
START-UP AND ADJUSTMENTS
The initial start-up of the furnace requires the following addi-
tional procedures.
1. When the gas supply is initially connected to the furnace,
the gas piping may be full of air. In order to purge this air,
it is recommended that the ground joint union be loosened
until the odor of gas is detected. When gas is detected,
immediately retighten the union and check for leaks. Allow
five minutes for any gas to dissipate before continuing with
the start-up procedure.
2. All electrical connections made in the field and in the
factory should be checked for proper tightness.
IGNITION SYSTEM CHECKOUT/ADJUSTMENT
1. Turn the gas supply ON at external valve and main gas valve.
2. Set the thermostat above room temperature to call for heat.
3. System start-up will occur as follows:
a. The venter motor will start and come up to speed.
Shortly after venter start-up, the hot surface igniter will
glow for about 45 seconds.
b. After this warm-up cycle, the ignition module will ener-
gize (open) the main gas valve for seven seconds.
c. The burners light and are sensed by the remote sensor.
NOTE: Burner ignition may not be satisfactory on first
start-up due to residual air in gas line, or until gas
pressure (manifold) is adjusted.
4. With the furnace in operation, paint the pipe joints and
valve gasket lines with a rich soap and water solution.
Bubbles indicate a gas leak. Take appropriate steps to stop
the leaks. If the leak persists, replace the component.
WARNING: DO NOT omit this test! NEVER use a
flame to check for gas leaks.
CHECKING GAS INPUT
1. Turn off all other gas appliances connected to gas meter.
2. With the furnace turned on, measure the time needed for
one revolution of the hand on the smallest dial on the
meter. A typical domestic gas meter usually has a 1/2 or 1
cubic foot test dial.
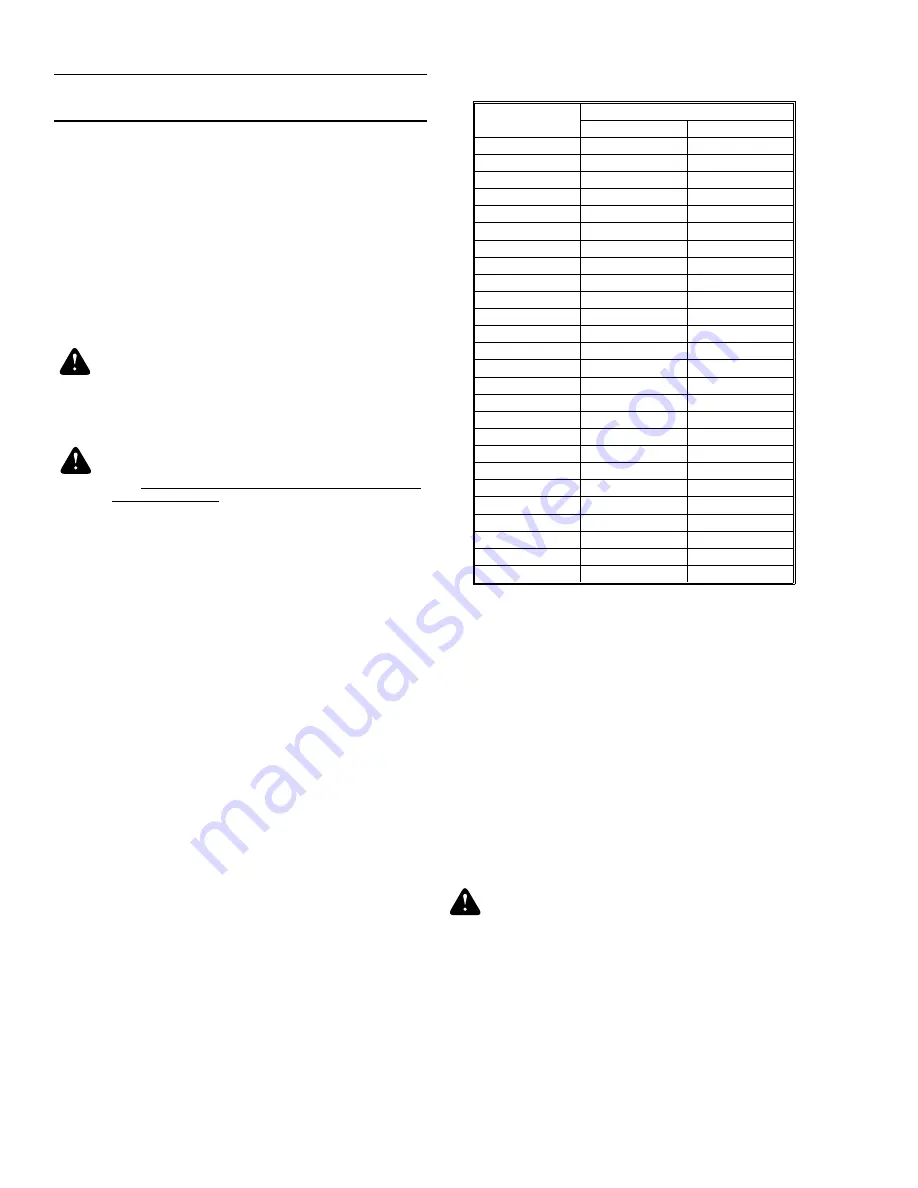
3. Using the number of seconds for each revolution and the
size of the test dial increment, find the cubic feet of gas
consumed per hour from Table 2.
Seconds for
One Revolution
Size of Test Dial
1/2 cubic foot
1 cubic foot
10
180
360
12
150
300
14
129
257
16
113
225
18
100
200
20
90
180
22
82
164
24
75
150
26
69
138
28
64
129
30
60
120
32
56
113
34
53
106
36
50
100
38
47
95
40
45
90
42
43
86
44
41
82
46
39
78
48
37
75
50
36
72
52
35
69
54
34
67
56
32
64
58
31
62
60
30
60
TABLE 2 - GAS RATE (Cubic Feet Per Hour)
Set the heat anticipator in the room thermostat to 1.16 amps.
Setting it higher will cause the room thermostat to exceed
the setpoint.
650.64-N4
8
Unitary Products Group


