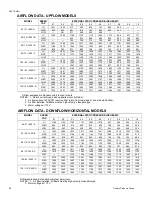
York 65075-N4U Скачать руководство пользователя страница 13

VENT 

CLEARANCES 

    (2-PIPE) 

U.S. 

ONLY

  Dryer Vent ..........................................................3 ft.
  Plumbing Vent Stack ............................................3 ft.
 Gas 

Appliance 

Vent 

Terminal ...............................3 

ft.*

  From any mechanical
    fresh air intake ....................................................1 ft.
  From any door, window or non-mechanical
    fresh air or combustion air intake .......................1 ft.
  Above grade and anticipated
    snow depth .........................................................1 ft.
  Above grade when adjacent to
    a public walkway ................................................7 ft.
  From electric, gas meters, 
   regulators and relief equipment - 
    min. horizontal distance  .....................................4 ft.

  * Does not apply to multiple installations of this furnace
   model. Refer to multi-unit vent terminations.

NOTE: Consideration must be given for degradation of building

materials by flue gases.

NOTE: Shaded components of the combustion air/vent system

shown in the following figures are considered to be part of
the vent terminal. These components should not be
counted when determining piping limitations. Refer to Fig-
ures 15 - 19

.

 Sidewall termination may require sealing or

shielding of building surfaces with a corrosive resistance
material to protect against combustion product corrosion.

VENTING MULTIPLE UNITS

Each unit must have its own intake/vent piping and termination.
Do not use common pipes for combustion air or venting. The
vent terminals must be located as shown in Figures 20 & 21.

PIPING ASSEMBLY

The final assembly procedure for the vent/combustion air piping
is as follows:

1.  Cut piping to the proper length, beginning at the furnace.

2.  Deburr the piping inside and outside.

3.  Chamfer the outer edges of the piping.

4.  Dry-fit the entire vent/combustion air piping assembly.

5. Disassemble the piping and apply cement primer and

cement per the cement manufacturer’s instructions.
Primer and cement must conform to ASTM D2564 for
PVC, or ASTM D2235 for ABS piping.

In Canada, refer to CAN/CGA-B149.1 or .2 Installation Code
(latest edition - Venting Systems and Air Supply)

VENT

OVERHANG

COMBUSTION AIR

(ELBOW PARALLEL TO WALL)

12" SEPARATION BETWEEN

BOTTOM OF COMBUSTION AIR

AND BOTTOM OF VENT

MAINTAIN 12" CLEARANCE ABOVE

HIGHEST ANTICIPATED SNOW LEVEL

OR GRADE, WHICHEVER IS GREATER

12" MINIMUM

90°

FIGURE 16 - HORIZONTAL TERMINATION
      RAISED 

CONFIGURATION

      FOR 

ADDITIONAL 

CLEARANCE

VENT

OVERHANG

COMBUSTION AIR

12" SEPARATION BETWEEN

BOTTOM OF COMBUSTION AIR

AND BOTTOM OF VENT

MAINTAIN 12" CLEARANCE ABOVE

HIGHEST ANTICIPATED SNOW LEVEL

OR GRADE, WHICHEVER IS GREATER

12" MINIMUM

90°

FIGURE 15 - HORIZONTAL TERMINATION
      CONFIGURATION 

WITH 

12"

      MINIMUM 

CLEARANCE

VENT

OVERHANG

COMBUSTION AIR

12" SEPARATION BETWEEN

BOTTOM OF COMBUSTION AIR

AND BOTTOM OF VENT

MAINTAIN 12" CLEARANCE ABOVE

HIGHEST ANTICIPATED SNOW LEVEL

OR GRADE, WHICHEVER IS GREATER

12" MINIMUM

90°

18" MAXIMUM

FIGURE 17 - HORIZONTAL TERMINATION
      CONFIGURATION 

WITH 

HORZ. 

EXTENS.

MAINTAIN 12" MINIMUM

CLEARANCE ABOVE HIGHEST

ANTICIPATED SNOW LEVEL.

MAXIMUM OF 24" ABOVE ROOF

COMBUSTION AIR

VENT

12" VERTICAL SEPARATION

BETWEEN COMBUSTION

AIR AND VENT

FIGURE 18 - VERTICAL TERMINATION

650.75-N4U

Unitary Products Group

13

Содержание 65075-N4U

Страница 1: ...r other flammable vapors and liquids in the vicinity of this or any other appliance WARNING IMPROPER INSTALLATION ADJUSTMENT AL TERATION SERVICE OR MAINTENANCE CAN CAUSE INJURY OR PROPERTY DAMAGE RE F...

Страница 2: ...ce since it requires separate properly sized air intake and vent lines The furnace shall not be connected to any type of B BW or L vent or vent connector and not connected to any portion of a factory...

Страница 3: ...e access is required for passage to the front when servicing or for inspection or replacement of flue vent connections NOTE In all cases accessibility clearances shall take prece dence over clearances...

Страница 4: ...95 2000 C 21 19 3 4 16 5 8 2 2 120 112 2000 D 24 1 2 23 1 4 20 1 8 3 2 3 140 130 2000 D 24 1 2 23 1 4 20 1 8 3 2 3 Vent pipe must be increased to 3 on this model INPUT MBH OUTPUT MBH NOM CFM CAB WIDTH...

Страница 5: ...75 1200 17 1 2 91 0 35 65 1370 165 11 8 1 2 9 0 20 14 80 75 1600 21 91 0 30 60 1563 160 11 8 3 4 12 0 20 14 100 95 2000 21 91 0 40 70 1582 170 11 10 1 12 0 20 14 120 112 2000 24 1 2 91 0 40 70 1885 1...

Страница 6: ...ambient temperature may drop below 32 F a UL listed self regulated heat tape must be installed It is recommended that self regulating heat tape rated at 3 watts per foot be used This must be installe...

Страница 7: ...r sides of the cabinet wall NOTE Air velocity through throw away type filters may not exceed 300 feet per minute All velocities over this require the use of high velocity filters Side Return External...

Страница 8: ...n sions Install the plenum following instructions under Ductwork in this instruction SUPPLY AIR DUCTS Installations on combustible material or floors must usea combus tible floor base shown in Figure...

Страница 9: ...ezing are possible refer to Page 6 Below Freezing Locations GAS PIPING The gas supply must be installed in accordance with the current National Fuel Gas Code ANSI Z223 1 in the U S or CAN CGA B149 1 o...

Страница 10: ...switch should be close to the unit for convenience in servicing With the disconnect switch in the OFF position check all wiring against the unit wiring label Also see the wiring diagram in this instru...

Страница 11: ...nnection top right of unit back to the outdoors See Figure 13 or 14 The intake vent should be located either through the wall horizontal or side vent or through the roof vertical vent Care should be t...

Страница 12: ...roofor sidewall NOTE Accessory concentric intake vent terminations models 1CT0302 and 1CT0303 are available and approved for use with these furnaces Refer to Form 650 75 N2 4V for installation details...

Страница 13: ...ning at the furnace 2 Deburr the piping inside and outside 3 Chamfer the outer edges of the piping 4 Dry fit the entire vent combustion air piping assembly 5 Disassemble the piping and apply cement pr...

Страница 14: ...the furnace This may be from within the space in a non confined location or it may be brought into the furnace area from outdoors It is not directly ducted into the furnace A single properly sized pi...

Страница 15: ...m dimension of rectangular ducts shall be three inches 2 One permanent opening commencing within 12 inches of the top of the enclosure shall be permitted where the equipment has clearances of at least...

Страница 16: ...t connections NOTE An offset using two 45 degree elbows may be required for plenum clearance when the vent is increased to 3 1 Long radius elbows are required for all units 2 Elbows are assumed to be...

Страница 17: ...on may require seal ing or shielding of building surfaces with a corrosive resistant material due to vent system corrosive combus tion products PIPING ASSEMBLY The final assembly procedure for the ven...

Страница 18: ...e allowable locations shown in Figure 24 and Section 7 8 in the National Fuel Gas Code ANSI Z223 1 current edition Follow all local agency and utility requirements if more restrictive than those shown...

Страница 19: ...w the instructions with the coil for trapping the drain SAFETY CONTROLS Control Circuit Fuse A 3 amp fuse is provided to protect the 24 volt transformer from overload caused by control circuit wiring...

Страница 20: ...blower motor failure START UP AND ADJUSTMENTS The initial start up of the furnace requires the following addi tional procedures 1 When the gas supply is initially connected to the furnace the gas pip...

Страница 21: ...MPLE CHECKING GAS INPUT It is found by measurement that it takes 26 seconds for the hand on the 1 cubic foot dial to make a revolution with only a 120 000 Btuh furnace running Using this information l...

Страница 22: ...and electrical supplies ON Start furnace and observe manifold pressure on manometer 5 Adjust manifold pressure by adjusting gas valve regulator screw for natural gas set at 3 5 W C If gas valve regula...

Страница 23: ...or lead Place all unused motor leads on Park terminals Two Park terminals are provided CAUTION Do not energize more than one motor speed at a time or damage to the motor will result ADJUSTMENT OF FAN...

Страница 24: ...the thermostat circuit opens the ignition control is deener gized Withtheignitioncontroldeenergized thegasflowstopsand the burner flames are extinguished The venter continues to operate for 15 seconds...

Страница 25: ...me Lift filter slightly to dislodge and remove for service 3 Remove the filter and follow the cleaning instructions above DO NOT remove the filter stiffener rods if provided When reinstalling the filt...

Страница 26: ...blower and the condensate pan The turbulators can then be gently re moved from the secondary heat exchanger 3 With a stiff wire brush brush out loose scale or soot 4 Vacuum the secondary heat exchang...

Страница 27: ...e is lost 5 times during the heating cycle This could be caused by low gas pressure or faulty gas valve 9 FLASH TI61F 2 CONTROL ONLY Indicates reversed line voltage polarity Check incoming power wirin...

Страница 28: ...985 835 757 665 450 MED 900 887 851 810 752 693 609 403 LOW 581 577 569 542 468 60 55 1000 B HI 1220 1200 1190 1152 1115 1065 1012 950 872 771 MED 920 915 900 880 842 803 740 650 LOW 725 729 715 700...

Страница 29: ...UNIT WIRING DIAGRAM UPFLOW 650 75 N4U Unitary Products Group 29...

Страница 30: ...UNIT WIRING DIAGRAM DOWNFLOW HORIZONTAL...

Страница 31: ...NOTES 650 75 N4U Unitary Products Group 31...

Страница 32: ...ect to change without notice Printed in U S A Copyright by Unitary Products Group 1998 All rights reserved 650 75 N4U Supercedes 650 75 N4U 498 5005 York Drive Norman OK 73069 Unitary Products Group 6...

Отзывы: