background image

72

IM 04L45B02-02EN

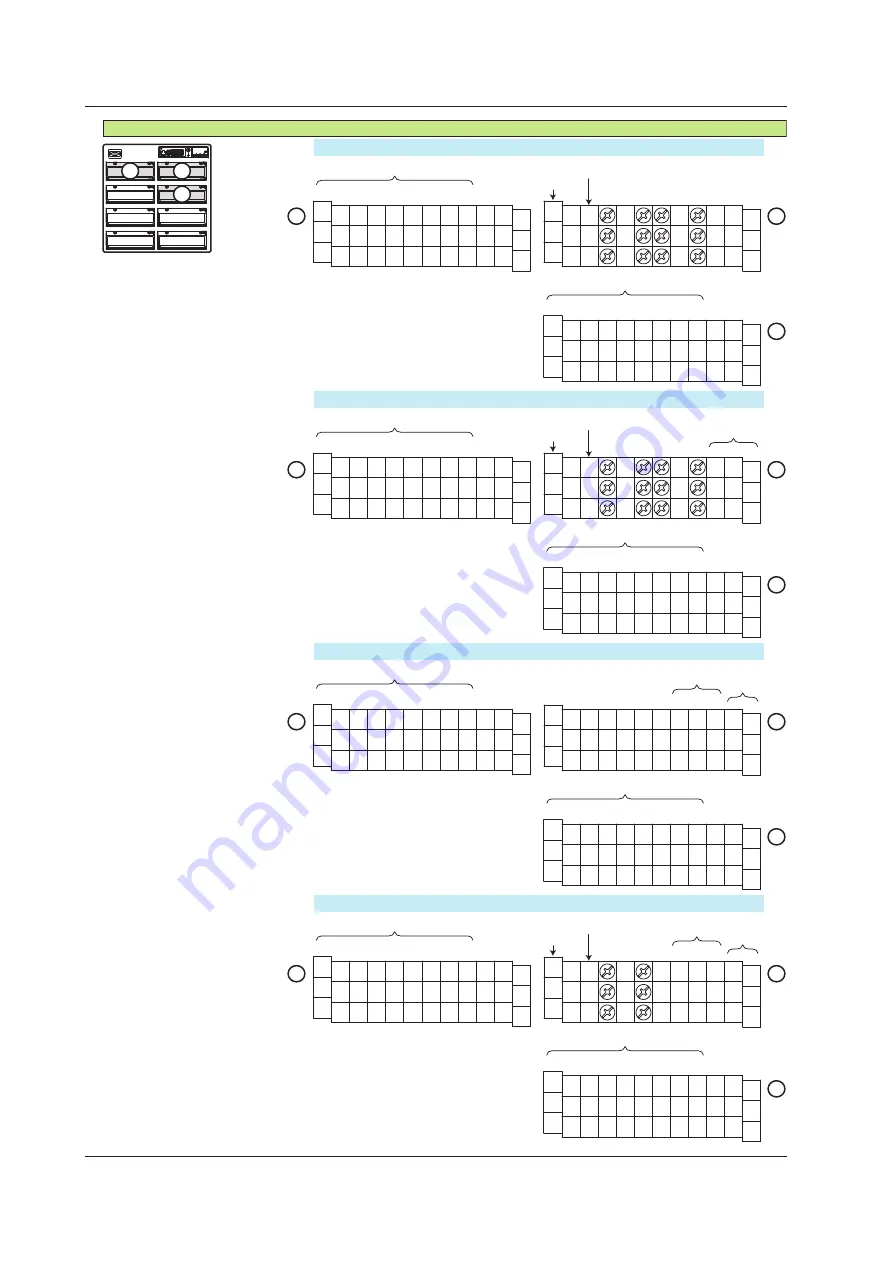
/A4 /PM1

/A4 /F1 /R1

NC

C

NO

NC

C

NO

NC

C

NO

NC

C

NO

NC

C

NO

NC

C

NO

22

21

24

23

26

25

NC

C

NO

NC

C

NO

NC

C

NO

NC

C

NO

NC

C

NO

NC

C

NO

12

11

14

13

16

15

/A4 /F1

NC

C

NO

NC

C

NO

NC

C

NO

NC

C

NO

NC

C

NO

NC

C

NO

22

21

24

23

26

25

NC

C

NO

NC

C

NO

NC

C

NO

NC

C

NO

NC

C

NO

NC

C

NO

22

21

24

23

26

25

NC

C

NO

NC

C

NO

NC

C

NO

NC

C

NO

NC

C

NO

NC

C

NO

22

21

24

23

26

25

NC

C

NO

NC

C

NO

NC

C

NO

NC

C

NO

NC

C

NO

NC

C

NO

NC

C

NO

NC

C

NO

12

11

14

13

16

15

NC

C

NO

NC

C

NO

NC

C

NO

NC

C

NO

NC

C

NO

NC

C

NO

12

11

14

13

16

15

NC

C

NO

NC

C

NO

NC

C

NO

NC

C

NO

C
1
2

8

7

6

5

4

3

/A4 /F1 PM1

NC

C

NO

NC

C

NO

NC

C

NO

NC

C

NO

NC

C

NO

NC

C

NO

12

11

14

13

16

15

C

H
L

H
L

H
L

1
2

5

4

3

7 6

8

C

H
L

H
L

H
L

1
2

5

4

3

7 6

8

Options That Use Option Terminal Blocks 1, 2, and 3

1

2

1

2

1

2

1

3

3

3

3

2

1

3

2

These options can come with /TPS4.

In that case, the option terminal block 4 is installed.

For the terminal arrangement for /TPS4, see page 74.

Pulse 

input

Alarm 

output

Alarm 

output

Alarm 

output

Alarm 

output

Alarm 

output

Alarm 

output

Alarm 

output

Alarm 

output

Remote

control

input

Pulse 

input

Remote

control

input

FAIL

Status 

FAIL

Status 

FAIL

Status 

Installation and Wiring

Содержание DX2004T

Страница 1: ...User s Manual Y okogawa Electric Corporation Model DX2004T DX2008T DX2010T DX2020T DX2030T DX2040T DX2048T Daqstation DX2000T Operation Guide IM 04L45B02 02EN 1st Edition...

Страница 2: ...gistration Thank you for purchasing YOKOGAWA products We invite you to register your products in order to receive the most up to date product information To register visit the following URL http www y...

Страница 3: ...Run Modes 16 Entering Values and Characters 16 Changing the Date Time 18 Operation Example in the Setting Mode Changing the Input Range 19 Operation Example in the Basic Setting Mode Changing the Sca...

Страница 4: ...e Message START 43 Writing a Free Message 45 Displaying Previously Measured Data Historical trend display 46 Operating Other Screens 51 Calibrating the Touch Panel and Checking the Calibration 52 Prev...

Страница 5: ...M 04L41B01 65EN Installing DAQSTANDARD IM 04L41B01 66EN Differences between the DX2000T and the DX2000 Some of the DX2000T and DX2000 specifications are different When you view the electronic manual p...

Страница 6: ...ply Ensure that the source voltage matches the voltage of the power supply before turning ON the power In the case of a desktop type ensure that it is within the maximum rated voltage range of the pro...

Страница 7: ...e model name and suffix code given on the name plate match those on your order Name plate SUFFIX SUPPLY FREQUENCY NO STYLE H S MODEL NO Instrument Number When contacting the dealer from which you purc...

Страница 8: ...th the H5H option Maximum rated voltage 250 V Optional Accessories Sold Separately The following optional accessories are available for purchase separately If you make an order make sure that all cont...

Страница 9: ...ope B V office Conventions Used in This Manual This manual covers information regarding DX2000Ts that have a suffix code for language 2 English For details on how to set the language see section 2 6 C...

Страница 10: ...Display Function Measured data can be displayed as trends numeric values and bar graphs for each group In addition the overview display can be used to display and monitor all channels on a single scr...

Страница 11: ...ication Interface User s Manual EtherNet IP Communication Interface User s Manual PROFIBUS DP Communication Interface User s Manual PLC programmable logic controller EtherNet IP Serial communication R...

Страница 12: ...e tab at the center of the upper section of the cover CF card slot CF card access indicator CF card eject button Used when ejecting the CF card Key panel cover Open the cover by pinching the left tab...

Страница 13: ...output signal wires Serial interface port C3 option A RS 422A 485 interface connector Serial interface port C2 option A RS 232 interface connector Input terminals screw terminals or clamped terminals...

Страница 14: ...sured data to Excel Lotus and ASCII formats Page 60 DAQSTANDARD Viewer User s manual IM 04L41B01 63EN On a DX with advanced security AS1 option carry out the following procedure after turning the DX o...

Страница 15: ...eration cover CAUTION If nothing is displayed when the power switch is turned ON turn OFF the power switch and check the points listed above one more time After checking the points turn ON the power s...

Страница 16: ...rom the setting mode to the basic setting mode DISP ENTER key and four arrow keys up down left and right Switches the operation screen Selects and enters setup items DISP ENTER key Up arrow key Right...

Страница 17: ...y name Date and time Displayed in yellow while the time is being corrected Display name or group name For all channel display on the trend display ALL is displayed Data type DISP Display data EVENT Ev...

Страница 18: ...g mode A mode in which input range measurement method and so on are configured Settings can be changed when memory sampling is in progress excluding some items Basic setting mode A mode used to set ba...

Страница 19: ...er of times the A a 1 soft key and the character number input key is pressed The character types that can be entered vary depending on the item being set Input status of the A a 1 soft key Input statu...

Страница 20: ...ard into the slot see page 24 Changing the Date Time In this example we will change the date to the 14th After carrying out this step reset the time to the correct date time 1 Display the operation mo...

Страница 21: ...operation mode screen On a DX with advanced security AS1 option Press ESC twice or MENU once to display a confirmation screen To return to the operation mode screen select Yes and press DISP ENTER on...

Страница 22: ...e Select First CH 6 Press the 1 soft key once to set First CH and Last CH to 2 7 Press the down arrow key once to move the cursor to Mode 8 Press the TC soft key once The cursor moves to Range and the...

Страница 23: ...cursor moves to Span Upper 14 Enter 400 0 in the Span Upper box See step 12 for the procedure 15 Press DISP ENTER once The changed items are entered and the cursor returns to First CH The changed ite...

Страница 24: ...ouple Channel 2 Measures every 2 s DX2000T 1 Display the operation mode screen 2 Press MENU once to display the setting menu 3 Hold down FUNC for at least 3 s Display the basic setting mode menu Alter...

Страница 25: ...re entered and the cursor returns to Scan mode Set the scan interval to 2 s 9 Press ESC once to return to the basic setting mode menu 10 Press ESC once more Alternatively use the up or down arrow key...

Страница 26: ...e u p CAUTION Forcing the CF card into the slot with the upside down may cause damage 2 Insert the CF card into the slot Displays the storage media icon 3 Close the operation cover Operation complete...

Страница 27: ...Setting Mode 1 Press MENU to switch to setting mode hold down FUNC for 3 s to switch to basic setting mode select the File Initialize tab Media eject CF and press DISP ENTER Select CF if you have a ch...

Страница 28: ...ce to select the File tab 4 Press the down arrow key four times Select Save settings 5 Press DISP ENTER once 6 Enter SF2 for the file name For the input procedure see Entering Values and Characters on...

Страница 29: ...s and press DISP ENTER 1 Display the operation mode screen 2 Press MENU once to display the setting menu 3 Press the right arrow key once to select the File tab 4 Press the down arrow key three times...

Страница 30: ...0 C DX2000T Setup Item Description Number in the Figure Channel Use channel 1 1 Tag TI 001 2 Sensor Type T thermocouple 3 Input range 0 0 to 200 0 C 4 1 Input Range Press MENU to switch to setting mod...

Страница 31: ...I 002 2 Input signal 1 5V 3 Input range 0 0 to 500 0 L H 4 Alarm condition Output an alarm if the measured value is less than or equal to 120 0 L H Output destination Relay contact I03 5 1 Input Range...

Страница 32: ...In this example we will assign channels 1 and 2 to group 1 Channel 1 Group 1 Channel 2 Setup Item Description Number in the Figure Group Assign channel 1 and 2 to group 1 1 1 Group Press MENU to swit...

Страница 33: ...to 1 dot is 4 s when the trend interval is 2 min 30 dots 4 s 2 min 30 dots div Setup Item Description Number in the Figure Trend interval Set the time per division to 2 minutes The waveform is update...

Страница 34: ...els Channel 1 TI 001 and channel 2 FI 002 1 Data to be recorded Continuously record the display data from the start of the measurement 2 Data storage method Automatically store every 24 hours 3 Sampli...

Страница 35: ...dia save Batch 3 3 Save the Settings 1 Press ESC to return to the basic setting menu 2 Press ESC once more The window appears for you to confirm the saving of the settings 3 Select Yes and press DISP...

Страница 36: ...the Data to the CF Card Select the Menu tab Display Trend Save interval 4 3 6 Data File Name Select the Menu tab Data save File header Data file name 5 7 Save Destination Directory within the CF Card...

Страница 37: ...w are the same as Setup Example 5 Setup Item Description Number in the Figure Data storage time Save the data once at hour 0 every day 7 Data storage method Automatically save the measured data at the...

Страница 38: ...n be saved to the CF card by pressing the USER key This function is called snapshot The extension of snapshot data files is png USER key Setup Item Description Number in the Figure Event action Save t...

Страница 39: ...eature is convenient when comparing data such as historical trends Favorite key Favorite key Favorite key Example when three screens are registered to the Favorite key Favorite key Favorite key 1 Disp...

Страница 40: ...he screen name Select the digit Left and right arrow keys Enter characters Character Number input keys Delete a character Del soft key or Bs soft key Cancel the setting Press ESC before pressing DISP...

Страница 41: ...ons Tap This refers to the act of lightly pressing your finger against the screen for just a moment Hold your finger down This refers to the act of lightly pressing your finger against the screen and...

Страница 42: ...key menu button Operation screen menu button Home button Registering the Home Operation screen menu Cancel ESC button FUNC key menu Displays the operation screen menu Displays the FUNC key menu Displ...

Страница 43: ...m the factory START key Memory sampling progress DISP Display data EVENT Event data Recording data Operation complete Stopping Memory Sampling 1 Press STOP once Display the confirmation window 2 2 Tap...

Страница 44: ...witch from the trend display to the digital display 1 Tap the Operator menu button 1 2 Tap the operation screen menu button 2 3 Tap DIGITAL on the operation screen menu 4 Tap one of the groups that ar...

Страница 45: ...ith message 1 selected press the Input soft key Enter START Show the message registration window Select the digit Left and right arrow keys Enter characters Character Number input keys Delete a charac...

Страница 46: ...on the trend display Show the trend display first 1 Tap the Operator menu button 1 2 Tap the Message button The Message list window is displayed 2 3 Tap the message that you want to write START 4 Tap...

Страница 47: ...the Free message button The Message list window is displayed 2 3 Tap the cell in which you want to enter the message The message input window is displayed ESC button ESC button 3 4 Enter the message...

Страница 48: ...u button Operator menu on the trend display 2 2 If you have tapped the Trend history button the procedure is finished The historical trend is displayed on the trend display group that was displayed in...

Страница 49: ...ur finger down in the waveform display range to move the cursor Tap the waveform display range to move the cursor to the position that you tapped Position Description Position Description 1 Moves the...

Страница 50: ...played at the top right section of the historical trend display 3 On the all data display tap the area that you want to view The frame that indicates the display range moves to the position that you t...

Страница 51: ...rch button The calendar is displayed 2 3 Tap the date that you want to display If the selected date has display data and event data the data type selection window is displayed Changes the displayed ye...

Страница 52: ...creen 6 Operation complete Writing an Additional Message or an Additional Free Message 1 Tap the position where you want to write the message The cursor moves to the tapped position 1 2 2 Tap the Oper...

Страница 53: ...item in the title area to sort the list by that item Hold your finger down to scroll through the data Cursor Sort symbol Moves the cursor a half page up Moves the cursor a half page down Moves the cur...

Страница 54: ...and press DISP ENTER The DX2000T returns to the operation mode screen Checking the Touch Panel Calibration 1 Press MENU to switch to setting mode hold down FUNC for 3 s to switch to basic setting mod...

Страница 55: ...s are disabled The password is used to unlock the touch panel The password is up to eight alphanumeric characters The password is displayed as Procedure Locking the Touch Panel 1 Tap the FUNC key menu...

Страница 56: ...User s Manual IM 04L41B01 17E Setting Command SM Sets the custom menu Function menu setting p1 Type FUNC p2 and up Menu items to display The selected function is displayed in the specified order on th...

Страница 57: ...er in the Figure IP address 192 168 1 101 1 Subnet mask 255 255 255 0 Web server function Monitor from a Web browser on the PC using operator page 2 Access to the DX Display the Web page and do not se...

Страница 58: ...reen on the PC Select the Menu tab Communication Ethernet Web page 2 3 4 Save the Settings 1 Press ESC twice to return to the basic setting menu 2 Press ESC once more The window appears for you to con...

Страница 59: ...eck that a correct response is returned Send ping 192 168 1 101 Response example Reply from 192 168 1 101 bytes 32 time 10ms TTL 255 7 Displaying the DX Screen on the Browser 1 Start the browser on th...

Страница 60: ...eters according to your network environment DX Measurement input Ethernet Automatic data transfer to an FTP server CF card FTP server Internal memory Setup Item Description Number in the Figure Host n...

Страница 61: ...ion complete Executing a File Transfer Test 1 Press FUNC once to display the FUNC key menu 2 Press the Next soft key until FTP test is displayed and then press the FTP test soft key FTP test soft key...

Страница 62: ...red data using the accompanying software program DAQSTANDARD 1 Insert the CF card containing the measured data file into the PC that has DAQSTANDARD installed 2 Start DAQSTANDARD Viewer 3 From the Fil...

Страница 63: ...ed tab set the model to DX2000T Basic setting mode Environment tab Detail Setting Touch panel OFF The touch panel is not locked ON The touch panel is locked Password The touch panel is locked and a pa...

Страница 64: ...panel mounting Note Condensation may occur if the DX is moved to another place where the ambient temperature is higher or if the temperature changes rapidly In addition measurement errors will result...

Страница 65: ...roximately perpendicular to the panel as you fasten the screws press the mounting bracket against the case so that they are in contact with each other CAUTION Tightening the screws too much can deform...

Страница 66: ...aching the mounting bracket When the H2 or PM1 option is installed Allowable panel thickness Dimensions after attaching the mounting bracket 288 11 33 295 2 11 62 360 min 361 min 180 7 09 108 288 11 3...

Страница 67: ...entering the measurement circuit Move the measurement circuit away from the power cable power circuit and ground circuit It is desirable that the object being measured does not generate noise However...

Страница 68: ...g section of the wire for example to make sure that the wire is securely connected to the clamped terminal Arrangement of the Input Terminals Input terminal block 1 2 3 4 DX2004T DX2008T DX2010T DX202...

Страница 69: ...hem to match the DX Remove the terminal block Hold both ends of the terminal block and pull straight Input signal wire First loosen the screw at the front using a flat blade screwdriver Insert the inp...

Страница 70: ...als fasten all wiring cables to the rear of the mounting panel Do not short the transmitter power supply output terminal or apply external voltage to it If you do the DX may malfunction When using the...

Страница 71: ...s can come with TPS4 or TPS8 In that case the option terminal block 4 or option terminal blocks 3 and 4 are installed For the terminal arrangement for TPS4 and TPS8 see page 74 02 01 04 03 NC C NO NC...

Страница 72: ...arm output NC C NO NC C NO 02 7 6 8 02 01 C H L H L H L 1 2 5 4 3 NC C NO NC C NO 02 7 6 8 C H L H L H L 1 2 5 4 3 7 6 8 C 1 2 8 7 6 5 4 3 Remote control input Remote control input Pulse input Remote...

Страница 73: ...C NO NC C NO NC C NO NC C NO NC C NO 12 11 14 13 16 15 NC C NO NC C NO NC C NO NC C NO NC C NO NC C NO 12 11 14 13 16 15 NC C NO NC C NO NC C NO NC C NO NC C NO NC C NO C 1 2 8 7 6 5 4 3 02 01 04 03...

Страница 74: ...O NC C NO NC C NO NC C NO 12 11 14 13 16 15 NC C NO NC C NO NC C NO NC C NO C 1 2 8 7 6 5 4 3 A4 F1 PM1 NC C NO NC C NO NC C NO NC C NO NC C NO NC C NO 12 11 14 13 16 15 C H L H L H L 1 2 5 4 3 7 6 8...

Страница 75: ...C NO 22 21 24 23 26 25 NC C NO NC C NO NC C NO NC C NO NC C NO NC C NO 12 11 14 13 16 15 NC C NO NC C NO NC C NO NC C NO NC C NO NC C NO 02 01 04 03 06 05 NC C NO NC C NO NC C NO NC C NO NC C NO NC C...

Страница 76: ...input voltage 5 V Internal circuit Transistor input open collector Relay contact input voltage free contact Contact closed at 200 or less Contact open at 100 k or greater ON voltage 0 5 V or less 30...

Страница 77: ...able should meet the following specifications Type Shielded twisted pair cable 3 pairs 24 AWG or more four wire 2 pair 24 AWG or more two wire Characteristic impedance 100 Capacitance 50 pF m Total ca...

Страница 78: ...Ethernet connector of the DX Indicator Connection Status of the Ethernet Interface Illuminated green The Ethernet interface is electrically connected Blinking red Transmitting data Off The Ethernet i...

Страница 79: ...P1 3 A or more P1 Inrush current rating 60 A or more other than P1 70 A or more P1 Use a switch complies with IEC60947 1 3 Connect a fuse between 2 A and 15 A to the power line Use a fuse approved by...

Страница 80: ...ective earth ground Otherwise the protection function will be compromised Use a power supply that meets the following conditions Item Condition Rated supply voltage 100 to 240 VAC Allowable power supp...

Страница 81: ...BR 1 Dust and water proof strip 5 years Packing B8706FY 1 5 years Key Case Assembly B8706BM 1 English specifications 5 years Key Case Assembly B8706BY 1 Japanese specifications Aluminum electrolytic c...

Страница 82: ...ng in the Setting column for your convenience Setting mode menu Page 82 Page 82 to 84 Page 85 to 86 Page 87 Page 88 Page 89 Page 89 Page 89 to 91 Page 92 Page 92 Page 93 Page 93 Page 93 Page 94 Page 9...

Страница 83: ...8 Page 98 Page 98 Page 98 Page 99 Page 99 to 100 Page 101 Page 101 Page 102 to 105 Page 106 Page 107 Page 107 Page 107 Communication PROFIBUS DP On models with the PROFIBUS DP Interface CP1 option Sig...

Страница 84: ...m Selectable Range or Selections Default Value Setting First CH Last CH Range Mode Channel number Skip Volt TC RTD Scale Delta DI 1 5V Sqrt 001 Volt Mode Volt Range Span Lower Span Upper 20mV 60mV 200...

Страница 85: ...200 00 Off 0 5 Alarm 1 2 3 4 Type Value Relay Number Detect On Off H High L Low h delta H l delta L R rate H r rate L T delayH t delayL Numerical value On Off I01 I06 I11 I16 I21 I26 I31 I36 Depends...

Страница 86: ...50 Boundary Span Lower 1digit to Span Upper 1digit 0 0000 Meas channel Alarm mark Color scale band Setup Item Selectable Range or Selections Default Value Setting First CH Last CH Channel number 001 A...

Страница 87: ...lt Value Setting First CH Last CH Channel number 101 Tag Comment 32 characters or less Tag No 16 characters or less Memory sample On Off On Off On Alarm delay Time 1 to 3600 10 Math channel TLOG Rolli...

Страница 88: ...86 IM 04L45B02 02EN Math channel Math start action Setup Item Selectable Range or Selections Default Value Setting Math start action Math start Off Start Rst St Start Setup Items and Default Values...

Страница 89: ...0 00 Ext alarm 1 2 3 4 Type Value Relay On Off Number Detect On Off H High L Low T delayH t delayL Numerical value On Off I01 I06 I11 I16 I21 I26 I31 I36 Depends on the option S01 S02 S03 S29 S30 On O...

Страница 90: ...tal Vertical Normal Fine Mark Bargraph 1 2 3 Auto 4 5 6 7 8 9 10 11 12 Horizontal Off Horizontal Normal Mark 2 Auto Circular Circular Full circle action Circular Trend line Circular Grid Allclear Divc...

Страница 91: ...90 91 100 11 20 1 to 100 32 characters or less Message Comment Text Comment text fields Setup Item Selectable Range or Selections Default Value Setting Coment txt field no 1 to 200 1 Text info 32 char...

Страница 92: ...evelSwitch EventEdgeSwitch Relay Off Switch Off Alarm Off EventLevelSwitch Off None Remote Remote number 1 2 3 4 5 6 7 8 1 Relay Relay number I01 I06 I11 I16 I21 I26 I31 I36 Depends on the option I01...

Страница 93: ...1 All 1 1 Key 1 1 1 1 1 The following menus appear when the multi batch function is in use MemoryStart Stop Target Action MemoryStart Stop Select Batch Group No MemoryStart Target Action MemoryStart S...

Страница 94: ...75 95 100 0 Trigger signal Key On Off On With AS1 The Sample rate and Data length items are the same as on a DX without the AS1 option Mode Fixed at Free Free There are no Pre trigger or Trigger signa...

Страница 95: ...or Selections Default Value Setting Function menu Select Hide View Transfer Display menu Separate Select Hide View Transfer End AS1 option Setup Item Selectable Range or Selections Default Value Sett...

Страница 96: ...ate Serial Batch Date Data file name Identified strings 16 characters or less Data save Batch text Setup Item Selectable Range or Selections Default Value Setting First Batch Group No Last Batch Group...

Страница 97: ...nal 1 to Internal 3 External 1 to External 25 Internal 1 File name 32 characters or less Custom display save All Setup Item Selectable Range or Selections Default Value Setting Directory name 20 chara...

Страница 98: ...e Free Over Over Tag Basic settings Tag No Use Not Use Not Not Alarm Action Setup Item Selectable Range or Selections Default Value Setting No logging On Off Off Annunciator mode Sequence Time off col...

Страница 99: ...ff With AS1 On 6 On 4 Communication Service port Setup Item Selectable Range or Selections Default Value Setting FTP 1 to 65535 21 HTTP 1 to 65535 80 SNTP 1 to 65535 123 Modbus 1 to 65535 502 Communic...

Страница 100: ...D integrate Fast Scan interval Fast A D integrate Normal Fast 125ms 250ms DX2004T DX2008T 1s 2s 5s DX2010T DX2020T DX2030T DX2040T DX2048T Auto 50Hz 60Hz 100ms 25ms DX2004T DX2008T 125ms DX2010T DX202...

Страница 101: ...ction Display Function Free Lock Free Lock Free Lock Free Lock Free Lock Free Lock Free Lock Free Free Free Free Free Free Free Login Basic settings Setup Item Selectable Range or Selections Default V...

Страница 102: ...Lock Free Lock Free Lock Free Lock Free Lock Free Free Free Free Free Free Media USB External media Media USB Load settings Free Lock Free Lock Free Free Authority of user Action of Function AlarmACK...

Страница 103: ...Time hour 0 to 23 0 00 Report Report settings Setup Item Selectable Range or Selections Default Value Setting Report channel number R01 R02 R03 R59R60 R01 On Off On Off Depends on the model Channel Ch...

Страница 104: ...r Selections Default Value Setting Keep alive On Off On Application time out On Off Application time out Time On Off 1 to 120 min Off 1 Communication Ethernet Server Server modes Setup Item Selectable...

Страница 105: ...2 characters or less Password 32 characters or less Communication Ethernet E Mail Alarm settings Setup Item Selectable Range or Selections Default Value Setting Recipient 1 On Off Off Recipient 2 On O...

Страница 106: ...t time Report 0 to 120 min 0 to 120 min 0 0 With AS1 FTP transfer file Disp Event data On Off Off FTP transfer file Report On Off Off FTP transfer file Snapshot On Off Off FTP transfer file Setting On...

Страница 107: ...lections Default Value Setting Client command number 1 8 9 16 1 8 1 to 16 First Last Server Regi Type Off R R M W W M E M Depends on the command type Depends on the command type 1 2 3 15 16 Numerical...

Страница 108: ...lections Default Value Setting Read cycle 125ms 250ms 500ms 1s 2s 5s 10s 1s Timeout 125ms 250ms 500ms 1s 2s 5s 10s 1min 1s Retrials Off 1 2 3 4 5 10 20 1 Inter block delay Off 5ms 10ms 15ms 45ms 100ms...

Страница 109: ...mple Invalid user Login Status relay Status Relay Status Relay Details Setup Item Selectable Range or Selections Default Value Setting Memory Media status On Off Off Measurement error On Off Off Commu...

Страница 110: ...ation Execute Check With AS1 Load settings All settings Kind CF USB CF Load settings Login info only Kind CF USB CF Load settings Other settings Kind CF USB CF Initialize Kind Clear 1 Clear 2 Clear 3...

Страница 111: ...isplays the sign record menu AS1 AlarmACK Performs alarm acknowledgment Operation screen menu Displays the Operation screen menu FUNC key menu Displays the FUNC key menu Overview AlarmACK Performs ala...

Страница 112: ...isplay AlarmACK Performs alarm acknowledgment Home Displays the specified standard display Operation screen menu Displays the Operation screen menu FUNC key menu Displays the FUNC key menu Memory summ...

Страница 113: ...1 4 panel 2 Shows 4 panel 2 4 panel 3 Shows 4 panel 3 4 panel 4 Shows 4 panel 4 AlarmACK Performs alarm acknowledgment Home Displays the specified standard display Operation screen menu Displays the...

Отзывы: