background image

O P E R A T I O N   M A N U A L

Содержание S Series

Страница 1: ...O P E R A T I O N M A N U A L...

Страница 2: ...2...

Страница 3: ...3...

Страница 4: ...ng the Smoker 31 Initial Burn Off 31 Lighting Your Smoker 31 Pre Heating 31 Lid Position 31 Pellet Usage 31 Door Open Function 31 Prime Button 31 Pre Grill Checklist Routine Maintenance 32 Startup Pro...

Страница 5: ...Cooking Chamber 44 Firebox and Burn Grate Assembly Maintenance 45 Stainless Steel Burn Grate 45 Burn Grate Inspection 45 Igniter 47 Fan Cooled Hopper Assembly 48 Grease Management Area and Bucket 48 A...

Страница 6: ...when moving an appliance containing hot oil or other hot liquids Exterior surfaces on the grill will be hot when in use and during cool down Unplug from outlet when not in use and before cleaning All...

Страница 7: ...xtension cord connection dry and off the ground Do not immerse cord or plugs in water or other liquid Caution To ensure continued protection against risk of electric shock connect to properly grounded...

Страница 8: ...8...

Страница 9: ...9 COOKING GRATES HEAT DIFFUSER HOPPER CONTROLS IGNITER BURN GRATE FIRE POT VARIABLE DISPLACEMENT DAMPER...

Страница 10: ...move the grease bucket that contains the power cord and a spare fuse and set aside Open the cooking chamber and remove all of the wrapped components There will be a front shelf a side shelf four cooki...

Страница 11: ...ended that two people move the Yoder due to its size and weight Once in position follow the setup instructions Page 30 to prepare your new cooker for use Attach the front and side shelves to the Yoder...

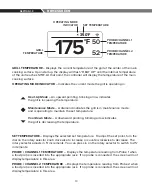
Страница 12: ...BUTTONS These buttons are used to make selections throughout the menu LCD DISPLAY SCREEN Displays all content ROTARY SELECTOR Allows you to navigate the menu by rotating the knob and also allows you...

Страница 13: ...e to decrease The rotary selector adjusts in 5 increments You can press in on the rotary selector to switch to 25 increments PROBE CHANNEL 1 TEMPERATURE Displays the temperature reading from Probe 1 w...

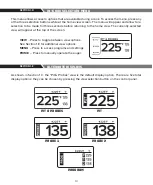
Страница 14: ...a cook To access the menu press any of the three selection buttons while at the home view screen The menu will appear and allow for a selection to be made for three seconds before returning to the ho...

Страница 15: ...NGS Allows access to additional settings such as temperature selection between Fahrenheit Celsius or calibration of the thermocouple while the grill is running There is a test function that can be ini...

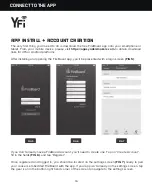
Страница 16: ...he FireBoard app you ll be presented with a login screen FIG 5 If you don t already have a FireBoard account you ll need to create one Tap on Create Account fill in the fields FIG 6 and tap Register O...

Страница 17: ...ll fail While within 30 feet of your cooker tap the Add FireBoard button on your app screen Your mobile device will scan for nearby FireBoard devices FIG 8 and will find the one embedded into your coo...

Страница 18: ...oint on the provided lines Please note that network names and passwords are case sensitive If you re unsure of the exact spelling of your network name or you are unsure of which networks are within th...

Страница 19: ...presented with the Dashboard FIG 15 This is your quick overview screen as well as one of the main sections you ll use to interact with your cooker The large grey bar across the top indicates your cook...

Страница 20: ...ange its name FIG 18 This name will also be used in the various charts throughout the app An alert in the form of an app alert an SMS text message or an email can be set to let you know when one of th...

Страница 21: ...can toggle between the two by tapping on the word Chart or Detail respectively in the title bar area of the app FIG 20 21 Tapping the small wrench icon in the upper right of the grey bar will take yo...

Страница 22: ...aphs very similar to the detail graph shown in the dashboard PROGRAMS Your cooker can be set up to execute a series of instructions that construct a cooking plan called a program This program consists...

Страница 23: ...ies of steps that can combine cooker setpoints run times and measured probe temps to form any conceivable cook plan you desire For the purposes of this manual we ll walk through a simple custom progra...

Страница 24: ...d temperature of 180 FIG 28 In actuality this automatically creates a third step with a setpoint of 180 and no time limit Pressing back will show the resultant program and now fill in the Name and Des...

Страница 25: ...p after a few seconds You may also stop or pause a running program at any time or delete a program by tapping into it and then tapping the Delete button in the upper right of the app s title bar FIG 3...

Страница 26: ...count the email address is not changeable and perhaps more importantly set up the basic information needed for the types of notifications you desire to use We support app alerts SMS text alerts and em...

Страница 27: ...a notification that will stay in your notifications area like the swipe down action on many Android mobile devices that will show you the current temperature of your pit and the meat probes if you ha...

Страница 28: ...ng FIG 36 then tap Submit to save your changes and return to the device settings screen DRIVE SETTINGS While Standalone FireBoard devices have more options available in the Drive Settings section of t...

Страница 29: ...eed your wish It should be noted that any given cooker can only be added to a single account at a time ADVANCED SETTINGS This section of the app contains some seldom used but occasionally helpful opti...

Страница 30: ...pad is recommended if the smoker is on a wooden deck FIG 39 Leveling the Smoker The smoker must be level front to back However the smoker does not have to be perfectly level from left to right as long...

Страница 31: ...temperatures ambient air temperature wind and whether or not the Yoder is equipped with a thermal jacket Generally usage is about 2 pounds per hour at grilling temperatures 350 to 450 F At smoking te...

Страница 32: ...cover if foil has been applied Install a new layer of protective foil Select heavy duty foil that is wide enough to wrap around the edges of the diffuser plate and cut long enough to cover the entire...

Страница 33: ...l around the firebox paying particular attention to the seal above the firebox at the hopper wall It will be necessary from time to time to reapply high heat silicone such as Permatex 81160 in this ar...

Страница 34: ...e hopper end and that the plate is adjusted evenly from front to back The diffuser is angled toward the right side of the grill to channel grease into the grease container FIG 44 8 Reinstall the cooki...

Страница 35: ...allowing 5 to 13 hours of cooking depending on cooking temperatures ambient temperatures wind condition and whether or not the optional thermal jacket is installed 3 Open the cooking chamber door 4 R...

Страница 36: ...36 VARIABLE DISPLACEMENT DAMPER FIREBOX BURN GRATE FIG 46 FIG 47...

Страница 37: ...ering fire started NOTE The only way to reactivate the igniter is to turn the cooker off and let it go through the cool down cycle or simply pull the plug for a hard reset at which point you can resta...

Страница 38: ...iter has developed a dead short and is tripping the GFCI or blowing the fuse 1 Be sure the Yoder s power cord is unplugged Remove the cooking grates FIG 48 diffuser plate FIG 49 and burn grate FIG 50...

Страница 39: ...on position and press the start on the control panel The feed system begins the prime cycle before defaulting to the set temperature feed rate Set the desired cooking temperature default set point is...

Страница 40: ...rue with the diffuser in or out Finally precise temperature management is not important when you are doing short cooks where you are opening and closing the pit frequently Find a set temperature that...

Страница 41: ...rill grates for extended direct grilling surface Setup 3 Direct grilling with searing capability set temperatures above 400 Remove the heat diffuser plate set the variable displacement damper in the f...

Страница 42: ...the left half of the grill will run hotter FIG 55 When positioned all the way open the right side of the grill will run hotter With the damper pushed in about 5 inches the grate surface will cook even...

Страница 43: ...rface temperatures to work for you FIG 56 When the damper is positioned approximately 5 inches from the stack end of the pit full open position this adjustment will allow you to even out temperatures...

Страница 44: ...se a long handled grill brush to clean the grates before evenly coating the grates with vegetable oil Heat Diffuser Drip Plate This requires very little maintenance if the plate is lined with foil non...

Страница 45: ...ide of the burn grate on the fire pot and then pressing down on the left hand side of the burn grate until fully seated Once the burn grate is seated there is little to no movement in this assembly Al...

Страница 46: ...nd apply enough pressure to bend it back to its original shape DO NOT apply too much pressure or you will overcorrect the burn grate and it will not fit back into the firebox FIG 59 3 Place the burn g...

Страница 47: ...irebox assembly confirm that the igniter assembly tube and igniter rod are free of ash or other debris Periodically inspect the igniter tube to ensure it is tightly secured by grabbing the tube and tu...

Страница 48: ...and clean any debris from the auger motor Visually inspect the wiring harnesses and terminal connections 5 Upon inspection and any required maintenance replace all screws Hand start each screw to ens...

Страница 49: ...the slot on the top of the fuse container and twist it counterclockwise to open If the fuse is blown replace it with the supplied replacement fuse The fuse is a 5 ampere quick blow fuse Reconnect the...

Страница 50: ...0X58WHB 20 X 5 8 WHIZ BOLT 2 23 90460 YS GALVANIZED BUCKET 1 24 W90779 YS640s CHAMBER 1 25 90197 YS640s YS480s CHROME WIRE SIDE SHELF 1 26 90195 YS640s CHROME WIRE FRONT SHELF 1 27 90352 LEFT 2ND SHEL...

Страница 51: ...51 15 10 4 5 16 8 26 42 25 25 21 22 20 24 12 11 40 39 41 43 20 17 18 30 29 38 37 2 3 14 13 28 27 34 31 32 33 36 1 6 7 8 9 640 COOKING COMPONENTS...

Страница 52: ...0X1HB HEX BOLT 1 4 20 X 1 LONG 1 5 91713 STAINLESS AUGER COVER BRACKET 1 6 W90811 STAINLESS FIRE POT 1 7 92401 STAINLESS REINFORCED BURN GRATE 1 8 24667 CERAMIC IGNITER ASSEMBLY 1 9 A91413 SIDE WALL T...

Страница 53: ...53 11 8 5 3 9 7 4 6 3 10 1 2...

Страница 54: ...AND COOKING CHAMBER ITEM PART DESCRIPTION QTY 1 A92473 HOPPER ASSEMBLY YS480s YS640s WITH ACS 1 2 10X34HHSDS SCREW HEX HEAD SELF DRILLING 10 x 3 4 10 3 1420X12HHSTS SCREW SLOTTED HEX HEAD SELF TAPPING...

Страница 55: ...55 1 2 3...

Страница 56: ...1 4 20 x 5 8 LONG BOLT 16 5 701 102 02 PIN 2 6 90398 AXLE 2 7 1016X38HHSMS HEX HEAD SLOTTED SHEET METAL SCREW 16 8 90172LFP YS 640s BOTTOM SHELF 1 9 W90786 RIGHT FRONT LEG 1 10 W90784 LEFT FRONT LEG 1...

Страница 57: ...57 7 8 11 4 12 13 14 2 6 10 5 9 1...

Страница 58: ...0527 YODER SMOKERS COMP CART SIGN 2 9 1420X12BHCSSS BUTTON HEAD CAP SCREW STAINLESS 1 4 20 x 1 2 8 10 1420X1FHB FLANGE HEAD BOLT 1 4 20 x 1 LONG 8 11 1420HNNL 1 4 20 NYLOCK NUT 16 12 91434 COMP CART W...

Страница 59: ...59 1 17 16 15 18 11 10 9 8 7 4 6 3 5 13 14 12 2...

Страница 60: ...7 1024X12HHSTS HEX HEAD SELF TAPPING SCREW 10 24 X LONG 2 18 22866 SPRING HANDLE 1 19 1420WHN 20 WHIZ NUT 1 20 W90790 HOPPER BACK 1 21 W90788 HOPPER LID 1 22 90312 SOCKET 15 AMP 1 23 632X38MS ROUND HE...

Страница 61: ...61 2 4 34 15 8 9 10 39 32 31 38 38 27 28 35 39 25 30 17 33 5 16 7 2 1 12 41 36 6 14 13 12 37 29 11 1 18 21 12 20 23 12 22 40 42 HOPPER ASSEMBLY...

Страница 62: ...A Jalape o Cheese Sauce 1 cup heavy whipping cream 6 oz white american cheese grated 6 oz pepper jack grated 6 fl oz your favorite IPA beer 1 Tbsp Grannie s Hickory Mustard Bring the cream beer and mu...

Страница 63: ...our breasts with Cattleman s Grill Italiano Seasoning and grill at 400 F until internal temperature reaches 160 F Rest five minutes Dice Step 2 Assemble pizza Preheat your cooker to 500 F Stretch the...

Страница 64: ...o your pizza COFFEE CRUSTED FILET MIGNON WITH CHIPOTLE AIOLI Filet mignon steaks Sweetwater Spice Ancho Chipotle Bath Cattleman s Grill Smoky Chipotle Steak Seasoning Chipotle Aioli recipe below Direc...

Страница 65: ...res Chiles Cattleman s Grill California Tri tip Seasoning Oakridge BBQ Santa Maria Grill Seasoning Directions Step 1 Marinate the tri tip in the Sweetwater Spice Tres Chiles according to the provided...

Страница 66: ...e on Wheels BBQ Marinade 2 6 8 strips of Frogmat For the stuffing 4 C cornbread crumbled 1 2 C shallots sliced 1 2 C pecans toasted chopped 1 T fresh thyme leaves only 1 2 C maple syrup 2 T heavy crea...

Страница 67: ...heet pan Repeat this process until all tortillas are fried and soaked in sauce Cover the bottom of a half sized aluminum foil steam table pan 12 75 X 10 3 with the enchilada sauce Lay out a layer of 4...

Страница 68: ...68 NOTES...

Страница 69: ...69 NOTES...

Страница 70: ...1 8 1 6 E Wa s p R d H u t c h i n s o n K S 6 7 5 0 1 8 7 7 4 0 9 6 3 3 7 Y O D E R S M O K E R S C O M 1010GAUGE COOKING BODY 03CONTROL SYSTEM 03IGNITER ROD...

Отзывы: