


W
ARRANTY
&
SUPPORT
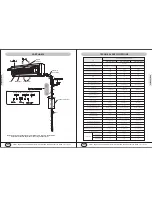
UNIT MAINTENANCE &
SER
VICE GUIDE
P37 OF 40
P38 OF 40
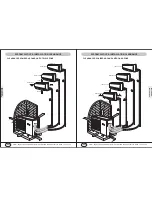
DISASSEMBLY PROCEDURE
OPERATING PROCEDURES / PHOTOS
Disassemble Cover of Electric Box
Loosen the three clasps, and pull upward to remove
the cover of the electric box.
Disassemble Electric Box
Remove the grounding wire of the evaporator.
Take out the pipe temp. sensor.
Unplug the plugging connector of the indoor motor
at the electric box, use screwdriver to
unscrew the screw fixing the electric box,
loose the clasp and remove the electric box.
Screw off one screw which fix the connection board
clamp. Take down the connection board clamp.
Screw off 4 screws fixing the left and right side of the
evaporator, then elevate left side the evaporator to
remove it backward.
Disassemble Evaporator
CAUTION:
When repair, Carefully take out the evaporator and
pay attention to protect the connecting pipe.
Disassemble Motor
Use screwdriver to unscrew the two screws fixing the
motor clamp, and remove the motor clamp.
Unscrew the three holding screws at the shaft sleeve,
and remove the motor.
Disassemble Cross Flow Fan
After remove the motor, pull out it from the left
bearing holder.
YMGI, Engineered Comfort Products for A Sustainable and Efficient Green World !
YMGI, Engineered Comfort Products for A Sustainable and Efficient Green World !
DISASSEMBLY PROCEDURE
OPERATING PROCEDURES / PHOTOS
Disassemble Front Panel
Lift the front panel upward. Firstly, screw off a screw
fixing the upper protection plate at the receiving
window and remove the protection plate. Then, pull
away the connection terminal. Pull the panel outward
with force along the groove fixing the panel of the
panel body to remove the panel.
Disassemble Cope of Electric Box
Firstly, screw off the screw fixing the cope of electric
box, open the cope of electric box, loose the clasp
and remove the cope of electric box.
Disassemble Filter
Push the filter inward, and then pull it upward to
remove it.
Manually bend the lower guide louver to loose the
clasp at the guide louver. Remove the lower guide
louver.(Note:to remove the upper guide louver, you
must open the front case first, then screw off the
screws fixing the upper guide louver and the water
tray , bend the upper guide louver and remove the
upper guide louver).
Disassemble Lower Guide Louver
Disassemble Front Case
Unscrew the three screw covers at the front case,
unscrew the three screws, pull open the clasp at the
front case, and remove the front case.
Disassemble Water Tray
Screw off the fixing screws fixing the water tray with a
screw driver. Loose the clasp at the other end and pull
out the terminal board of the step motor. Pull upward
the water tray and take it out. Remove the water tray.


