background image

YINGLISOLAR.COM

©  Yingli  Energy  Development  Company  Limited           

GB Modules Installation and User Manual  Page 4 

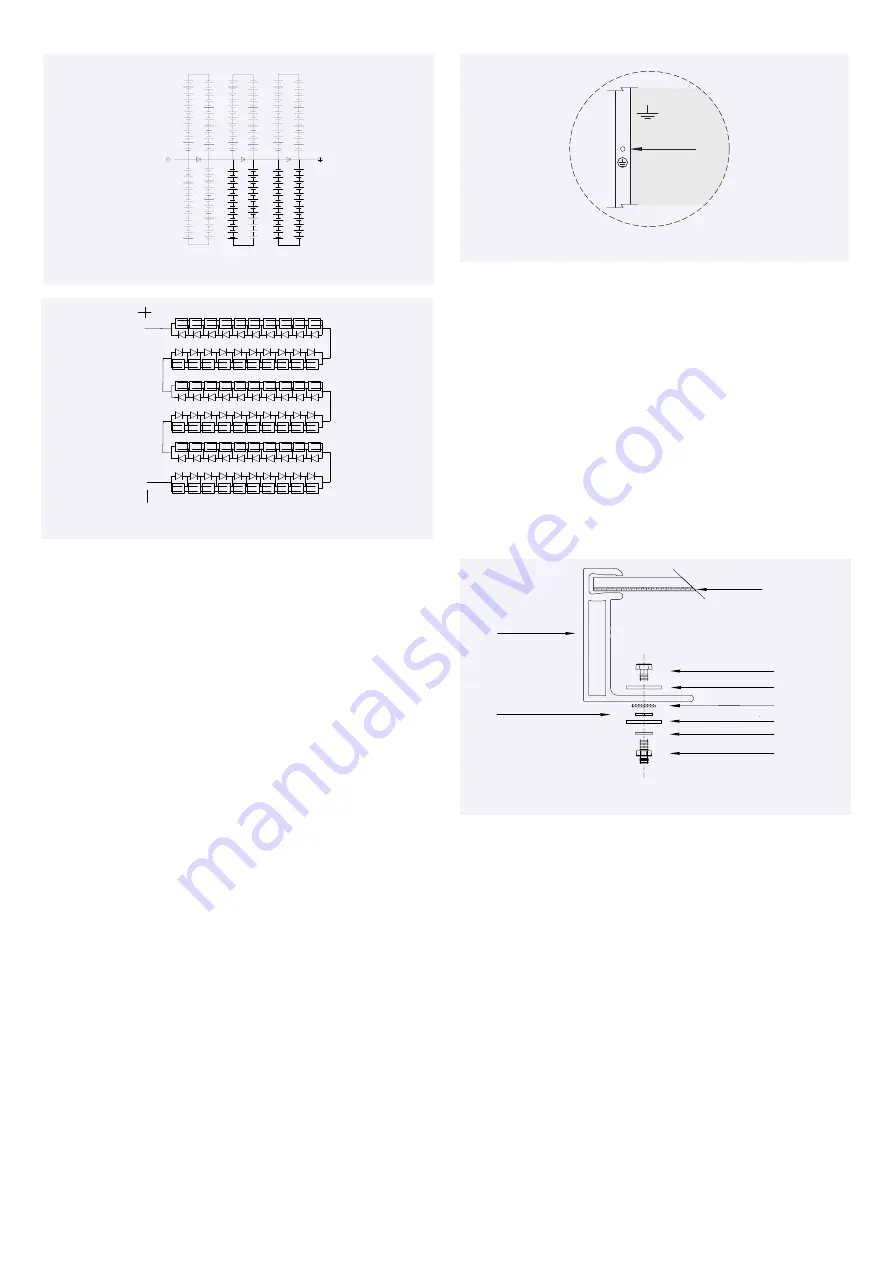
Grounding Holes

Screw

Plain Washers

Spring Washers
Backing Nut

Piercing Washers

Plain Washers

Frame

Grounding Terminal

PV Laminate

Figure 7-1: Electrical circuitry of cell strings and bypass diodes

Figure 7-2: Electrical circuitry of cells and bypass diodes

In the event of a known or suspected diode failure, installers or maintenance 
providers should contact the company the PV modules were purchased from. 
Never attempt to open the junction box of a Yingli Solar PV module yourself.

PV Array Grounding

For optimal performance, Yingli Solar recommends that the negative pole of the 
PV array be connected to ground.

Equipment Grounding

The frame of the PV module, as well as any exposed non-current-carrying metal 
parts of fixed equipment that are able to become energized by the PV system, 
must be connected to the equipment grounding conductor (EGC) in order to 
prevent electrical shock. Even when applicable regulations, code requirements, 
and standards do not require safety-related grounding, Yingli Solar recommends 
grounding all PV


module frames in order to ensure the voltage between


electrically conductive equipment and earth ground is zero in all circumstances.

Proper equipment grounding is achieved by bonding all exposed non-current-
carrying metal equipment continuously to one another using an appropriately 
sized EGC or racking system that can be used for integrated grounding (see 
Option B in Grounding Methods below). 

Yingli Solar PV modules employ a coated aluminum frame for corrosion 
resistance. In order to properly ground the module frame, the coating must be 
penetrated. 

The potential for corrosion due to the electrochemical action between dissimilar 
metals in contact is minimized if the electrochemical voltage potential between 
the dissimilar metals is low. The grounding method must not result in the direct 
contact of dissimilar metals with the aluminum frame of the PV module that 
will result in galvanic corrosion. An addendum to  UL Standard 1703 “Flat Plate 
Photovoltaic Modules and Panels” recommends metal combinations not exceed 
an electrochemical potential difference of 0.5 Volts.

The frame rails have pre-drilled holes marked with a grounding sign, as 
illustrated in Figure 8. These holes should be used for grounding


purposes and 

must not be used for installation the PV modules. Do not drill additional holes 
into the frame rails. 


Figure 8: Grounding hole detail

The following grounding methods are available:

Option A: Screw Assembly (see Figure 9)

1.  The grounding screw must be installed on the designed grounding hole and 

must be stainless steel screw.

2.  The screw first passes through the stainless steel flat washers. The screw 

rods pass through the grounding holes outwards, and then pass through 
the stainless steel piercing washers, grounding terminal, stainless steel flat 
washers, and stainless steel spring washers in turn, and finally fix them with 
stainless steel backing nuts.

3. Tighten the backing nut to a torque of not less than 4 N∙m to ensure that the 
backing nut can securely hold the screw.

4.  Install piercing washers of appropriate size, and ensure that the protrusions of 

the piercing washers reliably pierce the frame of the module.

Figure 9: Grounding screw assembly detail

Option B: Racking Manufacturer Integrated  

Grounding Methods

Yingli Solar PV modules can be grounded by bonding PV modules to a grounded 
racking system. Integrated grounding methods must be certified for grounding 
PV modules and must be installed in accordance     with the specified instructions 
of their respective manufacturers.

Option C: Additional Third-party Grounding Devices

Yingli Solar PV modules can be grounded using third party grounding devices so 
long as they are certified for grounding PV modules and the devices are installed 
according to the manufacturer’s specified instructions. 

M E C H A N I C A L   I N S TA L L AT I O N

General

Yingli Solar PV Modules have been certified for a maximum static load on the 
back of the module of up to 2400 Pa (i.e. wind load) and a maximum static load 
on the front of the module of up to either 2400 Pa or 5400 Pa (i.e. wind and 

Figure 7-1: Electrical circuitry of cells and bypass diodes

Содержание YLM-J 3.0 PRO Series

Страница 1: ...tification requirements has been verified by an independent certification laboratory This Installation and User Manual is available in different languages In cases of discrepancy between versions the English language version shall control Failure to comply with the requirements listed in this manual will invalidate the Limited Warranty for PV Modules as provided by Yingli Solar at the time of sale...

Страница 2: ...ules in any way Doing so may degrade performance or cause irreparable damage and will void any applicable warranties If it is necessary to store PV modules prior to installation the PV modules should remain inside the packaging and protected from exposure that could compromise the durability of the packaging Fire Yingli Solar PV Modules have a Class C fire resistance rating in accordance with the ...

Страница 3: ...cross sectional areas that are approved for use at the maximum short circuit current of the PV module Yingli Solar recommends installers use only sunlight resistant cables qualified for direct current DC wiring in PV systems The minimum wire size should be 4mm2 Table 1 Required minimum field wiring specifications Testing Standard Wire Size Temperature Rating Required Minimum Field Wiring EN 50618 ...

Страница 4: ...sult in galvanic corrosion An addendum to UL Standard 1703 Flat Plate Photovoltaic Modules and Panels recommends metal combinations not exceed an electrochemical potential difference of 0 5 Volts The frame rails have pre drilled holes marked with a grounding sign as illustrated in Figure 8 These holes should be used for grounding purposes and must not be used for installation the PV modules Do not...

Страница 5: ...n attachment Figure 12 Installation rails The large size modules are mounted with four outer holes with max mechanical loads of 5400 Pa snow front and 2400 Pa wind back Top down Clamps Third party clamps that have been designed for PV installation structures are an approved installation attachment method for Yingli Solar PV modules Modules must be fastened using clamps applied to the top side of t...

Страница 6: ...rasive materials that could scratch or damage the glass surface Failure to comply with these requirements may adversely affect the PV module performance Yingli Solar PV modules are designed to withstand high snow loads However if removing snow is desired to enhance production use a brush to gently remove snow Do not try to remove frozen snow or ice from PV modules DECOMMISSIONING The dismantling o...

Страница 7: ...racteristics are within 10 percent of the indicated values of Isc Voc and Pmax under Standard Test Conditions irradiance of 1000 W m2 AM 1 5 spectrum and a cell temperature of 25 C Refer to module datasheets for specific power output tolerances Please refer to Table 1 to see which power classes actually exist for which module series Family YLM J 3 0 PRO Type YLxxxD 37e 1 2 xxx 390 415 YLxxxD 37e 1...

Страница 8: ...4 20 N m The tightening steps as follows use torque wrench to tighten nut to target torque nut loosen 90 180 degrees finally tighten the nut to the target torque and reduce the torque attenuation 2 Mounting hole installation 1P tracker Type Mechanical load Pa Safety factor Schematic diagram Purlin parallel to long side frame 1600 1600 1 5 Notes To maximize mounting longevity Yingli Solar strongly ...

Страница 9: ...ashers of minimum 1 4 mm thickness with an minimum outer diameter of 15 57 mm Modules can be attached using the mounting holes the number of mounting holes used for a single long side frame 2 including at least one φ7 10 mm hole on the back of the module frame by fixing the module to the support rails with bolts Secure the module in each mounting location with M6 and M8 bolts and matching flat was...

Страница 10: ... when it is pressed down L represents the length of the long side of the module the described distances are from the module edge to the middle of the clamp The long side frames of the module are fixed to the mounting beam or rail by at least 4 clamps that can be fitted with M8 bolts The length of the clamp 40 mm and the module frame to maintain at least 7 mm but not more than 10 mm overlap part co...

Страница 11: ...es are required to secure the modules to the forklift with a tensile strength greater than 2000 kgf 2 Pass the forearm of the anti tilting bracket through the pallet insert the two bolts into the front round hole of the anti tilting bracket and adjust the support angle of the anti tilting bracket so that the angle with the ground is between 80 and 87 3 When placing it need to wait for the packing ...

Отзывы: