background image


10 

Horizon  

/

  Yealink W73P User Guide 


Register the Handset(s) to Base Station 

You need to register your handset to a base station if you want to use the basic functions of the DECT 
phone. You can register up to 10 handsets per base station. 

Putting the Base Station into Registration Mode 

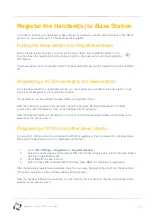
Before registering the handset, you must put the base station into registration mode. To do 
this, long press the registration button (pictured right) on the base station until the registration 
LED flashes. 


If the base station does not identify a DECT handset within 90 seconds the registration mode will switch 
off. 


Registering a W73H handset to the Base Station 

Once the base station is in registration mode, you can register your handset to the base station. To do 
this, press the 

Reg

 soft key to register the handset. 

The handset is now searching for a base station in registration mode. 

After the handset is registe

red successfully, the phone prompts “Handset Subscribed” and “Base 

number 

[The last 4 characters of the connected Base’s MAC address]

”. 

After the handset initialised successfully, an icon with the internal handset number and handset name 
appears on the phone screen. 


Registering a W73H to another Base Station 

If  you  wish  to  change  which  base  station  the  W73H  is  registered,  then  complete  the  following  steps. 
Make sure the base station is in the registration mode then: 


1. 

Go to 

OK

 > 

Settings

 > 

Registration

 > 

Register Handset

2. 

Select the desired base and then press 

OK

. The handset begins searching for the base station 

which is in registration mode. 

3. 

Press 

OK

 after a base is found 

4. 

Enter the base PIN (default is 0000) and then press 

Done

 to complete the registration. 

After the handset is registered successfully, the phone prompts “Handset Subscribed” and “Base number 

[The last 4 characters of the connected Base’s MAC address]

”. 

After the handset initialised successfully, an icon with the internal handset number and handset name 
appears on the phone screen. 

Содержание W73P

Страница 1: ...1 Horizon Yealink W73P User Guide artemis marketing Horizon Yealink W73P User Guide...

Страница 2: ...10 Troubleshooting 11 Deregistering a handset 11 Placing a Call 11 Placing an Internal call Intercom 11 Placing an Internal Call During an External Call 12 Placing External Calls 12 Placing Multiple...

Страница 3: ...16 Locking Unlocking the Handset 16 Locating a Handset 16 Renaming the Handset 17 Silent Mode 17 DECT Repeater RT30 18 LED Status 19 Installation 20 Connect the Power for the Repeater 20 Mount to a W...

Страница 4: ...t You can purchase additional W73H handsets separately though one comes in the W73P package The W73P will allow you to register up to 10 users using the W73H handset per W70B base station When using a...

Страница 5: ...he handset registration status or the base station is in the paging mode 2 Network Status LED Indicates the network status 3 Power LED Indicator Indicates the power status of the base station 4 Paging...

Страница 6: ...e voice mail or missed call 6 Speakerphone Key Switches among the receiver headset and handsfree modes Answers an incoming call Places a call in handsfree mode 7 Navigation Keys Scroll through informa...

Страница 7: ...the handset when the handset is idle To return to the main screen you can long press the On hook key to quickly exit the menu 10 Off hook Key Answers an incoming call Enters the redial calls list Pla...

Страница 8: ...ll Waiting Directory To access the directory Settings To personalise the settings of your handset History To access the call history list Icons Description Signal strength Weak to strong No reception...

Страница 9: ...er special characters Press to enter the space character or the following special characters _ Press If it is in the uppercase ABC uppercase and lowercase Abc or lowercase abc input modes it will prov...

Страница 10: ...fter the handset is registered successfully the phone prompts Handset Subscribed and Base number The last 4 characters of the connected Base s MAC address After the handset initialised successfully an...

Страница 11: ...to the base station you can use your handset to place an internal or external call The handset can handle 2 calls at the same time Placing an Internal call Intercom Intercom is a useful feature in the...

Страница 12: ...xtension number or telephone number and then press the OK key Placing a Call from the Call History You can place calls to contacts from the History list which contains the calls that were recently pla...

Страница 13: ...g call and select Answer Silencing an Incoming Call You can silence a call to stop your phone from ringing Even if you silence the call the incoming call notification continues to be displayed on your...

Страница 14: ...update the Horizon platform The types of call forwarding available are Always Forward Incoming calls are always forwarded There is no prompt on the phone screen when the line receives an incoming cal...

Страница 15: ...You can initiate a three way including yourself conference calls with your contacts on the phone 2 Place a call to the first party 3 When the first party answers the call select Options Conference The...

Страница 16: ...is automatically turned on 1 Go to OK Settings Display Display Backlight 2 Select the desired value from the Active Level field 3 Select the desired value from the In Charger or Out Of Charger field 4...

Страница 17: ...rent name in the Rename Phone Name field 3 Confirm the action Silent Mode You can enable the silent mode if you do not want to be disturbed The handset will not ring when receiving an incoming call bu...

Страница 18: ...e in accordance with Digital Enhanced Cordless Telecommunication DECT standards All the usual handset functions are supported by the base station in the extended radio range The repeater base station...

Страница 19: ...on in calls reached the max number of calls Green Green Orange Red Error Repeater ID conflict Green Alternately flashing red and green Off Repeater ID confirmation Green Red Flashing Green 1 Repeater...

Страница 20: ...20 Horizon Yealink W73P User Guide Installation Connect the Power for the Repeater Connect the RT30 to a power outlet using the provided cable and USB power adapter Mount to a Wall...

Страница 21: ...repeater can be used to extend the range up to 300m in unobstructed outdoor areas and up to 50m inside buildings in a single direction or in all directions The automatic handover process is seamless...

Страница 22: ...peater If you want to register more than one repeater in order to avoid ID conflict we recommend that you put the repeaters closer to the base station and register the repeaters one by one 1 Plug the...

Страница 23: ...ode 2 On the other repeater a Long press the program key for about 3 seconds b Press the program key as soon as POWER LED turns orange and DECT LED flashes green to enter the repeater s ID to be casca...

Страница 24: ...lashes red the de registration is successful Placement To achieve optimum performance for the repeater it is important to find an appropriate location 1 Hold the handset and stand near the base statio...

Страница 25: ...s Choose a raised position for both the base station and the repeater wherever possible When positioning the repeater avoid obstacles that can interference with radio transmission such as thick walls...

Отзывы: