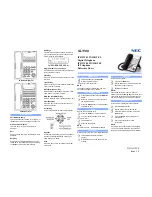
background image

8   -  Title 


Item 

Description 

  LCD Screen 

Shows information about calls, messages, soft keys, 
time, date and other relevant data: 
• Call information—caller ID, call duration 
• Icons (for example,     ) 
• Missed call text or second incoming caller information 
• Prompt text (for example, "Saving config file!") 
• Time and date 


Power Indicator 
LED 

Indicates phone power and some feature statuses. 

  Line Keys 

Use these keys to activate up to sixteen accounts and 
assign various features. 


HEADSET Key 

Toggles and indicates the headset mode. 

MUTE Key 

Toggles and indicates mute feature. 


MESSAGE Key 

Accesses voice messages. 

HOLD Key 

Places a call on hold or resumes a held call. 

REDIAL Key 

Redials a previously dialled number. 

TRANSFER Key 

Transfers a call to another party. 

  Speakerphone Key 

Toggles the hands-free speakerphone mode. 

  Volume Key 

Adjusts the volume of the handset, headset, speaker, 
and ringer. 

  Keypad 

Provides the digits, letters and special characters in 
context-sensitive applications. 


Scroll through the displayed information. 


Confirms actions or answers incoming calls. 


Cancels actions or rejects incoming calls. 

  Soft Keys 

Label automatically to identify their context-sensitive 
features. 

  Speaker 

Provides ringer and hands-free (speakerphone) audio 
output. 

  Hookswitch Tab 

Secures the handset in the handset cradle when the IP 
phone is mounted vertically.  

  Hookswitch 

Picking up the handset from the handset cradle, the 
hookswitch bounces and the phone connects to the 
line, laying the handset down on the handset cradle, 
the phone disconnects from the line. 


Icon Instructions 

Содержание T46G Skype For Business Edition

Страница 1: ...Claranet Hosted Voice v2 Yealink T46G User Guide All Rights Reserved 2010 Claranet Contents Claranet Hosted Voice v2 Yealink T46G User Guide March 2018...

Страница 2: ...e 7 Hardware Component Instructions 7 Icon Instructions 8 Phone Display Views 10 Basic Call Features 11 Placing Calls 11 Answering Calls 11 Transferring Calls 12 Ending Calls 12 Conference Calls 12 Do...

Страница 3: ...This doesn t take long as it is easy to do Just follow the simple instructions in this user guide or the quick start guide included with the phone Got everything IP Phone Handset Handset cord Etherne...

Страница 4: ...work in the event of power or broadband connection failure These failures may be caused by reasons outside our control Location information provided to the emergency services is limited to the locati...

Страница 5: ...vise you which one to use AC power Optional Power over Ethernet PoE AC Power Optional To connect the AC power 1 Connect the DC plug on the power adapter to the DC5V port on the phone and connect the o...

Страница 6: ...one and an available port on the in line power switch hub Note If in line power switch hub is provided you don t need to connect the phone to the power adapter Make sure the switch hub is PoE complian...

Страница 7: ...low the phone time to complete Your phone has provisioned correctly if this symbol is showing against the phones line key Your phone has not provisioned correctly if this symbol is showing against the...

Страница 8: ...dialled number TRANSFER Key Transfers a call to another party Speakerphone Key Toggles the hands free speakerphone mode Volume Key Adjusts the volume of the handset headset speaker and ringer Keypad P...

Страница 9: ...put mode Alphanumeric input mode Numeric input mode Multi lingual uppercase and lowercase letters input mode Voice Mail Text Message Auto Answer Do Not Disturb Call Forward Call Hold Call Mute Ringer...

Страница 10: ...nu 5 This area shows the wallpaper which can be customized Phone Status You can view phone status via phone user interface or web user interface Available information of phone status includes Network...

Страница 11: ...by pressing the Speakerphone key the Headset key or picking up the handset To place a call using the handset 1 Pick up the handset 2 Enter the desired number using the keypad 3 Press or the Send soft...

Страница 12: ...ss the Directory soft key to find the number of directory or History 3 Press or to dial out 4 Press the Tran soft key to complete the transfer when receiving ringback To perform an attended transfer 1...

Страница 13: ...ompt list The detailed information of the entry appears on the LCD screen To place a call from the call history list 1 Press the History soft key 2 Press or to switch between All Placed Received Misse...

Страница 14: ...ce mail the phone will play a warning tone and the power indicator LED will slow flash red The LCD screen will display a prompt message and appear an icon 1 When the phone user interface prompts recei...

Страница 15: ...electrical storm Product disposal instructions The symbol shown here and on the product means that the product is classed as Electrical or Electronic Equipment and should not be disposed with other h...

Страница 16: ...ver any faults or defects caused by accidents misuse fair wear and tear neglect tampering with the equipment or any attempt at adjustment or repair other than through approved agents This guarantee do...

Отзывы: