background image

5  Installation Procedure

20


YASKAWA ELECTRIC

 TOBP C730600 82B YASKAWA AC Drive Option SI-P3 Installation Manual

5.

Select the proper PROFIBUS-DP dedicated communication cable according to 

Table 6

 and 

Table 7

.

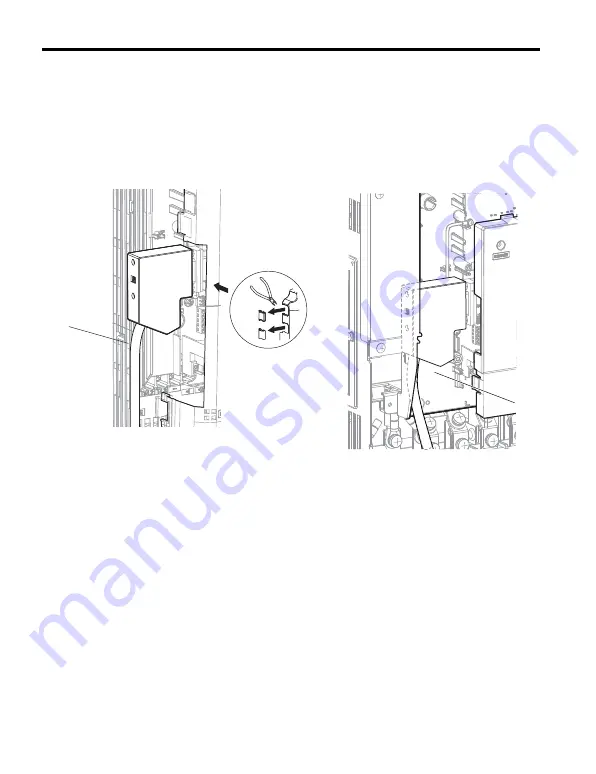
Route the option wiring inside the enclosure as shown in 

Figure 8

-B. Take proper 

precautions so that the front covers will easily fit back onto the drive.

Users may also choose to route the option wiring through openings on the front 

cover of some models. Remove the perforated tabs on the left side of the front cover 

as shown in 

Figure 8

-A to create the necessary openings on these models. 

Refer to the Peripheral Devices & Options section of the drive instruction manual for 

more information.

Figure 8  

Figure 8  Wire Routing Examples

A – Route wires through the openings 

provided on the left side of the 
front cover. 

<1>

<1> The drive will not meet Enclosed wall-mounted type (UL Type 1) requirements if wiring is exposed outside the 

enclosure.

B – Use the open space provided 

inside the drive to route option 
wiring.

A

B

Содержание PROFIBUS-DP SI-P3

Страница 1: ...use the product read this manual thoroughly and retain for easy reference inspection and maintenance Ensure the end user receives this manual 製品を安全にお使いいただくために この取扱説明書を必ずお読みください また 本書をお手元に保管していただくとともに 最終的に本製品をご使用になる ユーザー様のお手元に確実に届けられるよう お取り計らい願います MANUAL NO TOBP C730600 82B PROFIBUS DP PROFIBUS DP通信 ...

Страница 2: ... the prior written permission of Yaskawa No patent liability is assumed with respect to the use of the information contained herein Moreover because Yaskawa is constantly striving to improve its high quality products the information contained in this manual is subject to change without notice Every precaution has been taken in the preparation of this manual Yaskawa assumes no responsibility for er...

Страница 3: ...ation Manual 3 Table of Contents 1 PREFACE AND SAFETY 4 2 PRODUCT OVERVIEW 8 3 RECEIVING 9 4 OPTION COMPONENTS 10 5 INSTALLATION PROCEDURE 14 6 RELATED PARAMETERS 34 7 PROFIBUS DP OPTION DATA AND I O MAPS 38 8 TROUBLESHOOTING 42 9 EUROPEAN STANDARDS 46 10 SPECIFICATIONS 48 ...

Страница 4: ...peration of that part Any warnings provided by YASKAWA must be promptly provided to the end user YASKAWA offers an express warranty only as to the quality of its products in conforming to standards and specifications published in the manual NO OTHER WARRANTY EXPRESS OR IMPLIED IS OFFERED YASKAWA assumes no liability for any personal injury property damage losses or claims arising from misapplicati...

Страница 5: ... http www e mechatronics com Other areas Check the back cover of these manuals YASKAWA AC Drive 1000 Series Technical Manual YASKAWA AC Drive GA700 Quick Start Guide Initial Steps YASKAWA AC Drive GA700 Technical Manual Note Indicates a supplement or precaution that does not cause drive damage Option YASKAWA AC Drive Option PROFIBUS DP SI P3 Drive YASKAWA A1000 Series Drive YASKAWA U1000 Series Dr...

Страница 6: ...ng conventions indicate safety messages in this manual Failure to heed these messages could cause fatal injury or damage products and related equipment and systems DANGER Indicates a hazardous situation which if not avoided will cause death or serious injury WARNING Indicates a hazardous situation which if not avoided could cause death or serious injury CAUTION Indicates a hazardous situation whic...

Страница 7: ...wa sales office and provide the manual number shown on the front cove to order new copies of the manual DANGER Heed the safety messages in this manual Failure to comply will cause death or serious injury The operating company is responsible for any injuries or equipment damage resulting from failure to heed the warnings in this manual WARNING Electrical Shock Hazard Do not attempt to modify or alt...

Страница 8: ...rotocol PROFIBUS DP is included into the European Fieldbus Standard EN 50170 The network is primarily used in process and factory automation Install the option PROFIBUS option on a drive to perform the following functions from a PROFIBUS DP master device Operate the drive Monitor the drive operation status Change drive parameter settings u Applicable Models The option can be used with the models i...

Страница 9: ...ntact the distributor where the option was purchased or the Yaskawa sales office immediately about any problems with the option u Contents and Packaging Table 2 Contents of Package u Installation Tools A Phillips screwdriver Phillips screw sizes vary by drive capacity A flat blade screwdriver blade depth 0 4 mm 0 02 in width 2 5 mm 0 1 in A pair of diagonal cutting pliers A small file or medium gr...

Страница 10: ... LED ERR 1 B Installation hole G Ground terminal FE and installation hole 2 C LED RUN 1 H Communication cable connector CN4 D LED COMM 1 I Option model number 1 Refer to Option LED Display on page 11 for details on the LEDs 2 Connect the provided ground wire during installation Installation on GA700 drives does not require the ground wire E LED BF 1 A H I B C D FE G SI P3 Communication connector b...

Страница 11: ... the LEDs after completion of the power up diagnostic process are described in Table 5 Wait at least 2 seconds for the power up diagnostic process to complete before verifying the states of the LEDs Connector Pin Signal Description 1 Shield Connected to the metal shell no direct FG connection 2 3 RxD TxD P Receive Transmit data line B red 4 CNTR P Control signal for repeaters direction control 5 D...

Страница 12: ...on error Connection error between option and drive This includes node address setting errors to parameter F6 30 on the drive side OFF Normal operation Drive and option are properly connected COMM Communication Status Green ON Communication connected Normal send receive between the option and the PROFIBUS DP master OFF No data exchange There is a problem establishing communication between the optio...

Страница 13: ...r The option is damaged Cycle power to the drive If the LED status does not change replace the option Problem connecting to the drive Problem initializing the drive and the option Incorrect node address Cycle power to the drive If the LED status does not change replace the option Check the node address setting in the drive F6 30 Waiting for data from the master device Waiting for data from the mas...

Страница 14: ...OFF measure for unsafe voltages to confirm the drive is safe WARNING Electrical Shock Hazard Do not operate equipment with covers removed Failure to comply could cause death or serious injury The diagrams in this section may include options and drives without covers or safety shields to illustrate details Reinstall covers and shields before operating the drive and run the drive according to the in...

Страница 15: ...d cause ESD damage to circuitry Never connect or disconnect the motor from the drive while the drive is outputting voltage Improper equipment sequencing could damage the drive Do not connect or operate any equipment with visible damage or missing parts Failure to comply could further damage the equipment Do not use unshielded wire for control wiring Failure to comply may cause electrical interfere...

Страница 16: ... normally Refer to Figure 3 for an exploded view of the drive with the option and related components for reference in the installation procedure Figure 3 Figure 3 Drive Components with Option A Insertion point for CN5 I Ground wire B Option card J Drive grounding terminal FE C Front cover K Connector CN5 A D Digital operator L Connector CN5 B Not available for communication option installation E L...

Страница 17: ...d on the warning label The internal capacitor remains charged even after the drive is de energized The charge indicator LED will extinguish when the DC bus voltage is below 50 Vdc When all indicators are OFF measure for unsafe voltages to confirm the drive is safe 1 Shut off power to the drive wait the appropriate amount of time for voltage to dissipate then remove the digital operator D and front...

Страница 18: ...n the appropriate position on the drive front cover C Figure 5 Figure 5 Affix the LED Label 3 Insert the option card B into the CN5 A K connector on the drive and fasten it into place using one of the included screws H Tighten the screw to 0 5 to 0 6 N m 4 4 to 5 3 in lbs Figure 6 Figure 6 Insert the Option Card ERR BF RUN COMM C E K H B ...

Страница 19: ...terminal J using one of the remaining provided screws H Connect the other end of the ground wire I to the remaining ground terminal using the last remaining provided screw H Figure 7 Figure 7 Connect the Ground Wire Note The drive has only two ground terminal screw holes J Two ground wires should share the same ground terminal when connecting three options BF H I J ...

Страница 20: ...ring through openings on the front cover of some models Remove the perforated tabs on the left side of the front cover as shown in Figure 8 A to create the necessary openings on these models Refer to the Peripheral Devices Options section of the drive instruction manual for more information Figure 8 Figure 8 Wire Routing Examples A Route wires through the openings provided on the left side of the ...

Страница 21: ...e cable end is firmly connected see Figure 18 Refer to Communication Cable Specifications on page 30 for details 7 Replace and secure the front covers of the drive C F and replace the digital operator D NOTICE Do not pinch cables between the front covers and the drive Failure to comply could cause erroneous operation Figure 9 Figure 9 Replace the Front Covers and Digital Operator 8 Set drive param...

Страница 22: ... Verify that the drive functions normally Refer to Figure 10 for an exploded view of the drive with the option and related components for reference in the installation procedure Figure 10 Figure 10 Drive Components with Option A Insertion point for CN5 connector H Connector CN5 A B SI P3 option I Connector CN5 B Not available for communication option installation C Included screws D Drive front co...

Страница 23: ...al Shock Hazard Do not inspect connect or disconnect any wiring while the drive is energized Failure to comply will cause death or serious injury Before servicing disconnect all power to the equipment and wait for at least the time specified on the warning label The internal capacitor remains charged even after the drive is de energized The charge indicator LED will extinguish when the DC bus volt...

Страница 24: ...NOTICE Damage to Equipment Observe proper electrostatic discharge ESD procedures when handling the option drive and circuit boards Failure to comply could cause ESD damage to circuitry Figure 12 Figure 12 Remove the Front Cover and Keypad A1000 D F Keypad connector Keypad connector tab Move the keypad connector to the holder on the drive after removing the keypad and before removing the front cove...

Страница 25: ... side of the drive using the temporary placement holes Refer to the manual packaged with the drive for details on removing the LED Status Ring board NOTICE Do not remove the LED Status Ring board cable connector Failure to comply could cause erroneous operation and damage the drive Figure 13 Figure 13 Remove the LED Status Ring Board A1000 G Drive front view Temporary placement holes ...

Страница 26: ...place using the included screws C Tighten both screws to 0 5 to 0 6 N m 4 4 to 5 3 in lbs Note Installing the option card on a GA700 drive requires only two screws and does not require a ground wire The option package ships with three screws and a ground wire for installation on other drive series Do not use the ground wire or the extra screw Figure 14 Figure 14 Insert the Option Card H C B A1000 ...

Страница 27: ...ording to Table 6 and Table 7 Firmly connect the PROFIBUS DP communication cable to option communication connector CN4 Install PROFIBUS DP communications cables apart from main circuit wiring and other electrical and power lines Ensure the cable end is firmly connected see Figure 18 Refer to Communication Cable Specifications on page 30 for details Note Maximum transmission distance is 100 m 328 f...

Страница 28: ... not pinch cables between the front cover or the LED Status Ring board and the drive Failure to comply could cause erroneous operation 9 Replace and secure the front cover of the drive D including the keypad F Figure 17 Figure 17 Replace the Front Cover and Keypad A1000 G D F Install the keypad to the drive after replacing the keypad connector and then the keypad connector At that time insert the ...

Страница 29: ...onal cutters to cut out the perforated openings in the right side of the drive front cover and leave no sharp edges to damage wiring The drive will not meet IP20 conformity if wiring is exposed outside the enclosure 10 Set drive parameters in Table 8 for proper option performance Be sure to set parameter F6 30 to a node address unique to the network Right side of the drive front cover Route the wi...

Страница 30: ...le for the conditions listed in Table 6 and Table 7 Table 6 Communication Cable Requirements Table 7 Communication Cable Length Condition Specifications Impedance 135 to 165 Ω at a frequency of 3 to 20 MHz Capacity 30 pF m maximum Loop Resistance 110 Ω km maximum Core Cross Section 0 34 mm2 minimum Core Diameter 0 64 mm minimum Communication Speed kbps Distance per Segment 9 6 1200 m 3937 ft 19 2 ...

Страница 31: ...e provided ground wire during installation on 1000 series drives Installation on GA700 drives does not require the ground wire Drive 9 pin D sub Connector Turn on the termination resistor switch for the last node on the bus SI P3 RTS DGND VP A line B line 1B 1A 3 8 4 6 5 2B 2A CN5 A FE 1 PROFIBUS Cable PROFIBUS Cable Connector Red Green Red Green Shell To PROFIBUS DP Master To the next slave Shell...

Страница 32: ...etwork drive has a termination resistor Use only the input side cable entry as shown in Figure 19 when connecting both ends of the network Most 9 pin D sub connectors have a function for disconnecting the output side of the cable Communication will not be possible between devices if the connector is reversed Most connectors have arrows indicating the input and output sides Figure 19 Figure 19 PROF...

Страница 33: ...uctors as shown in Figure 18 Figure 20 Figure 20 Cable Termination of the Option Cable to EN50170 Pin Numbers for a 9 pin D sub Connector u GSD Files To facilitate network implementation obtain a GSD file from one of the following websites depending on your region U S http www yaskawa com Europe http www yaskawa eu com Japan http www e mechatronics com Other areas Contact your Yaskawa representati...

Страница 34: ...0 to 3 Set to 3 d5 01 29A Torque Control Selection 0 Speed Control 1 Torque Control Default 0 Range 0 1 F6 01 3A2 2 Communication Error Selection Selects drive response when a bUS error is detected during communications with the option 0 Ramp to Stop 1 Coast to Stop 2 Fast Stop Use C1 09 3 Alarm Only 2 4 Alarm Run at d1 04 3 4 5 Alarm Ramp to Stop 3 4 Default 1 Range 0 to 5 3 F6 02 3A3 Comm Extern...

Страница 35: ...s received 0 Resets to 0 1 Maintains the previous value Default 0 Range 0 1 F6 32 3CD 8 10 PROFIBUS DP Data Format Selection 0 PPO Type 1 Conventional 2 PPO bit0 4 11 3 PPO Type Enter 4 12 4 Conv Enter 4 12 5 PPO bit0 Enter 4 11 12 Default 0 Range 0 to 5 F7 16 3F4 4 8 Timeout Value Sets the time out value for communication loss detection in tenths of a second A value of 0 disables the connection t...

Страница 36: ...7 70 78A 4 8 PZD1 Read Sets MEMOBUS Modbus address for PZD1 Read PPO Read The value of 0 to 2 enables the PZD1 Read as ZSW Default 0H Min 0H Max FFFFH F7 71 78B 4 8 PZD2 Read Sets MEMOBUS Modbus address for PZD2 Read PPO Read The value of 0 to 2 enables the PZD2 Read as HIW Default 0H Min 0H Max FFFFH F7 72 78C 4 8 PZD3 Read Sets MEMOBUS Modbus address for PZD3 Read PPO Read The value of 0 to 2 di...

Страница 37: ...ter depends on drive series 1000 Series Drives Parameter is available in CLV AOLV PM and CLV PM In AOLV PM this value is read as the Torque Limit GA700 Drives Parameter is available in CLV AOLV AOLV PM and CLV PM 6 Refer to the instruction manual of a specific drive to determine if settings 4 and 5 are available in the drive 7 The setting specifies that network communications provide the torque re...

Страница 38: ...en the drive and controller or PLC using MEMOBUS Modbus messages All drive parameters and data can be accessed through MEMOBUS Modbus The data in this message type is transferred to the drive after being received and edited by the option and more time is required to return the data to the master The master must synchronize the timing of sending and receiving the data by a process called handshakin...

Страница 39: ...e Low Byte 3 Motor Speed Low Byte 5 4 Torque Reference High Byte 1 2 4 Torque Reference Monitor High Byte 6 5 Torque Reference Low Byte 1 2 5 Torque Reference Monitor Low Byte 6 6 Torque Compensation High Byte 1 6 Speed Detection PG Pulse Count 1 High Byte 7 Torque Compensation Low Byte 1 7 Speed Detection PG Pulse Count 1 Low Byte 8 Reserved 8 Frequency Reference High Byte 9 9 Frequency Reference...

Страница 40: ...gital output ON OFF during communications set H2 01 Terminal M1 M2 and MC Function Selection relay H2 02 Terminal P1 PC Function Selection open collector H2 03 Terminal P2 PC Function Selection open collector and H2 04 Terminal P2 PC Function Select to F through mode 5 Unit depends on the setting of o1 03 Digital Operator Display Scaling Input data is 0 when the drive is set for V f Control or OLV...

Страница 41: ... to the PROFIBUS specification for more information on PPO types 1 5 The option supports five possible PPO type formats PPO type 1 8 octets PKW 4 octets PZD PPO type 2 8 octets PKW 12 octets PZD PPO type 3 4 octets PZD PPO type 4 12 octets PZD PPO type 5 8 octets PKW 20 octets PZD All PPO Types have the registers STW ZSW HSW and HIW These registers are not mapped directly to drive registers 1 Unit...

Страница 42: ...splay Fault Name bUS Option Communication Error After establishing initial communication the connection was lost Only detected when the run command frequency reference is assigned to the option bl 01 3 or bl 02 3 Cause Possible Solution No signal was received from the PLC Check for faulty wiring Correct any wiring problems Faulty communications wiring An existing short circuit or communications di...

Страница 43: ...for those options Keypad Display Fault Name oFA01 Option Card Fault CN5 A Option is not properly connected Cause Possible Solution The option connected to option port CN5 A was changed during run De energize the drive and plug the option into the drive according to Installation Procedure on page 14 Keypad Display Fault Name to oFA30 to oFA43 Option Card Connection Error CN5 A Communication ID erro...

Страница 44: ...pported by option port CN5 C Keypad Display Fault Name oFC02 Option Fault Option Flash write mode Cause Possible Solution An option of the same type is already installed in option port CN5 A CN5 B or CN5 C Connect the option to the correct option port Keypad Display Minor Fault Name bb Baseblock Data format and setting contents do not match Cause Possible Solution Minor Fault H2 10 The drive outpu...

Страница 45: ...disconnected cables and short circuits and repair as needed Programming error on the master side Check communications at start up and correct programming errors Communication circuitry is damaged Perform a self diagnostics check If the problem continues replace either the control board or the entire drive For instructions on replacing the control board contact Yaskawa or your nearest sales represe...

Страница 46: ...When using drives displaying the CE mark in combination with other devices it is ultimately the responsibility of the user to ensure compliance with CE standards Verify that conditions meet European standards after setting up the device u EMC Guidelines Compliance This option is tested according to European standards EN61800 3 2004 A1 2012 and complies with EMC guidelines The CE marking is declare...

Страница 47: ...ls PG DI DO AI AO SI Figure 23 Figure 23 Option Installation for CE Compliance A Braided shield cable C Cable clamp conductive B Metal panel C B A L1 L2 L3 L1 L2 L3 R CN5 B CN5 C CN5 A CN5 B CN5 C CN5 A S T PG Drive EMC filter PG option DI DO AI AO I O option SI Communication option Encoder I O device Master Cable clamp Enclosure panel Three phase power supply Cable clamp Cable clamp ...

Страница 48: ...bytes outputs 4 bytes MEMOBUS Modbus message inputs 8 bytes outputs 8 bytes Basic data High speed I O data inputs 6 bytes outputs 6 bytes Connector 9 pin D sub connector 4 40 UNC thread Communications Speed 9 6 kbps to 12 Mbps Ambient Temperature 10 C to 50 C 14 F to 122 F Humidity 95 RH or lower with no condensation Storage Temperature 20 C to 60 C 4 F to 140 F allowed for short term transport of...

Страница 49: ... bottom of the back cover Date of Publication Revision Number Section Revised Content June 2017 2 Back cover Revision Address October 2016 1 All Revision Applicable drive series Reviewed and corrected entire documentation Back cover Revision Address April 2016 First Edition MANUAL NO TOBP C730600 82B 1 Published in Japan October 2016 Date of publication Revision number ...

Страница 50: ...66 2 017 0099 Fax 66 2 017 0799 http www yaskawa co th YASKAWA ELECTRIC CHINA CO LTD 22F One Corporate Avenue No 222 Hubin Road Shanghai 200021 China Phone 86 21 5385 2200 Fax 86 21 5385 3299 http www yaskawa com cn YASKAWA ELECTRIC CHINA CO LTD BEIJING OFFICE Room 1011 Tower W3 Oriental Plaza No 1 East Chang An Ave Dong Cheng District Beijing 100738 China Phone 86 10 8518 4086 Fax 86 10 8518 4082...

Отзывы: