background image

3

Home Position Return

3.3

Methods for Home Position Return

3-8

HW1485471

HW1485471

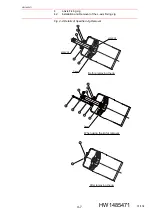
6. T-Axis Positioning

As shown in 

fig. 3-7  “T-axis Positioning” 

, insert two pins (HW1408161-6-

20) into the wrist, and then mount the plate (HW0400734-1).
Insert the pin (HW9405595-1) from the above mentioned mounted plate 
(HW0400734-1), and perform positioning by using the programming 
pendant so that the pin fits into the hole (

) of the wrist.

Fig. 3-7: T-axis Positioning

3.3.3 Using Encoder Backup Error Recovery Function

For details on the encoder backup error recovery function, refer to 
“YRC1000 INSTRUCTIONS (RE-CTO-A221)”.

3.3.4 Robot Calibration (MOTOCALV EG)

Contact your YASKAWA representative for the procedure of robot 
calibration.

6 dia.

+0.012

  0

Pin (HW1408161-6-20) (2 pins)

Plate (HW0400734-1)

Wrist

Flange

Pin (HW9405595-1)

Pin hole (6 dia.        )

+0.012

  0

24/134

Содержание MOTOMAN-PH130F

Страница 1: ...these instructions thoroughly and retain for future reference MOTOMAN INSTRUCTIONS MOTOMAN PH130F INSTRUCTIONS YRC1000 INSTRUCTIONS YRC1000 OPERATOR S MANUAL GENERAL SUBJECT SPECIFIC YRC1000 MAINTENANCE MANUAL YRC1000 ALARM CODES MAJOR ALARMS MINOR ALARMS The YRC1000 operator s manual above corresponds to specific usage Be sure to use the appropriate manual The YRC1000 operator s manual above cons...

Страница 2: ...aration 3 3 3 3 1 2 Replacement of Motor or Speed Reducer 3 3 3 3 1 3 Home Position Adjustment 3 4 3 3 2 Using Keys 3 5 3 3 3 Using Encoder Backup Error Recovery Function 3 8 3 3 4 Robot Calibration MOTOCALV EG 3 8 4 L Axis Fixing Jig 4 1 4 1 Fixing Jig 4 1 4 1 1 Recommended Installation Posture of the Specified Fixing Jig 4 2 4 1 2 Range of L Arm Postures to Avoid 4 3 4 2 Installation and Removal...

Страница 3: ...isassembly and Reassembly of R Axis Speed Reducer 7 13 7 5 Disassembly and Reassembly of B Axis Speed Reducer 7 16 7 6 Disassembly and Reassembly of T Axis Speed Reducer 7 20 8 Disassembly and Reassembly of Wrist Unit 8 1 9 Cable Wiring 9 1 9 1 Disassembly and Reassembly of Internal Wiring Harness 9 1 10 Disassembly and Reassembly of Balancer Unit 10 1 10 1 Notes when Disassembling and Reassemblin...

Страница 4: ...Contents iv HW1485471 HW1485471 12 3 U R B T Axis Unit 12 7 12 4 U arm unit 12 10 12 5 Wrist unit 12 12 12 6 Balancer Unit 12 15 4 134 ...

Страница 5: ...show details Make sure that all the covers or shields are installed in place before operating this product The drawings and photos in this manual are representative examples and differences may exist between them and the delivered product YASKAWA is not responsible for incidents arising from unauthorized modification of its products Unauthorized modification voids the product warranty NOTICE The d...

Страница 6: ...potentially hazardous situation which if not avoided will result in death or serious injury Hazards identified by the signal word WARNING present a lesser degree of risk of injury or death than those identified by the signal word DANGER CAUTION Indicates a hazardous situation which if not avoided could result in minor or moderate injury It may also be used without the safety alert symbol as an alt...

Страница 7: ...se safety precautions may result in death or serious injury from unexpected turning of the manipulator s arm WARNING Maintenance and inspection must be performed by specified personnel Failure to observe this caution may result in electric shock or injury For disassembly or repair contact your YASKAWA representative 7 134 ...

Страница 8: ...e safety fence when going into the area enclosed by the safety fence In addition the operator of the teaching operation must display the sign that the operation is being performed so that no other person closes the safety fence View the manipulator from the front whenever possible Always follow the predetermined operating procedure Always keep in mind emergency response measures against the manipu...

Страница 9: ...ck for damage to insulation and sheathing of external wires Always return the programming pendant to the hook on the YRC1000 cabinet after use If the programming pendant is left unattended on the manipulator on a fixture or on the floor etc the Enable Switch may be activated due to surface irregularities of where it is left and the servo power may be turned ON In addition in case the operation of ...

Страница 10: ...nipulator Fig 1 1 Warning Label Locations NJ3884 NJ4175 T MADE IN JAPAN YASKAWA ELECTRIC CORPORATION Kitakyushu 806 0004 Japan 2 1 Kurosakishiroishi Yahatanishi ku MASS kg TYPE PAYLOAD NJ4030 SERIAL NO DATE kg NJ4032 NJ4036 NJ4040 NJ4032 NJ4175 NJ4176 NJ4036 Motor removing prohibited label Nameplate Balancer disassembly prohibited label Crush hazard label Fall down hazard label Collision hazard la...

Страница 11: ...down which may result in personal injury and or equipment damage Collision hazard label Description Personal injury may result if a person enters the manipulator s operating range during operation Immediately press an emergency stop button whenever there is a problem Confirm that no person is present in the manipulator s operating range and that the operator is in a safe location before Turning ON...

Страница 12: ...sembly prohibited label Description Do not disassemble the balancer When disassembling the balancer the internal energy is released and the L arm rotates Failure to observe this caution may result in injury or malfunction Motor removing prohibited label Description Do not remove the motor without installing the jig for fixing the motor Failure to observe this safety precaution may result in injury...

Страница 13: ...he motor of each axis lead wires are connected to each part of the manipulator When replacing a motor or lead wire prepare the necessary parts and perform maintenance operations by referring to fig 2 1 Details of Internal Connections and table 2 1 Details of Internal Connections Fig 2 1 Details of Internal Connections S head Casing 1 2 3 4 5 6 7 7 15 14 16 13 12 8 8 9 7 11 10 8 13 134 ...

Страница 14: ...le Not provided with the motor Power cable Not provided with the motor B axis motor 1 Encoder cable Not provided with the motor Power cable Not provided with the motor T axis motor 1 Encoder cable Not provided with the motor Power cable Not provided with the motor Multi port connector HW1384619 A 3 Battery pack HW1483880 A 3 Internal wiring harness HW1173558 A 1 S axis encoder cable HW1372597 BK 1...

Страница 15: ...iring harness Refer to fig 2 3 Wiring Connection of Multi Port Connector When removing the multi port connector for a battery replacement etc be careful not to remove the connector between the motor and the multi port connector If the connector between the motor and the multi port connector is removed the encoder absolute data will be lost Fig 2 2 Multi Port Connector Fig 2 3 Wiring Connection of ...

Страница 16: ...le tie Protective tube Cable tie Protective tube Cable tie Battery pack for B T axes Battery for U R axes Multi port connector Multi port connector Cover Fixing bolt for the cover Cross head APS bolt M4 length 8 mm 2 bolts Cover Fixing bolt for the cover Cross head APS bolt M4 length 8 mm 3 bolts S IN OUT L B T IN When the Cover is Removed When the Cover is Removed 16 134 ...

Страница 17: ...C1000 stores the position data of the job program hereinafter called JOB as the pulse number from the home position of each axis Thus by precisely resetting the home position the JOB used before resetting can be used without correction Perform home position return in one of the following cases The motor or absolute encoder is replaced Stored memory is cleared due to the run out of the internal bat...

Страница 18: ...arm occurs run the Backup Alarm Restoration software on the programming pendant This function cannot be used when the motor or absolute encoder is replaced 3 2 4 Robot Calibration MOTOCALV EG If any method described above in chapter 3 2 1 to chapter 3 2 3 cannot be performed perform robot calibration to reset the home position of the manipulator Perform teaching of the five point in five posture 2...

Страница 19: ...l end effector or the jigs related unit including the rotary table It is rec ommended to use a specific jig if necessary Use a pointed object stylus etc to create the check point so that deviation is easily found Keep the distance between the check point and the rotational center of the axis under home position adjustment as far as possible Consider the moving direction of the axis under home posi...

Страница 20: ...e check JOB to move the axis to the position where the axis does not interfere with jigs etc when it moves to the home position Ensure that the manipulator does not interfere with jigs etc when moving the axis Refer to the position screen and move the axis to the position where the pulse number is equal to the amount of deviation The following figure shows an example At this position perform home ...

Страница 21: ...the pin hole on the S head and perform positioning by using the programming pendant so that the pin fits into the hole of the base Fig 3 2 S Axis Positioning Table 3 2 Parts List Drawing No Name Qty Note HW9405595 1 Pin 1 For S L U R B and T axes HW0300669 1 Plate 1 Plate for R axis HW1408161 6 20 Pin 2 For HW0300669 1 HW0400734 1 Plate 1 Plate for T axis HW1408161 6 20 Pin 2 For HW0400734 1 6 dia...

Страница 22: ...o that the pin fits into the hole of the L arm Fig 3 3 L Axis Positioning 3 U Axis Positioning As shown in fig 3 4 U Axis Positioning insert the pin HW9405595 1 from the pin hole on the casing and perform positioning by using the programming pendant so that the pin fits into the hole of the L arm Fig 3 4 U Axis Positioning 6 dia 0 012 0 S head L arm Pin HW9405595 1 Pin hole 6 dia 0 012 0 6 dia 0 0...

Страница 23: ...g pendant so that the pin fits into the hole of the wrist base Fig 3 5 R Axis Positioning 5 B Axis Positioning As shown in fig 3 6 B Axis Positioning insert the pin HW9405595 1 from the pin hole on the wrist cover and perform positioning by using the programming pendant so that the pin fits into the hole of the wrist base Fig 3 6 B Axis Positioning 6 dia 0 012 0 U arm Wrist base Pin HW9405595 1 Pl...

Страница 24: ...d perform positioning by using the programming pendant so that the pin fits into the hole of the wrist Fig 3 7 T axis Positioning 3 3 3 Using Encoder Backup Error Recovery Function For details on the encoder backup error recovery function refer to YRC1000 INSTRUCTIONS RE CTO A221 3 3 4 Robot Calibration MOTOCALV EG Contact your YASKAWA representative for the procedure of robot calibration 6 dia 0 ...

Страница 25: ...echanism refer to chapter 4 3 Mechanism in this chapter When releasing the L axis holding power be sure to hold the L arm with the fixing jig specified in this manual by following the procedure DANGER The maintenance operation should be carried out by a specified person Execute disassembly and reassembly of the L axis motor after mounting the L axis fixing jig on the balancer After mounting the L ...

Страница 26: ...ied Fixing Jig is recommended L axis 60 126 530 pulses Care must be taken so that the arm may not interfere with the peripheral devices including the workpiece and hand and the main unit of the manipulator Install the specified fixing jig to the section A shown in fig 4 1 the rear of the balancer Set the posture in which the specified fixing jig is installed on section A Fig 4 1 Recommended Instal...

Страница 27: ...n operate the turning axis or other axes and move the manipulator to a posture without interference L axis 15 to 15 44005 to 44005 pulses Fig 4 2 Range of L Arm Postures to Avoid CAUTION When the axis must be secured in the range shown in fig 4 2 out of necessity as the motor cannot drive the axis move the arm gradually by turning the brake ON and OFF at short intervals when releasing the brake Re...

Страница 28: ...for the impact when the arm moves Removal 1 Remove the shaft and nut attached to the stud 2 Mount the plate to the stud by using the hexagon socket head cap screw and tighten it with the tightening torque shown in table 4 1 3 Mount the plate to the case by using the hexagon socket head cap screws and tighten them with the tightening torque shown in table 4 1 4 Tighten the bolts until the nut becom...

Страница 29: ...0400632 1 1 Rod 1 Nut HW9405581 1 1 Shaft HW9405579 1 1 Hexagon socket head cap screw M8 length 45 mm Conical spring washer 2L 8 3 each Tightening torque 24 5 N m Plate HW9402997 1 1 Hexagon socket head cap screw M16 length 35 mm Conical spring washer 2H 16 1 each Tightening torque 206 N m Plate HW9402998 1 1 Hexagon socket head cap screw M8 length 40 mm Conical spring washer 2L 8 3 each Tightenin...

Страница 30: ...Jig 4 2 Installation and Removal of the L axis Fixing Jig 4 6 HW1485471 HW1485471 Fig 4 3 Details of Specified Jig Installation 1 2 Before installing the jig After installing the jig M55XP2 Case M36XP2 7 5 3 6 4 30 134 ...

Страница 31: ...Removal of the L axis Fixing Jig 4 7 HW1485471 HW1485471 Fig 4 4 Details of Specified Jig Removal When using the jig for removal Case Before removing the jig M55XP2 Case M36XP2 7 5 3 6 4 1 2 After removing the jig 13 8 12 10 4 9 3 5 11 31 134 ...

Страница 32: ...the L axis rotation and its direction and extent vary depending on the edge load posture of the wrist the U arm and the L arm When no load is applied to the edge for the L arm rotational direction 3 patterns are assumed as described in fig 4 5 It is quite difficult to accurately compare the extent of the torque which works around the L axis and the extent of the torque which is generated by the ba...

Страница 33: ... the grease pump 0 3 MPa or less rough stan dard When using extrusion air for discharging grease set air supply pressure at 0 025 MPa or less If the air supply pressure is higher than above mentioned value an oil seal of a speed reducer will come off and it may result in a failure When using extrusion air for discharging grease grease may be vigorously discharged from the exhaust port Perform an o...

Страница 34: ... Grease Exchange Procedures for Each Axis Speed Reducer 5 2 HW1485471 HW1485471 WARNING When operating the manipulator do not enter into the working area of the manipulator Injury may result if anyone enter into the working area during the operation 34 134 ...

Страница 35: ...haust port of S axis Hexagon socket head plug PT3 8 S axis speed areducer R B and T axis gear in the casing Grease inlet Hexagon socket head plug PT1 8 Grease exhaust port of U axis Hexagon socket head plug PT1 8 Grease inlet of U axis Hexagon socket head plug PT1 8 U axis speed reducer R axis speed reducer Grease inlet of R axis Hexagon socket head plug PT1 8 Grease exhaust port of R axis Hexagon...

Страница 36: ...a grease zerk to the grease inlet The grease zerk is delivered with the manipulator 4 Inject grease through the grease inlet using a grease gun Grease type Molywhite RE No 00 Recommended grease lubricator Powerlube P3C made by Macnaught Amount of grease 7 g s or less For example if grease is supplied from the lubricator at 2 times s set the amount to 3 5 g time or less Air supply pressure of greas...

Страница 37: ...Refer to table 5 4 Amount of Grease Discharged from Each Axis In order to discharge the specified amount of grease receive the discharged grease into a container and then measure the weight of the discharged grease by weighing the container till the amount reaches to the specified amount Use one of the following methods to discharge grease Method 1 Extruding grease by air 1 Connect the joint and t...

Страница 38: ...nd then attach it to the grease inlet Tighten the plug with the tightening torque shown in table 5 6 Plug Type and Tightening Torque for Each Axis Also discharge the excess grease in order not to increase the inner pressure of the speed reducer Attach a bag to receive grease such as indicated in fig 5 2 Grease Receiving Bag Example and then perform the running in operation Table 5 4 Amount of Grea...

Страница 39: ...for Each Axis Table 5 6 Plug Type and Tightening Torque for Each Axis Axis to exchange grease Plug for the grease inlet Plug for the grease exhaust port Plug type Tightening torque Plug type Tightening torque S axis PT1 4 12 N m 1 2 kgf m PT3 8 23 N m 2 34 kgf m L axis PT1 8 4 9 N m 0 5 kgf m U axis In the casing R B and T axis gear PT1 8 4 9 N m 0 5 kgf m R and B axes T axis PT1 16 3 9 N m 0 4 kg...

Страница 40: ...and degrease the thread part of the plug Wrap the seal tape TB4501 around the thread part and then tighten the plug with a tightening torque of 4 9 N m 0 5 kgf m 4 Reinstall the plug to the grease inlet of the link and Before installing the plug clean and degrease the thread part of the plug Wrap the seal tape TB4501 around the thread part and then tighten the plug with a tightening torque of 4 9 ...

Страница 41: ...Surface of Speed Reducer If not wiping whole surface of the speed reducer the rust preventive oil adhered to the speed reducer gradually flows out to the outside of the manipulator and a phenomenon considered as oil leakage occurs mis recognition as oil leakage 3 Saturate a clean cloth with the degreasing and cleaning agent and sufficiently degrease the sealing surface of the manipulator side and ...

Страница 42: ...ied wipe the agent with a new cloth Refer to fig 5 6 Wiping the Agent For the part where wiping cannot be performed such as the concave part use air to blow off 2 Apply ThreeBond 1206C to the sealing surface Fig 5 5 Checking the Dryness Fig 5 6 Wiping the Agent NOTE The points to apply sealing bond depend on the axes When applying sealing bond make sure to refer to chapter 6 Disassembly and Reasse...

Страница 43: ...inside of the speed reducer Imme diately perform assembling so that the rust preventive oil does not flow out to the sealing surface 2 After assembling fix them with screws as soon as possible For tightening the screws tighten them by using the tightening torque indicated in chapter 6 Disassembly and Reassembly of the Motors and chapter 7 Disassembly and Reassembly of the Speed Reducers 3 By using...

Страница 44: ...or or speed reducer When replacing the motor or speed reducer hold the manipulator arm by using a hanging tool e g chain block Failure to observe this caution may cause a hazardous condition Replace the motor or speed reducer with due care NOTE Refer to chapter 2 Notes for Maintenance chapter 3 Home Position Return chapter 5 Notes on Grease Replenishment Exchange Procedures and chapter 6 Disassemb...

Страница 45: ...y wheel and key Reassembly 1 Mount the key on the S axis motor The key is provided with the S axis motor 2 Apply ThreeBond 1206C to the contact surface of the S axis motor gear and fly wheel and then mount the gear and fly wheel on the S axis motor For the place to apply sealing bond refer to fig 6 2 c Surface to Apply Sealing Bond on the S Axis Gear and fig 6 2 d Surface to Apply Sealing Bond on ...

Страница 46: ... harness side match 8 Replenish grease Molywhite RE No 00 from the grease inlet Refer to chapter 5 Notes on Grease Replenishment Exchange Procedures 9 Turn ON the power supply of the YRC1000 Table 6 1 S Axis Motor Parts Checklist No Item Qty Note S axis motor 1 SGM7G 44APK YR1 Hexagon socket head cap screw M12 length 40 mm trivalent chromate Conical spring washer 2H 12 trivalent chromate 4 each Ti...

Страница 47: ...y Sealing Bond on the S Axis Motor Fig 6 2 c Surface to Apply Sealing Bond on the S Axis Gear Tapped hole for motor 4 places Tapped hole for eyebolt 2 places diagonal Apply sealing bond here Gear case 1 2 5 3 4 6 Apply sealing bond evenly to whole surface Apply sealing bond here Apply sealing bond here Apply sealing bond here Apply sealing bond here Apply sealing bond evenly to whole surface 47 13...

Страница 48: ...r 6 5 HW1485471 HW1485471 Fig 6 2 d Surface to Apply Sealing Bond on the S Axis Flywheel Fig 6 2 e Motor Power Cable Apply sealing bond evenly to whole surface Apply sealing bond evenly to whole surface Apply sealing bond here Apply sealing bond here Main key Coupling nut Alignment mark 48 134 ...

Страница 49: ...ices and release the brake 8 Unscrew the hexagon socket head cap screws and insert the stud bolts M6 length 30 mm or more into the tapped hole M6 4 places on the motor flange face Screw the stud bolt so that the clearance between the motor and the contact surface is 5 mm or more roughly 9 Remove the L axis motor horizontally from the S head Be careful not to damage the oil seal in the S head at th...

Страница 50: ...nnect the encoder cable to the L axis motor and then tighten the connector fixing bolt pan head screw M2 with a tightening torque of 0 2 N m The connector fixing bolt is provided with the connector 7 Insert the power connector to the L axis motor by aligning the key position as shown in fig 6 3 c Motor Power Cable and then turn the coupling nut on the cable side until it makes a clicking sound Con...

Страница 51: ...cap screw M8 length 135 mm Conical spring washer 2L 8 Washer HW9403980 1 1 each Tightening torque 40 0 N m Cover HW1302101 1 1 Hexagon socket head cap screw M5 length 12 mm trivalent chromate Conical spring washer 2H 5 trivalent chromate Washer M5 stainless 4 each Tightening torque 6 0 N m Support HW1200166 A 1 Hexagon socket head cap screw M8 length 35 mm trivalent chromate Conical spring washer ...

Страница 52: ... a Disassembly and Reassembly of the L Axis Motor Fig 6 3 b Surface to Apply Sealing Bond on the L axis Motor S head Apply sealing bond here 2 1 3 4 5 6 7 8 9 10 11 12 13 Surface to apply sealing bond 2 Apply sealing bond evenly to whole surface Surface to apply sealing bond 1 Apply sealing bond evenly to whole surface 52 134 ...

Страница 53: ...6 Disassembly and Reassembly of the Motors 6 2 Disassembly and Reassembly of the L Axis Motor 6 10 HW1485471 HW1485471 Fig 6 3 c Motor Power Cable Main key Coupling nut Alignment mark 53 134 ...

Страница 54: ...onnector does not turn remove the connector by holding the connector on the cable side with a pair of plastic pliers etc 7 Mount two eyebolts on the thread part M8 2 places of the motor and lift the motor to prevent it from falling down 8 Unscrew the hexagon socket head cap screws and insert stud bolts M6 length 30 mm or more into the tapped hole M6 4 places on the motor flange face Screw the stud...

Страница 55: ... motor and then tighten the connector fixing bolt pan head screw M2 with a tightening torque of 0 2 N m The connector fixing bolt is provided with the connector 7 Insert the power connector to the U axis motor by aligning the key position as shown in fig 6 4 c Motor Power Cable and turn the coupling nut on the cable side until it makes a clicking sound Confirm that the arrow marks on the connector...

Страница 56: ...cap screw M8 length 140 mm Conical spring washer 2L 8 Washer HW9403980 1 1 each Tightening torque 40 0 N m Cover HW1402688 2 1 Hexagon socket head cap screw M5 length 12 mm trivalent chromate Conical spring washer 2H 5 trivalent chromate Washer M5 stainless 3 each Tightening torque 6 0 N m Support HW1200167 1 1 Hexagon socket head cap screw M8 length 35 mm trivalent chromate Conical spring washer ...

Страница 57: ...mbly of the Motors 6 3 Disassembly and Reassembly of U Axis Motor 6 14 HW1485471 HW1485471 Fig 6 4 a Disassembly and Reassembly of the U Axis Motor L arm Apply sealing bond here Casing Fan 10 9 12 11 13 2 1 3 6 8 7 5 4 57 134 ...

Страница 58: ...1485471 HW1485471 Fig 6 4 b Surface to Apply Sealing Bond on the U axis Motor Fig 6 4 c Motor Power Cable Surface to apply sealing bond 2 Apply sealing bond evenly to whole surface Surface to apply sealing bond 1 Apply sealing bond evenly to whole surface Main key Coupling nut Alignment mark 58 134 ...

Страница 59: ...the hexagon socket head cap screws and insert the stud bolts M4 length 20 mm or more into the tapped hole M4 2 places on the motor flange face Screw the stud bolt into the tapped hole so that the clearance between the motor and the contact surface is roughly 6 mm or more 6 For the R axis Unscrew the hexagon socket head cap screw and then remove the key gear unit and inner ring of bearing and plate...

Страница 60: ...d cap screw and then tighten it with the tightening torque shown in table 6 4 5 Apply ThreeBond 1206C to the contact surface of the R B and T axis motor and the casing and then mount R B and T axis motor on the casing 6 Apply ThreeBond 1206C to the thread part of the hexagon socket head cap screws and then tighten them with the tightening torque shown in table 6 4 7 Connect the encoder cable to th...

Страница 61: ... each 3 Tightening torque 24 5 N m Key 1 each 3 Provided with the motor R axis gear HW0303963 1 B axis gear HW0303949 1 T axis gear HW0303947 1 1 1 1 Hexagon socket head cap screw M6 length 25 mm Conical spring washer 2L 6 1 each 3 Tightening torque 16 5 N m Casing HW0101365 1 1 Retaining ring ISTW 36 1 For R axis only Collar HW0402390 1 1 For R axis only Collar HW0402406 1 1 For R axis only Beari...

Страница 62: ...d Reassembly of the R B T Axis Motors 6 19 HW1485471 HW1485471 Fig 6 5 a Disassembly and Reassembly of the R B T Axis Motors Apply sealing bond here R axis View A B axis R axis T axis A B axis T axis 7 10 5 8 9 2 4 3 11 2 2 11 3 4 5 11 3 4 12 5 1 6 1 1 11 62 134 ...

Страница 63: ...le Surface to apply sealing bond 2 Apply sealing bond evenly to whole surface Surface to apply sealing bond 1 Put the flat head screw driver into a space between the gear and the motor and tilt it in the direction of the arrow to remove the gear Put the flat head screw driver into the hole of the side of the gear and tilt it in the direction of the arrow mark to make a space between the gear and t...

Страница 64: ...contact surface of the S head and the speed reducer 6 Lift up the upper part of the manipulator including the S head and put it down next to the base 7 Unscrew the GT SA bolts and then remove the cover 8 Unscrew the hexagon socket head cap screws and insert the stud bolt M12 length 35 mm or more into the tapped hole M12 2 places on the speed reducer Screw the stud bolt into the tapped hole until t...

Страница 65: ... Mount the S head on the speed reducer 9 Tighten the hexagon socket head cap screws with the tightening torque shown in table 7 1 10 Apply ThreeBond 1206C to the contact surface of the S head and the gear unit and then mount the gear unit on the S head by using the hexagon socket head cap screws Tighten the screws with the tightening torque shown in table 7 1 11 Assemble the S axis motor and mount...

Страница 66: ...ue 142 N m Hexagon socket head cap screw M16 length 50 mm Conical spring washer 2H 15 18 each Tightening torque 348 N m O ring G460 1 S axis motor SGM7G 44APK YR1 1 Input gear HW0307565 3 1 Shaft HW0308755 1 1 Hexagon socket head cap screw M16 length 16 mm Conical spring washer 2L 6 4 each Tightening torque 10 N m O ring G145 1 Cover HW0408507 1 1 GT SA bolt M5 length 12 mm 8 Tightening torque 6 N...

Страница 67: ...bly and Reassembly of the S Axis Speed Reducer Fig 7 1 b Surface to Apply Sealing Bond on the S Axis Speed Reducer S head Gear unit Apply sealing bond here Apply sealing bond here Apply MP 1 grease here 5 6 2 4 7 9 10 8 3 11 1 13 12 12 Base Side S head Side Apply sealing bond evenly to whole surface Apply sealing bond evenly to whole surface 67 134 ...

Страница 68: ...ces on the L arm Screw the stud bolt into the tapped hole until clearance is made between the contact surface of the L arm and the speed reducer 6 Remove the L arm from the speed reducer 7 Unscrew the hexagon socket head cap screws and insert the stud bolt M8 length 35 mm or more into the tapped hole M8 2 places on the speed reducer Screw the stud bolt into the tapped hole until the clearance is m...

Страница 69: ...hown in table 7 2 6 Assemble the L axis motor and mount the L axis motor on the S head Refer to chapter 6 2 Disassembly and Reassembly of the L Axis Motor When replacing the speed reducer replace the input gear too 7 Mount the balancer Refer to chapter 10 Disassembly and Reassembly of Balancer Unit 8 Remove the hexagon socket head plugs from the grease inlet and the grease exhaust port and then re...

Страница 70: ...80 A 1 Hexagon socket head cap screw M16 length 55 mm Conical spring washer 2H 16 18 each Tightening torque 348 N m O ring G340 1 Hexagon socket head cap screw M12 length 65 mm Conical spring washer 2H 12 30 each Tightening torque 142 N m L arm HW0101364 1 1 L axis motor 1 SGM7G 44APK YR1 Input gear HW0308757 1 1 Oil seal Y507212 5 1 S head HW0101363 1 1 1 2 3 4 5 6 7 8 9 Apply sealing bond here A...

Страница 71: ...s Speed Reducer L axis speed reducer Border line for applying sealing bond Edge surface of sealing bond contacting part ThreeBond 1206C ThreeBond 1206C Apply sealing bond evenly from the edge surface of sealing bond contacting part to the border line for applying sealing bond without any break L arm Side S head Side Apply sealing bond in the bead shape 5 5 Bead Cross section 71 134 ...

Страница 72: ... tapped hole M12 2 places on the speed reducer Remove the speed reducer horizontally by using the eyebolts At this time remove the O ring Reassembly 1 Mount the O ring on the speed reducer and then mount the speed reducer on the U arm unit 2 Tighten the hexagon socket head cap screws with the tightening torque shown in table 7 3 U Axis Speed Reducer Parts Checklist When mounting be careful that th...

Страница 73: ...7 Turn ON the power supply of the YRC1000 NOTE If grease is filled before the sealing bond is solidified it may cause grease to leak After tightening the screws leave it 30 minutes or more and then fill with grease Table 7 3 U Axis Speed Reducer Parts Checklist No Item Qty Note Speed reducer HW0384510 A 1 Hexagon socket head cap screw M12 length 50 mm Conical spring washer 2H 12 33 each Tightening...

Страница 74: ... the U Axis Speed Reducer Fig 7 3 b Surface to Apply Sealing Bond on the U Axis Speed Reducer Casing Apply sealing bond here 5 8 2 6 7 4 3 1 2 Apply MP 1 grease here 7 U arm unit Casing Side Spacer Side Apply sealing bond evenly to whole surface Part A Apply sealing bond evenly to whole surface Especially for the part A apply sealing bond evenly without any break 74 134 ...

Страница 75: ...d Reducers 7 3 Disassembly and Reassembly of U Axis Speed Reducer 7 12 HW1485471 HW1485471 Fig 7 3 c Surface to Apply Sealing Bond Between U axis Speed Reducer and L arm 5 5 Bead Cross section L arm Apply sealing bond in the bead shape 75 134 ...

Страница 76: ...n table 7 4 R Axis Speed Reducer Parts Checklist 3 Apply ThreeBond 1206C to the contact surface of the wrist unit and the speed reducer For the place to apply sealing bond refer to Wrist base side in fig 7 4 b 4 Mount the O ring on the wrist unit and then mount the wrist unit on the speed reducer Refer to chapter 8 Disassembly and Reassembly of Wrist Unit Be careful that the O ring does not get ca...

Страница 77: ... Parts Checklist No Item Qty Note Speed reducer HW0384822 A 1 Hexagon socket head cap screw M8 length 95 mm Conical spring washer 2L 8 16 each Tightening torque 40 N m Hexagon socket head cap screw M12 length 35 mm Conical spring washer 2H 12 8 each Tightening torque 142 N m Wrist unit HW1173507 A 1 U arm HW0100172 3 1 O ring G110 1 Pin HW1408161 6 15 1 1 2 3 4 5 6 7 A A Apply sealing bond here Vi...

Страница 78: ...assembly and Reassembly of R Axis Speed Reducer 7 15 HW1485471 HW1485471 Fig 7 4 b Surface to Apply Sealing Bond on the R Axis Speed Reducer Wrist Base Side U arm Side Apply sealing bond evenly to whole surface Apply sealing bond evenly to whole surface 78 134 ...

Страница 79: ...6 Unscrew the hexagon socket head cap screws and remove the shim gear and bearing from the speed reducer When removing the gear use the tapped holes Reassembly 1 Adjust the shim before mounting the gear 2 Mount the bearing shim and gear on the speed reducer and then tighten the hexagon socket head cap screws with the tightening torque shown in table 7 5 B Axis Speed Reducer Parts Checklist 3 Apply...

Страница 80: ... and then fill with grease Table 7 5 B Axis Speed Reducer Parts Checklist No Item Qty Note Speed reducer HW9380961 G 1 Cover HW0300889 1 1 Hexagon socket head cap screw M6 length 25 mm Conical spring washer 2L 6 4 each Tightening torque 13 75 N m Hexagon socket head cap screw M8 length 40 mm Conical spring washer 2L 8 14 each Tightening torque 40 N m O ring ARP568 263 1 Hexagon socket head cap scr...

Страница 81: ...HW1485471 HW1485471 Fig 7 5 a Disassembly and Reassembly of the B Axis Speed Reducer 19 0 1 18 5 0 5 shim Shim adjustment When installing the gear measure the space indicated with mark and select a shim to meet the dimensions in this figure 4 6 9 7 8 11 3 5 2 1 10 13 8 11 12 9 7 6 Apply sealing bond here 81 134 ...

Страница 82: ... the Speed Reducers 7 5 Disassembly and Reassembly of B Axis Speed Reducer 7 19 HW1485471 HW1485471 Fig 7 5 b Surface to Apply Sealing Bond on the B Axis Speed Reducer Wrist Base Side Apply sealing bond evenly to whole surface 82 134 ...

Страница 83: ...ducer Tighten the hexagon socket head cap screws with the tightening torque shown in table 7 6 T Axis Speed Reducer Parts Checklist 3 Apply ThreeBond 1206C between the speed reducer and the wrist For the place to apply sealing bond refer to Wrist side of the speed reducer in fig 7 6 b Surface to Apply Sealing Bond on the T axis Speed Reducer 4 Make sure that the speed reducer is mounted in the cor...

Страница 84: ... is filled before the sealing bond is solidified it may cause grease to leak After tightening the screws leave it 30 minutes or more and then fill with grease Table 7 6 T Axis Speed Reducer Parts Checklist No Item Qty Note Speed reducer HW9381400 E 1 Hexagon socket head cap screw M8 length 15 mm FA coat Conical spring washer 2L 8 FA coat 14 each Tightening torque 40 0 N m Flange HW0304688 1 1 Hexa...

Страница 85: ...W1485471 Fig 7 6 a Assembling View of T axis Disassembly and Reassembly of Speed Reducer 5 Shim adjustment When installing the gear measure the space indicated with mark and select a shim to meet the dimensions in this figure 1 shim 6 7 0 1 Apply sealing bond here Apply sealing bond here 5 8 4 2 3 1 9 7 6 10 6 5 7 8 85 134 ...

Страница 86: ...and Reassembly of T Axis Speed Reducer 7 23 HW1485471 HW1485471 Fig 7 6 b Surface to Apply Sealing Bond on the T axis Speed Reducer Flange Side Wrist Side of the Speed Reducer Apply sealing bond evenly to whole surface Apply sealing bond evenly to whole surface 86 134 ...

Страница 87: ...ear not mounted to the wrist unit 2 Tighten the hexagon socket head cap screws with the tightening torque shown in table 8 1 Wrist Unit Parts Checklist 3 Mount the retaining ring and bearing on the gear 4 Mount the gear and shim on the wrist unit 5 Measure the backlash in the gear and adjust the shim Use a small micrometer and determine the number of shims so that the backlash is 0 05 mm to 0 1 mm...

Страница 88: ...ng washer 2H 12 8 each Tightening torque 142 N m Speed reducer HW0390046 A 1 Cover HW0411720 1 1 GT SA bolt M4 length 12 mm 4 Tightening torque 4 8 N m Magic screw M5 length 7 mm 2 Tightening torque 4 N m B nut HW0411721 1 1 Tightening torque 12 4 N m Gear HW0309164 1 1 Shim HW0410868 1 to 4 Bearing 6007 1 Retaining ring ISTW 35 2 Note Ready a small micrometer for adjusting the shims 1 2 3 4 5 6 7...

Страница 89: ...8 Disassembly and Reassembly of Wrist Unit 8 3 HW1485471 HW1485471 Fig 8 1 Disassembly and Reassembly of Wrist Unit 4 U arm Wrist 1 2 3 9 11 8 7 6 5 9 12 10 89 134 ...

Страница 90: ...gon socket head cap screws which are mounted on the side of the casing and then remove the cover 3 Unscrew the pan head sems screws which are mounted on the cover and remove the connector 4 Remove the air line connected to the back of the union from the cover NOTE Refer to chapter 2 Notes for Maintenance and chapter 3 Home Position Return Table 9 1 Internal Wiring Harness Parts Checklist Connector...

Страница 91: ...9 1 Disassembly and Reassembly of Internal Wiring Harness Connectors for Internal User I O Wiring Harness For the internal user I O wiring harness Details of the Connector for the Internal User I O Wiring Harness Connector for the internal user I O wiring harness Position of the main key 4 3 2 1 91 134 ...

Страница 92: ...is motor and then disconnect the power cable If the connector does not turn remove the connector by holding the connector on the cable side with a pair of plastic pliers etc 5 Unscrew the hexagon socket head cap screws and then remove internal wiring harness together with the support Table 9 2 Internal Wiring Harness Parts Checklist Casing No Item Qty Note Internal wiring harness HW1173558 A 1 Cro...

Страница 93: ...ing Harness 9 4 HW1485471 HW1485471 Fig 9 2 Disassembly and Reassembly of the Internal Wiring Harness Casing When the Cover is Removed Casing Multi port connector Internal wiring harness IN Internal wiring harness Internal wiring harness 5 2 1 7 8 6 6 3 4 93 134 ...

Страница 94: ...et head cap screws and then remove the saddles 3 Cut off cable ties Table 9 3 Internal Wiring Harness Parts Checklist L Arm No Item Qty Note Plate HW0403915 1 1 Hexagon socket head cap screw M5 length 12 mm trivalent chromate Conical spring washer 2H 5 trivalent chromate 2 each Tightening torque 6 N m Saddle CD36 2 Hexagon socket head cap screw M6 length 16 mm trivalent chromate Conical spring was...

Страница 95: ...9 Cable Wiring 9 1 Disassembly and Reassembly of Internal Wiring Harness 9 6 HW1485471 HW1485471 Fig 9 3 Disassembly and Reassembly of the Internal Wiring Harness L Arm 4 3 4 3 1 2 5 95 134 ...

Страница 96: ... port connector in the S head 6 Cut off the cable ties 7 Turn the connector on the cable side of the power connector for the S and L axis motor and then disconnect the power cable If the connector does not turn remove the connector by holding the connector on the cable side with a pair of plastic pliers etc Table 9 4 Internal Wiring Harness Parts Checklist S Head No Item Qty Note Plate HW0403915 1...

Страница 97: ...s 9 8 HW1485471 HW1485471 Fig 9 4 Disassembly and Reassembly of the Internal Wiring Harness S Head When the Cover is Removed Internal wiring harness Multi port connector OUT Internal wiring harness IN Internal wiring harness Internal wiring harness 1 6 2 6 6 4 3 5 7 97 134 ...

Страница 98: ...internal user I O wiring harness 5 Remove the connectors 5 places except for CN4 connected to the back side of the 1BC connector The 1BC connectors are 1 2 3 4 5 and 6 from the top to the bottom 6 Cut off the cable tie and disconnect the tube 7 Unscrew the hexagon socket head cap screws and then remove the saddle and saddle 8 Cut off the connector sticking out from the connector base box and then ...

Страница 99: ...e S1 1BC CN4 Position of the main key 1BC connector Connector base Connector for internal user I O wiring harness Union Grease inlet Marking position of the internal wiring harness Board for the encoder power box Support Details of the Connector for the Internal User I O Wiring Harness View C Fixing part of the ground line B B A A View B B View A A C 1 9 8 9 3 6 7 4 5 2 99 134 ...

Страница 100: ...f the tube by using the cable ties 9 Connect the grease hose to the back side of the connector base unit 10 Mount the cross head APS bolts and then mount the connector base on the manipulator 2 S Head Refer to fig 9 4 Disassembly and Reassembly of the Internal Wir ing Harness S Head and table 9 4 Internal Wiring Harness Parts Checklist S Head 1 Mount the internal wiring harness on the plate by usi...

Страница 101: ...g torque shown in table 9 2 3 Connect the IN port of the multi port connector on the R B and T axis motor side of the casing to the IN connector of the internal wiring harness 4 Fix the lead wire 6 wires sticking out from the multi port connector of the casing by using the cable tie 5 Mount the cover by using the cross head APS bolts 6 Insert the power connector to the U R B and T axis motor by al...

Страница 102: ...nnect the air line to the union from the back of the cover 3 Mount the cover on the side face of the casing by using the cross head APS bolts and tighten them with the tightening torque shown in table 9 1 Internal Wiring Harness Parts Checklist Connectors for Internal User I O Wiring Harness 1 2 102 134 ...

Страница 103: ...alancer unit and this may cause the grease leakage or abnormal noise DANGER Be sure to mount the spring fixing bolts when removing the balancer unit from the manipulator If the balancer is removed without the spring fixing bolts the rod will rapidly shrink which may result in injury or accident Before removing the balancer unit from the manipulator confirm that the L axis motor brake is appropriat...

Страница 104: ...der to prevent the balancer unit assembly from falling support it by using a chain block etc NOTE Although the balancer unit position would not deviate when disassembled and reassembled refer to chapter 3 Home Position Return before replacement just in case 5 1 Space approx 5 mm Rod free from spring force Flange Balancer unit assembly Spring fixing bolt Spring pressure direction Spring Spring pres...

Страница 105: ... the rear of the balancer unit assembly 14 Only when replacing the balancer unit remove the oil seals and from the S head Reassembly 1 Only when replacing the balancer unit assemble the unit assembly Refer to chapter 10 3 Unit Assembly 2 Remove the old sealing bond adhering on the S head the B cover and 3 Only when replacing the balancer unit mount the oil seals and on the S head Apply Alvania EP ...

Страница 106: ...nd shim on the S head Be careful that the O ring does not get caught between the parts 20 Tighten the hexagon socket head cap screws with the tightening torque shown in table 10 1 21 Push the flange inside the balancer evenly with the spring fixing bolts or hexagon socket head cap screws to free the rod in the balancer unit assembly 22 Only when replacing the balancer unit if the thread length wit...

Страница 107: ...socket head cap screws with the tightening torque shown in table 10 1 Balancer Unit Parts Checklist 30 If there is enough space remove the B cover and the hexagon socket head cap screws and insert the shim whose thickness is about the average of the space at the a and b Select shims from the table below 31 Mount the B cover on the S head Be careful that the O ring does not get caught between the p...

Страница 108: ...pring washer 2H 12 12 each Tightening torque 84 0 N m Hexagon socket head cap screw M8 length 20 mm Conical spring washer 2L 8 8 each Light tightening torque 9 8 N m Tightening torque 24 5 N m B cover HW9405699 1 1 Shim HW9405195 O ring S105 1 Hexagon socket head cap screw M10 length 50 mm Conical spring washer 2L 10 9 each Tightening torque 48 0 N m Tapered roller bearing HR32916J 1 Outer ring of...

Страница 109: ...mbly of Balancer Unit 10 2 Disassembly and Reassembly of Balancer Unit 10 7 HW1485471 HW1485471 Fig 10 3 Balancer Installation Diagram View A A a b Flange L arm S head 6 2 8 9 10 11 3 4 5 7 20 18 12 19 17 1 15 14 16 13 109 134 ...

Страница 110: ...it to the correct direction 2 Apply Alvania EP Grease 2 on the lip part of the oil seal 3 Inject Alvania EP Grease 2 into the outer ring of the needle bearing and insert it into the clevis of the balancer unit so that the grease inlet for the needle bearing is positioned at in the figure below 4 Mount the retaining ring 2 2 Apply Alvania EP Grease 2 Clevis 2 3 4 4 5 Clevis 4 3 Outer ring 110 134 ...

Страница 111: ...into the clevis of the balancer unit to the correct direction 6 Apply Alvania EP Grease 2 on the lip part of the oil seal 10 3 2 Shaft Assembly Knuckle Part 1 Insert the inner ring of the needle bearing into the shaft 2 Mount the retaining ring 5 5 Apply Alvania EP Grease 2 Clevis 5 3 6 7 Inner ring 3 6 7 111 134 ...

Страница 112: ...ania EP Grease 2 on the tapered roller bearing 2 Insert the inner rings of the tapered roller bearing into the shaft 10 3 4 Shaft Assembly Support Part 2 1 Inject Alvania EP Grease 2 on the tapered roller bearing 2 Insert the inner rings of the tapered roller bearing into the shaft 8 8 9 Inner ring 8 9 8 10 8 10 8 11 Inner ring 10 11 112 134 ...

Страница 113: ... seal VB60787 1 Needle bearing NA6912 1 Outer ring inner ring Retaining ring AR85 1 Oil seal VB75956 1 Shaft HW9302054 1 1 Retaining ring WR60 1 Tapered roller bearing HR32916J 1 Inner ring Outer ring is used in chapter 10 2 Disassembly and Reassembly of Balancer Unit Shaft HW9405055 1 1 Tapered roller bearing HR32916J 1 Inner ring Outer ring is used in chapter 10 2 Shaft HW9405055 1 1 1 2 3 4 5 6...

Страница 114: ...the procedures described as follows Make sure to refer to chapter 2 Notes for Maintenance when replacing the battery pack Fig 11 1 Location of the Battery and Multi port Connector U R IN OUT Battery pack for S L axes Cable tie Protective tube Cable tie Protective tube Cable tie Battery pack for B T axes Battery for U R axes Multi port connector Multi port connector Cover Fixing bolt for the cover ...

Страница 115: ...ort connector and mount the new battery pack 6 Fix the new battery pack by using the cable tie T50R HSW 7 After placing the connector and the lead wires around the connector into the protective tube fix the opening of the protective tube by using the cable tie T18L HSW 8 Fix the new battery pack and the protective tube in which the connector is placed at step 7 by using the cable tie T18L HSW 9 Ti...

Страница 116: ... protective tube Cut the cable ties 2 places fixing the protective tube and take out the connector 7 Remove the old battery pack from the multi port connector and mount the new battery pack 8 Remove the lead wires for battery replacement and the battery pack for backup from the multi port connector connect the connector which has been removed at step 3 of this procedure to the IN or Y port again 9...

Страница 117: ...o the protective tube fix the opening of the protective tube by using the cable tie T18L HSW 11 Fix the new battery pack and the protective tube in which the connector is placed at step 10 by using the cable tie T18L HSW 12 Tighten the cover mounting bolts to reinstall the cover NOTE When reinstalling the cover be careful not to get caught the cable 117 134 ...

Страница 118: ... 1008 1006 1012 1013 1014 1011 1010 1015 1016 1019 1018 1020 1021 1017 1022 1023 1024 1025 1026 1027 1028 1029 1031 1030 1032 1033 1034 1035 1032 1036 1035 1033 1037 1038 1039 1040 1042 1040 1046 1045 1041 1047 1049 1048 1044 1043 1051 1052 1050 1053 1054 1055 1056 1057 1058 1059 1060 1062 1061 1063 1064 1065 1066 1067 1069 1068 1070 118 134 ...

Страница 119: ...6 KQ2S10 01AS Union 1 1017 HW0101363 1 S head 1 1018 M12 60 Hexagon socket head cap screw 17 1019 2H 12 Conical spring washer 17 1020 G460 O ring 1 1021 TC10513514 Oil seal 1 1022 HW0101152 1 Gear case 1 1023 M8 95 Hexagon socket head cap screw 10 1024 2L 8 Conical spring washer 10 1025 SGM7G 44APK YR1 Motor 1 1026 M12 40 TRIVALENT CHROMATE Hexagon socket head cap screw 4 1027 2H 12 TRIVALENT CHRO...

Страница 120: ...ring washer 8 1053 S180 O ring 1 1054 AR175 Retaining ring 1 1055 WR140 Retaining ring 1 1056 6828ZZ Bearing 1 1057 HW0308764 1 Gear 1 1058 M12 20 Hexagon socket head cap screw 1 1059 PT3 8 STAINLESS Plug 1 1060 HW0308765 1 Stopper 1 1061 M20 60 Hexagon head screw 3 1062 M20 STAINLESS Washer 3 1063 HW0402104 1 Pin 1 1064 HW0408507 1 Cover 1 1065 M5 12 GT SA bolt 8 1066 EZ5002A0 ribbed Bore plug 1 ...

Страница 121: ...s Unit 2001 2002 2003 2004 2006 2008 2009 2011 2005 2007 2010 2012 2013 2014 2015 2016 2018 2017 2019 2020 2021 2022 2023 2025 2026 2028 2029 2032 2033 2037 2036 2028 2029 2031 2030 2033 2034 2035 2037 2036 2031 2030 2034 2035 2038 2032 2024 2027 2038 2040 2039 2042 2041 2041 1017 121 134 ...

Страница 122: ...her 30 2016 HW0101364 1 L arm 1 2017 M16 55 Hexagon socket head cap screw 21 2018 2H 16 Conical spring washer 21 2019 VB60787 Oil seal 1 2020 WR60 Circlip 1 2021 NA6912 Bearing 1 2022 AR85 Circlip 1 2023 VB75956 Oil seal 1 2024 HW9302054 1 Shaft 1 2025 M12 50 Hexagon socket head cap screw 12 2026 2H 12 Conical spring washer 12 2027 HW0171165 G Balancer 1 2028 KE901107 Oil seal 2 2029 HW9405055 1 S...

Страница 123: ...ist 12 2 L Axis Unit 12 6 HW1485471 HW1485471 2041 PT1 8 STAINLESS Hexagon socket head plug 2 2042 EZ0094 A0 Air breezer 1 1017 HW0101363 1 S head 1 Table 12 2 L Axis Unit Sheet 2 of 2 No DWG No Name Pcs 123 134 ...

Страница 124: ... 3004 3005 3006 3008 3007 3009 3010 3011 3012 3013 3015 3014 3016 3018 3017 3019 3020 3021 3023 3023 3025 3024 3025 3024 3025 3024 3023 3026 3026 3027 3028 3029 3030 3032 3031 3037 3032 3031 3033 3032 3031 3033 3038 3039 3026 3033 3034 3036 3035 3040 3041 3042 3044 3043 3048 3045 3047 3046 3049 3050 3051 U axis R axis T axis B axis 124 134 ...

Страница 125: ...Flange 1 3017 M6X16 Hexagon socket head cap screw 4 3018 2L 6 Conical spring washer 4 3020 HW9482447 A Oil seal 1 3021 HW9405481 1 Collar 1 3022 IRTW 72 Retaining ring 1 3023 SGM7G 13APK YR1 Motor 3 3024 M8 25 TRIVALENT CHROMATE Hexagon socket head cap screw 12 3025 2H 8 TRIVALENT CHROMATE Conical spring washer 12 3026 HW0401506 1 Plate 3 3027 HW0303963 1 Gear 1 3028 TAFI405520 Needle bearing 1 30...

Страница 126: ... socket head cap screw 14 3047 2H 12 Conical spring washer 14 3048 HW1405947 8 20 Pin 1 3049 PT3 8 STAINLESS Hexagon socket head plug 2 3050 PT1 8 STAINLESS Hexagon socket head plug 1 3051 PT1 8 STAINLESS Hexagon socket head plug 1 2016 HW0101364 1 L arm 1 5031 HW0100172 3 U arm 1 Table 12 3 U R B T Axis Unit Sheet 2 of 2 No DWG No Name Pcs 126 134 ...

Страница 127: ...rm unit Fig 12 4 U arm unit 3001 5001 5003 5004 5002 5006 5008 5008 5005 5009 5009 5010 5011 5012 5014 5013 5017 5018 5019 5021 5020 5022 5023 5024 5025 5026 5015 5016 5029 5031 5030 3047 3046 5041 5041 5032 5033 5040 5035 5034 5037 5039 5038 5028 5027 5036 127 134 ...

Страница 128: ...haft 1 5019 HW0303951 1 Gear 1 5020 M5 12 Hexagon socket head cap screw 3 5021 2L 5 Conical spring washer 3 5022 HR32013XJ Bearing 1 5023 HW0301236 B Shaft 1 5024 HW0308760 1 Gear 1 5025 M4 12 Hexagon socket head cap screw 12 5026 2L 4 Conical spring washer 12 5027 6812LLU Bearing 1 5028 WR60 Circlip 1 5029 HR32017XJ Bearing 1 5030 AC3842F1 Oil seal 1 5031 HW0100172 3 U arm 1 5032 G115 O ring 1 50...

Страница 129: ...3 6018 6014 6015 6031 6030 6029 6021 6023 6023 6026 6020 6022 6024 6025 6027 6028 6040 6032 6034 6036 6038 6037 6033 6035 6039 6042 6047 6046 6048 6045 6043 6041 6041 6049 6050 6051 6052 6053 6052 6054 6055 6056 6057 6058 6059 6052 6060 6061 6052 6062 6056 6057 6061 6060 6062 6017 6016 6019 6066 6067 6068 6069 6070 6071 6075 6072 6074 6073 6076 6077 6078 129 134 ...

Страница 130: ... Conical spring washer 16 6018 HW1408162 6 15 Pin 1 6019 EZ5036A0 Cap 2 6020 HW0411718 1 Collar 1 6021 HW0410868 Shim 6022 HW0309164 1 Gear 1 6023 ISTW 35 Retaining ring 2 6024 6007 Bearing 1 6025 HW0411721 1 B nut 1 6026 M5 7 Magic screw 2 6027 HW0411720 1 Cover 1 6028 M4 12 GT SA bolt 4 6029 6911 Bearing 1 6030 HW0404270 1 Shim 1 6031 AE3290E3 Oil seal 1 6032 HW0100475 1 Wrist 1 6033 HW0301231 1...

Страница 131: ...17 1 Housing 1 6061 M6 15 GT SA bolt 4 6062 HW0301225 1 Gear 1 6063 HW0200615 1 Cover 1 6064 M6 15 GT SA bolt 6 6065 PT1 8 STAINLESS Hexagon socket head plug 1 6066 M5 16 Hexagon socket head cap screw 1 6067 2L 5 Conical spring washer 1 6068 HW9403619 1 Washer 1 6069 HW0301227 1 Gear 1 6070 HW9403620 Shim 6071 HW9482951 A Gasket 1 6072 HW9381400 E Speed reducer 1 6073 M14 40 Hexagon socket head ca...

Страница 132: ...r Unit 12 15 HW1485471 HW1485471 12 6 Balancer Unit Fig 12 6 Balancer Unit 2041 2042 2044 2045 2046 2043 2047 2048 7001 7002 7017 7003 7004 7005 7006 7007 7008 7009 7010 7011 7018 7012 7012 7013 7014 7015 7016 7003 2006 132 134 ...

Страница 133: ...FD3187A0 Dust seal 1 7011 EZ2228B0 Cap 1 7012 IRTW 75 Retaining ring 2 7013 M6 8 Magic screw 2 7014 PT1 8 STAINLESS Hexagon socket head plug 3 7015 M10 40 Hexagon socket head cap screw 8 7016 2L 10 Conical spring washer 8 7017 HW0481742 A Coil spring 1 7018 M8 40 Hexagon socket head cap screw 3 2006 HW0100647 2 L arm 1 2041 NA6912 Needle bearing 1 2042 HW9302054 1 Shaft 1 2043 AR 85 Clip 1 2044 WR...

Страница 134: ...WA SHOUGANG ROBOT Co Ltd 426 Udyog Vihar Phase IV Gurgaon Haryana India Fax 91 124 475 8542 Phone 91 124 475 8500 YASKAWA India Private Ltd Robotics Division YASKAWA Electric China Co Ltd 22F One Corporate Avenue No 222 Hubin Road Huangpu District Shanghai 200021 China Phone 86 21 5385 2200 Fax 86 21 5385 3299 YASKAWA Electric Thailand Co Ltd 59 1st 5th Floor Flourish Building Soi Ratchadapisek 18...

Отзывы: