8
Disassembly and Reassembly and Adjustment of Timing Belts
8.1 Disassembly and Reassembly of L- and U-Axis Timing Belts
8-1
176183-1CD
HW1483638
MH5S
(II)
/MH5F
8
Disassembly and Reassembly and Adjustment of Timing Belts
8.1
Disassembly and Reassembly of L- and U-Axis Timing
Belts
• Refer to
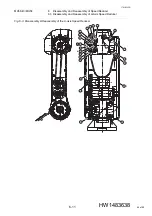
Fig. 8-1 “Disassembly & Reassembly of L- and U-Axis
.
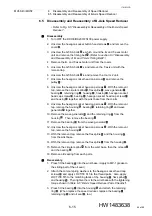
Disassembly
1. Turn OFF the DX100/DX200/FS100 power supply.
2. Unscrew the hexagon socket button head screws
and remove the
cover
.
3. Unscrew the GT-SA bolts
and remove the L-axis timing belt
.
However, without the L-axis timing belt
, its posture cannot be kept.
So when remove the L-axis timing belt, support the L-arm to avoid it
from rotating.
4. Unscrew the GT-SA bolts
and remove the U-axis timing belt
.
However, without the U-axis timing belt
,
its posture cannot be kept
as the L-axis. So when remove the U-axis timing belt, support the U-
arm to avoid it from rotating.
Reassembly
1. Mount the L-axis timing belt
and the U-axis timing belt
.
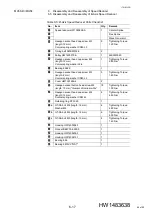
2. Adjust the initial tension of the timing belt. (Refer to
.) Then tighten the GT-SA bolts
with
the tightening torque shown in
Table 8-1 “L- and U-Axis Timing Belts
.
3. Mount the cover
and tighten the hexagon socket button head
screws
with the tightening torque shown in
.
4. Turn ON the DX100/DX200/FS100 power supply.
NOTE
Refer to
Chapter 3 “Home Position Return”
and
“Disassembly and Reassembly of the Motor”
.
6
5
3
1
1
4
2
2
1
2
3 4
5
6
72 of 99


