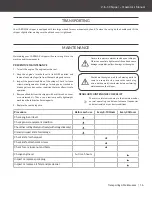
background image

16


mm

13


mm

18


mm

19


mm

30

 mm

32


mm

X 2

Remove the spark plug and drain all oil from the 
cylinder before attempting to start the unit after 
storage.

Do not use strong detergents or petroleum based 
cleaners when cleaning plastic parts. Chemicals can 
damage plastics.

Do not store your chipper with fuel in a non-ventilated 
area where fuel fumes could reach flames, sparks, pilot 
lights or any ignition sources.

Use only approved fuel containers.

STORAGE

If your chipper will not be used for more than 30 days, follow the 
steps below to prepare your unit for storage :

1.  Drain the fuel tank completely. Stale fuel has high gum con tent 
and can clog the carburetor and restrict fuel flow.

2.  Start the engine and allow it to run until it stops. This ensures 
no fuel is left in the carburetor and helps prevent deposits from 
forming inside, which can damage the engine.

3.  Drain the oil from the engine while it is still warm. Refill with 
fresh oil of the grade recommended in the engine manual.

4.  Allow the engine to cool. Remove the spark plug and put 60 ml 
of SAE-30 high-quality engine oil into the cylinder. Pull the starter 
rope slowly to distribute the oil. Replace the spark plug.

5. Use clean cloths to clean off the outside of the chipper and to 
keep the air vents free from obstructions.

6. Store your chipper in an upright position in a clean, dry building 
with good ventilation.

ENGINE OIL / FUEL

Refer to the engine manual packed  separately with your 
unit for information  on how to check or add oil/fuel and for 
recommendations.

ENGINE MAINTENANCE

Refer to the engine manual packed separately   with your unit for 
detailed information and a maintenance schedule.
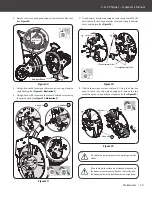
KNIFE RESHARPENING

After removal, the knives should be sharpened on a surface 
grinder. be careful and wear gloves to protect your hands. It is 
extremely  important  to  consistently  maintain  the  38-degree 
cutting angle for proper performance.

Make sure there is plenty of coolant used during the grinding 
process,  since  excessive  heat  damages  the  knives  and  weakens 
the metal. If you are unable to resharpen the knives your self, take 
them to a professional machine shop for proper resharpening. 
normally only as light touch-up is needed.

19

|

   Maintenance & Storage

36060US25M100_KOHLER.indd   19

2017/10/17   11:06:18

Содержание YW6065

Страница 1: ...YOUR SAFETY READ AND UNDERSTAND THE ENTIRE MANUAL BEFORE OPERATING MACHINE MODEL NUMBER YW6065 SERIAL NUMBER PURCHASE DATE Both model number and serial number may be found on the main label You should...

Страница 2: ...looking for outdoor power equipment OPE to get the job done right at the right price YARDMAX delivers the perfect combination of performance and practicality YARDMAX has a solution that s right for y...

Страница 3: ...ION 65 WARNING Engine exhaust some of its constituents and certain product components contain or emit chemicals known to the State of California to cause caucer and birth defects or other reproductive...

Страница 4: ...h the protection and safety devices Do not touch parts which are hot from operation Serious burns may result No smoking No sparks No flames Keep your hand and feet away from moving parts Thrown Object...

Страница 5: ...gine Manufacturer s manual packed separately with your unit Do not attempt to operate the machine until you fully understand how to properly operate and maintain the engine and how to avoid accidental...

Страница 6: ...esult in personal injury Avoid accidental starting Be sure the engine s switch is off before transporting the machine or performing any maintenance or service on the unit Transporting or performing ma...

Страница 7: ...tible substances away from the engine when it is hot Do not tilt the machine while the engine is running Never operate this machine without the feed hopper or discharge chute properly attached Replace...

Страница 8: ...when you are not working Do not put hands or feet near rotating parts This machine has two rotating cutting knives capable of amputating hands and feet and throwing objects Keep hands and feet out of...

Страница 9: ...11 Sparkplug Tools CONTENTS SUPPLIED Your YARDMAX chipper comes partially assembled and contains the following HARDWARE KIT Premium 4 Cycle NET CONTENTS 17 OZ 0 5 L 2 1 3 7 5 6 4 8 12 9 10 11 12 Hard...

Страница 10: ...otter pin from Hardware Kit 1 and insert into and through the axle hole Then bend the ends of thecotterpin SeeFigure1Illustration3 2 Align the three holes on the wheel axel bracket with the three hole...

Страница 11: ...ntake cone with the M8 nuts from Hardware Kit 4 See Figure 4 Illustration 2 Align the holes in the deflector bracket with the holes in the rotor disc housing as shown in Figure 5 illustration 1 Secure...

Страница 12: ...llustration 1 Then secure the handle assembly to the hopper opening with the M8 20 bolts washers and nuts from Hardware Kit 6 shown in Figure 6 illustration 2 1 Loosen the adjusting wing nut to set th...

Страница 13: ...MACHINE FEATURES AND CONTROLS Kickstand Rod Air Cleaner Feed Hopper Grip Handle Deflector Cone Cone Engine Muffer Oil Drain Plug Transport Wheels Spark Plug 12 2 in 1 Chipper Operator s Manual Know Yo...

Страница 14: ...hout the collection bag in place DEFLECTOR Chipped debris are discharged through the Deflector opening The deflector can be attached to the chute GRIP HANDLES The handles are used to move the unit TRA...

Страница 15: ...d fuel level inside the tank is not exceeded Use a portable gasoline container with an appropriately sized dispensing spout when filling the tank Do not use a funnel or other device that obstructs the...

Страница 16: ...position the deflector vertically as this will reduce the airflow impeding the discharge and causing blockage Feed tree limbs or branches with the cut end first into the hopper opening leaving the bru...

Страница 17: ...ecure 3 Inspect the general condition of the chipper Check for loose screws misalignment or binding of moving parts cracked or broken parts and any other condition that may affect its safe operation 4...

Страница 18: ...E CHECK Remove the chipper cone from the unit and rotate the cutting disc to inspect the sharpness of the knives See Figure 9 2 1 M8 20 2 Figure 11 16mm 13mm 18mm 19mm 30mm 32mm 2 KNIFE REMOVAL AND RE...

Страница 19: ...llen key S4 to remove the two screws on top of engine shaft bushing See Figure 13 illustration 1 6 Using Allen key S8 to remove the socket head cap screw fixing the engine shalt See Figure 13 illustra...

Страница 20: ...the spark plug and put 60 ml of SAE 30 high quality engine oil into the cylinder Pull the starter rope slowly to distribute the oil Replace the spark plug 5 Use clean cloths to clean off the outside o...

Страница 21: ...with fresh fuel 6 Clean or replace air cleaner 7 Refer to engine manual Engine overheats 1 Engine oil level low 2 Dirty air cleaner 3 Air flow restricted 4 Carburetor not adjusted properly 1 Fill cra...

Страница 22: ...PARTS DIAGRAM Parts List on page 24 21 Parts Diagram...

Страница 23: ...pper Knife 2 27 Engine Cushion 1 28 Bolt 5 16 24UNF 30 4 29 Bolt M8 50 2 30 Bolt M8 16 10 No Description QTY 31 Locknut M8 37 32 Chipper Cone 1 33 Locknut M6 5 34 Rubber Flap 1 35 Top Panel 1 36 Bolt...

Страница 24: ...844 YARDMAX 844 927 3629 info yardmax com yardmax com yardmax com Tame the Great Outdoors...

Отзывы: