


If the oil level on the dipstick is too low, carefully pour a small
amount of oil into the oil-fill tube, wait 3 minutes, and repeat
steps 8 through 10 until the oil level on the dipstick is correct.
If the oil level on the dipstick is too high, drain the excess oil until
the oil level on the dipstick is correct.
•
•
11. Install the dipstick into the oil-fill tube securely.
12. Recycle the used oil properly.
If the oil level in the engine is
too low or too high and you
run the engine, you may damage the engine.
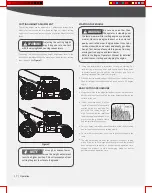
Always stop the engine before
you do work on the blade. The
blade continues to rotate after the throttle has been
released. Make sure that the blade is fully stopped
and disconnect the spark plug cap before you start
work.
The blade is sharp; contact
with the blade can result in
serious personal injury. Wear gloves when servicing
the blade.
WARNING
WARNING
WARNING
BLADE CARE
2. Examine the blade whenever you run out of fuel. If the blade is
damaged or cracked, replace it immediately. If the blade edge is
dull or nicked, have it sharpened and balanced, or replace it.
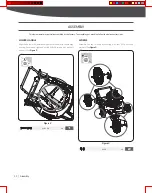
1. Disconnect spark plug wire from spark plug and place wire where
it cannot come in contact with plug. (See
Figure 15
)
3. Tip the machine onto its side with the air filter and carburetor
facing up. Use a block of wood to hold the blade steady. (See
Figure 16
)
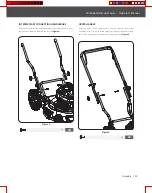
Figure 14
Figure 15
4. Tip the machine onto its side (so that the air filter is up) to drain
the used oil from the oil-fill tube. (See
Figure 14
)
5. After draining the used oil, return the machine to the operating
position.
6. Carefully pour about 3/4 of the engine capacity of oil into the oil-
fill tube.
7. Wait 3 minutes for the oil to settle in the engine.
8. Wipe the dipstick clean with a clean cloth.
9. Insert the dipstick into the oil-fill tube, then remove the dipstick.
10. Read the oil level on the dipstick. (See
Figure 13
)
21
|
Maintenance