


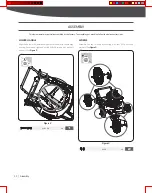


For mulching grass, remove the side discharge chute from the
mower. When you remove the side discharge chute, the mulch cover
will close. For effective mulching, do not cut wet grass. If the grass
has been allowed to grow in excess of four inches, mulching is not
recommended.
USING AS MULCHER
Rapid retraction of the starter
cord (kickback) will pull your
hand and arm toward the engine faster than you can
let go. Broken bones, fractures, bruises, or sprains
could result.
Wait for the blade to stop
completely before performing
any work on the mower.
WARNING
WARNING
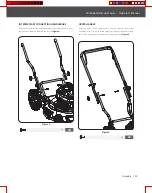
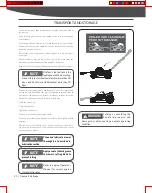
Open the mulch cover and install the side discharge deflector. (See
Figure 10
)
Release the engine start/stop control lever to stop the engine and
blade. (See
Figure 11
)
SIDE DISCHARGE MODE
STOPPING THE MACHINE
S T O P
2
1
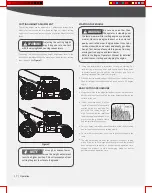
BLADE CONTROL
1.
Standing behind the mower, squeeze the engine start/stop
control lever against upper handle.
2. Holding the engine start/stop control lever firmly, grasp recoil
starter handle and pull rope out with a rapid, continuous, full arm
stroke. Keeping a firm grip on the starter handle, let the rope
rewind slowly.
3. Pull the recoil starter until engine compression has become
difficult to pull. Let the recoil return to the home position, then
pull quickly to start the engine. Repeat steps as needed. Fully
open the choke and set the throttle to the FAST position before
operating the unit.
Figure 10
Figure 11
18
Walk-Behind Lawn Mower
»
Operator’s Manual
Operation
|