background image

20

21

GB

GB

•  In the event of leakage of electrolyte, flush with water/

neutralising agent, seek medical help if it comes into 

contact with the eyes.

•  Store the appliance with battery pack fully charged at 

room temperature (around 20ºC). 

•  Every deep discharge cycle decreases the capacity 

of battery pack. To prolong battery life, it is 

recommended to charge the battery every 6 months 

over extended periods of time without use.

Transport 

The original packaging should be used when transporting 

the Robotic Mower over long distances.

To safely move from or within the working areas:
•  Press the STOP button to stop the mower.
•  Move the main switch button to the OFF position if you 

intended to carry the mower.

•  Carry the Robotic Mower using the handle below at the 

rear. Carry the mower with the blade disc away from the 

body.

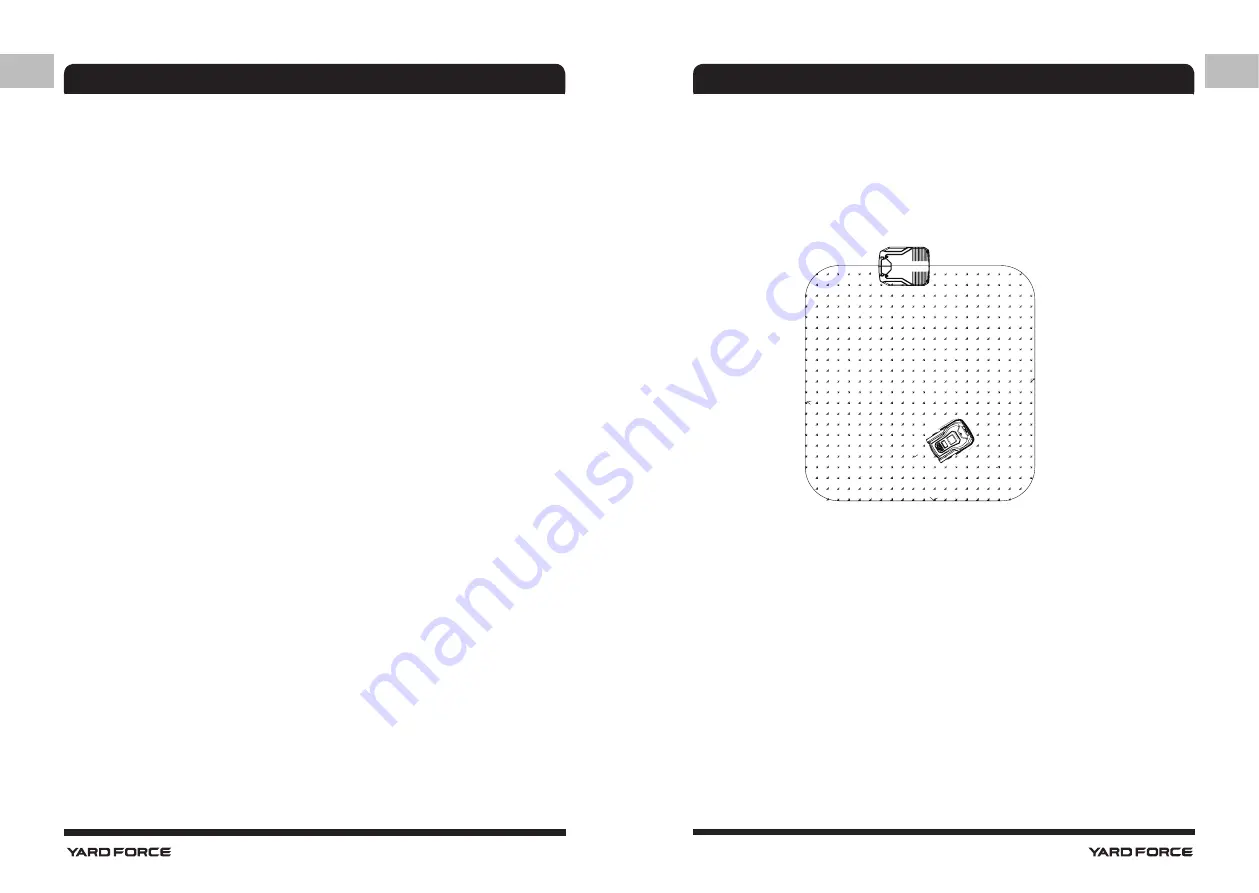
Robotic Mower basic operating principles

•  The Robotic Mower chooses its working direction 

randomly. It will mow your garden completely without 

leaving behind any uncut part within the area restricted 

by the chosen boundary.

•  You define the work area by installing the supplied 

boundary wire. Once the Robotic Mower detects 

the boundary wire, it will stop, move backwards and 

continue mowing in a different direction. It is important to 

ensure that the boundary is complete. Any objects you 

wish to protect within the boundary, such as a garden 

pond, trees, garden furniture or flower beds can also be 

protected using the boundary wire. The boundary wire 

must form one complete loop. If the Robotic Mower 

encounters an obstacle, such as a person, tree, pet 

or other general garden obstacles, it will stop, move 

backwards and continue mowing in a different direction.

SAFETY PRECAUTIONS

SAFETY PRECAUTIONS

Содержание SA650ECO

Страница 1: ...IC MOWER Original Instructions MÄHROBOTER Originalbetriebsanleitung GB DE FR NL ROBOT TONDEUSE Notice originale ROBOTMAAIER Originele handleiding ROBOSEKAČKA Originální návod CZ PL ROBOT KOSZĄCY Oryginalna instrukcja ...

Страница 2: ...sembling and operating the Robotic Mower It is dangerous to operate this product without being familiar with these instructions Keep this manual in a safe place and have it ready for future reference A 5 1 2 3 4a 12 15 18 16 17 13 14 4b 8 9 6 7 11 10 ...

Страница 3: ...eneral description 05 Technical Data 07 Safety precautions 08 Assembly instructions 28 Operation 42 Cleaning maintenance 48 Troubleshooting 53 Declaration of conformity 55 INTENDED PURPOSE Any other use that is not specifically approved in these instructions can result in damage to the Robotic Mower and could be a serious danger to the user This appliance MUST NOT be used by children and persons w...

Страница 4: ...s needed The three sharp blades ensure clean cuts with minimal damage to the plant leaving behind tiny snippets as natural fertilizer TECHNICAL DATA Model SA650ECO Max cutting area 650 m2 Battery 862615 862621 18650 20Q 20R Lithium Ion battery 28 V 2 0 Ah 56Wh Switching power supply FY3201500S1 FY3201500S2 Input 100 240V AC 50 60 Hz Output 32 V DC 1 5A Typical mow time on one charge 60 min Rated v...

Страница 5: ...d in the manual Warning symbols with information on damage and injury prevention Warning symbol with information on the danger of electric shock Symbols on the machine Attention These instructions must be read Danger of injury due to flung out material Keep bystanders well away from the machine WARNING Do not ride on the machine CAUTION Do not touch rotating blade WARNING Keep your hands and feet ...

Страница 6: ... supply SMPS Switch mode power supply unit Rated maximum ambient temperature 45 o C The charger is for indoor use only Warning Symbols on the battery pack Batteries contain Li Ion and should not be disposed with general household waste Contact your local authority for disposal advice Do not throw into water Do not throw on to fire Do not subject the battery to strong sunlight over long periods and...

Страница 7: ...transporting the Robotic Mower especially for long distances If you need to carry the Robotic Mower from or within the working area first press the STOP button 2 to stop the device Secondly ensure that the main power switch 11 is switched OFF before you lift up the Robotic Mower Thirdly close the top cover and carry the Robotic Mower using the carry handle 10 at the rear under the mower keeping th...

Страница 8: ...operator or user is responsible for accidents or hazards occurring to other people or their property Ensure the correct installation of the perimeter boundary system as instructed Periodically inspect the area where the machine is to be used and remove all stones sticks wires and other debris which could cause damage to the machine or be unsafe Periodically inspect to see that the blades blade bol...

Страница 9: ... operating the machine in wet grass Doing so can cause additional wear and tear and will increase the amount of cleaning required Work interruptions After the machine has been turned off the cutting cylinder will continue to rotate for a few seconds Keep hands and feet well away Only remove blockages when the machine is standing completely still Switch off the power when the machine is transported...

Страница 10: ...sk of electric shock Connect the machine to a power socket with a residual current circuit breaker that has a rated current of no more than 30 mA Always keep the extension cable well away from the cutting tools If the power cable becomes damaged during work instantly disconnect the power cable from the mains DO NOT TOUCH THE POWER CABLE BEFORE IT HAS BEEN DISCONNECTED FROM THE MAINS Risk of electr...

Страница 11: ... rear Carry the mower with the blade disc away from the body Robotic Mower basic operating principles The Robotic Mower chooses its working direction randomly It will mow your garden completely without leaving behind any uncut part within the area restricted by the chosen boundary You define the work area by installing the supplied boundary wire Once the Robotic Mower detects the boundary wire it ...

Страница 12: ... to the docking station It will approach the closest boundary wire and follow it anticlockwise without cutting back to the docking station When fully charged the Robotic Mower will automatically resume the interrupted working cycle The launch direction from the docking station clockwise is hard wired into the design and is impossible to change Recognising the boundary wire Note that before stoppin...

Страница 13: ...se a neighbour is using the same Robotic Mower you will need to keep a distance of 0 5m between you and your neighbour s boundary wires Otherwise the two devices might interfere with each other Additionally ensure that your docking station is positioned at least 10m away from your neighbour s boundary wires Finally ensure that the adjacent boundary wires are using different signals Please refer to...

Страница 14: ...ways start in a high cutting position and work your way down to the cutting height you want Before adjusting the cutting height always press the STOP button 2 to interrupt the cutting Then turn the large dial to adjust the cutting height Note Only adjust the cutting height while the Robotic Mower is switched off Do not use the Robotic Mower during lightning or thunder storms In case of damage to t...

Страница 15: ...p reverse backwards and then continue mowing in a different direction Still protecting the obstacles using the boundary wire is the recommended long term solution 100 mm Trees The Robotic Mower treats trees as common obstacles but if the roots of the tree are exposed and lower than 100mm this area should be excluded using boundary wire in order to protect the tree root cutting blades or rear wheel...

Страница 16: ...is advised to keep it outside of the boundary wire Please allow a safety distance of 40 cm between driveway and boundary wire boundary wire min 2 m Boundary wire Uneven lawn surfaces Uneven lawn areas or may cause the blades to touch the ground We recommend leveling the lawn before using your Robotic Mower or excluding uneven areas using the boundary wire boundary boundary If the driveway and lawn...

Страница 17: ...g it will bounce off it as usual When following the boundary wire back to the docking station it will take the detour around the flower bed 10 cm 10 cm Never cross the wires General Dos and Don ts Do not run the boundary wire directly above an ordinary power cable The power cable s electric field may distort the boundary signal Never cross two boundary wires This will distort the radio signal and ...

Страница 18: ...propriate use the included ruler to check the 40 cm required distance First locate the best position for your docking station Be aware that it needs a permanent connection to the mains so take into account the location of the nearest power outlet The included supply cord has a length of 9 m 1 m 2 m The docking station 5 must be placed on a flat surface at ground level To ensure the Robotic Mower c...

Страница 19: ...f electric shock Unpack the boundary wire 18 and locate the free end Mark the desired path of the boundary wire with the fixing pegs 15 Use the included ruler 16 to to ensure the required 40 cm distance between wire and obstacles The recommended distance between two pegs is about 80 cm in straight lines and less in tight curves Note that the pegs hook and wire slit always faces the outside of the ...

Страница 20: ... s total length must not exceed 300 m 10 15 mm Prepare the boundary wire for the docking station Use a wire stripper to remove 10 15 mm insulation from each end Twist the threads tight Connect the docking station to the boundary wire Place the docking station on the end of the boundary wire so that the wire runs lengthwise below the middle of the docking station Connect that end to the left black ...

Страница 21: ...otic Mower in the working area a few metres beside the docking station Set the main power switch 11 to ON The Robotic Mower will power up and start a self test but will not start working at this time Press down on the large STOP button 2 to open the top cover and access the controls Activate the button marked situated on the left part of the display and press down the top cover to close it Once cl...

Страница 22: ...ked OPERATION Lock Control panel will be locked when the Robotic Mower is restarted using the mains power switch Also you can simply press the lock button to manually lock the control panel Change PIN code The analog keyboard The panel is equipped with a 5 key numerical keyboard Use 4H for 0 6H for 1 8H for 2 10H for 3 S1 for 4 and S2 for 5 Changing the PIN Code 1 Switch OFF the mains power switch...

Страница 23: ...This LED will flash while the battery is charging A continuous LED indicates a fully charged battery While charging the boundary signal receiver is powered off to save energy This can cause the boundary wire signal LED to turn on Working time setting The above buttons let you choose the mower s daily working hours Please refer to the below table for the recommended working time per day depending o...

Страница 24: ...harging is complete the device will start cutting again It will also start working again on the following day STOP To interrupt the automatic working schedule press the STOP button to open the top cover and close it again without pressing any control button The Robotic Mower will beep five times to confirm the interruption It will not resume working without further user commands OPERATION OPERATIO...

Страница 25: ... wire can remain outside However it is imperative to protect the wire against corrosion We recommend a water free grease or suitable sealing tape If available repack the product in the original packaging Alternatively our service centre offers a winter service for your device This will include a check up of all parts and if available a software upgrade CLEANING MAINTENANCE Preparing for spring Aft...

Страница 26: ...the fixing screw Turn the blade upside down and fix it again with the fixing screw After tightening the fixing screw verify that the blade can rotate freely around the screw A set of spare blades is included with the Robotic Mower More are available from customer support The blade s spare part number is 846210 Only use original spare parts For best performance and avoiding imbalance always turn or...

Страница 27: ...power cable runs parallel and in close proximity the boundary wire If necessary reposition the boundary wire 2 Check if a front wheel is stuck 3 If a neighbor has a similar Robotic Mower the signals may interfere Try setting your docking station and Robotic Mower to the alternative boundary signal 4 Driving motor may be damaged please contact customer support 3 NONE The Robotic Mower is very noisy...

Страница 28: ...F the device 2 Place Robotic Mower on flat even surface 3 While pressing and holding the START button switch ON the device 4 The Robotic Mower will boot up All LEDs flash 5 Release START button Factory reset is complete Note The Robotic Mower must stand on a flat surface because the inclination sensors are also zeroed DECLARATION OF CONFORMITY Declaration of Conformity We MEROTEC GmbH Otto Brenner...

Страница 29: ...ubois General Manager Date 2019 09 18 SUMEC France Sarl 59 bis Rue du Mûrier 37540 Saint Cyr Sur Loire France DECLARATION OF CONFORMITY To the provisions of Council Directives We SUMEC UK Co Ltd Unit A B Escrick Business Park Escrick York YO 19 6FD Declare that the product Description 28V Robotic Mower Model No SA650ECO Function Cutting grass Conforms to the following directives and standards Mach...

Отзывы: