background image

E-

5

English

Make the following settings on your computer after the installation of the driver is finished.

Setting of Audio and Audio CD 
[Windows 98/98SE only]

• Terminate all the activated applications.

• When using Windows 98SE, restart Windows, 

first.

1. Click the Windows “Start” button and select 

“Settings”, and then “Control Panel”.

2. Double-click the “Multimedia” icon.

3. Click the “Audio” tab and select “USB Audio 

Device” at “Preferred device” of “Playback”.
* Usually, this setting is automatically made.

* If “USB Audio Device” does not appear, restart 

Windows.

4. Click the “CD Music” tab and select the CD-

ROM drive for playing audio CDs.

5. Click the check box of “Enable digital CD audio 

for this CD-ROM device” to enter the check 
mark.
* It may happen that the check box cannot be 

clicked because some CD-ROM drives cannot 
be used for playing audio CDs.

6. Click “OK” and close the “Multimedia” setting 

panel.

7. Restart Windows.

Note:  

When using two or more drives, you must make 

the above setting for each drive.

Checking the Audio setting 
[Windows Me only]

1. Click the Windows Me “Start” button and 

select “Settings”, and then “Control Panel”.

2. Double-click the “Sounds and Multimedia” 

icon.

3. Click the “Audio” tab and select “USB Audio 

Device” at “Preferred device” of “Sound Play-
back”.
* Usually, this setting is automatically made.

* If “USB Audio Device” does not appear, restart 

Windows.

Checking sound output and adjusting volume
[Windows 98/98SE and Windows Me]

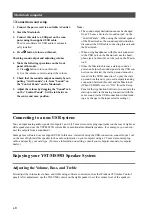
1. Make the following operations on the front 

panel of this unit.
a) Press 

 button to turn on this unit.

b) Use the volume control to adjust the volume.

2. Adjust the volume on the computer as follows.

a) Double-click the speaker icon on the task tray, 

or select “Start”, “Programs”, “Accessories”, 
“Entertainment” in this order and click “Vol-
ume Control”.
(The volume adjustment window appears.) 

b) Adjust the volume by dragging the “Volume” 

slider. Set the slider between the center and 
max. positions.
* Do not enter the check mark in the “Mute” 

check box. If entered, sound output will stop.

3. Click the Windows “Start” button and select 

“Settings”, and then “Control Panel”.

4. Double-click the “Sounds” (or “Sounds and 

Multimedia”) icon.

5. Click the “Sounds” tab.

6. Check that the sound is output normally by out-

putting “Default sound”, etc. from “Events” (or 
“Sound Events”).

* If no sound is heard, restart Windows and check 

again.

Содержание YST-MS55D

Страница 1: ...POWERED MULTIMEDIA SPEAKERS YST MS55D SPEAKERS MULTIMEDIA POWERED YST MS55D POWERED MULTIMEDIA SPEAKERS VOLUME BASS 0 10 OWNER S MANUAL MODE D EMPLOI UCA ...

Страница 2: ...t from the unit 12 Cleaning The unit should be cleaned only as rec ommended by the manufacturer 13 Nonuse Periods The power cord of the unit should be unplugged from the outlet when left unused for a long period of time 14 Object and Liquid Entry Care should be taken so that objects do not fall into and liquids are not spilled into the inside of unit 15 Damage Requiring Service The unit should be ...

Страница 3: ...ollow instructions could void your FCC authorization to use this product in the USA 3 NOTE This product has been tested and found to comply with the requirements listed in FCC Regulations Part 15 for Class B digital devices Compliance with these requirements provides a reasonable level of assurance that your use of this product in a residential environment will not result in harmful interference w...

Страница 4: ... speakers are magneti cally shielded keep floppy disks and tapes away from them The YST MS55Ds may cause picture distortion when located close to a television or computer monitor In this case move them away a short dis tance Avoid sources of hum transformers motors To prevent fire or electrical shock do not expose to rain and water Do not use force on switches knobs or cables When you move the YST...

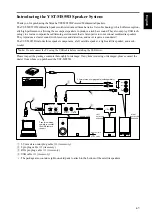
Страница 5: ... inspect the package contents thoroughly for damage If any item is missing or damaged please contact the dealer from whom you purchased the YST MS55D 1 3 5 mm stereo mini plug cable 1 Accessory 2 8 pin plug cable 1 Accessory 3 RCA pin plug cable 1 Accessory 4 USB cable 1 Accessory The package also contains eight non skid pads to attach to the bottom of the satellite speakers Note Do not connect th...

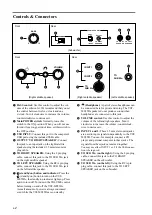
Страница 6: ... turning on and off the YST MS55Ds A small amount of power is always consumed even while the YST MS55Ds are on standby 8 Headphone A pair of stereo headphones can be connected here for private listening The YST MS55D speakers do not produce sound when headphones are connected to this jack 9 VOLUME control Use this control to adjust the volume of the left and right speakers Turn it clockwise to inc...

Страница 7: ...se the computer as an input source by connecting it to the analog or digital input s of this unit In that case however the sup plied Application Software cannot be used You may be requested to insert your OS s CD ROM during the installation so please have it ready before commencing The installing method may differ from the instruc tions below depending on the operating environ ment of your compute...

Страница 8: ...w devices by type option button 8 Click the symbol next to Sound video and game controllers and make sure that USB Audio Device appears in the list as shown The screen image is for Windows 98SE When using Windows Me may be shown at the head of USB Copmposite Device in green This means the USB driver has been installed with the Generic ID supplied with the operating system This is not an error mess...

Страница 9: ...s Me Start button and select Settings and then Control Panel 2 Double click the Sounds and Multimedia icon 3 Click the Audio tab and select USB Audio Device at Preferred device of Sound Play back Usually this setting is automatically made If USB Audio Device does not appear restart Windows Checking sound output and adjusting volume Windows 98 98SE and Windows Me 1 Make the following operations on ...

Страница 10: ...window appears 6 Select the Hardware tab and click the Device Manager The Device Manager window appears 7 Select the View tab and click the Devices by type option button 8 Click the symbol next to Sound video and game controllers and make sure that USB Audio Device appears in the list as shown 9 Click the symbol next to Human Interface Devices and make sure that HID compliant consumer control devi...

Страница 11: ... tor Note When using two or more drives you must make the above setting for each drive Checking sound output and adjusting volume 1 Make the following operations on the front panel of this unit a Press button to turn on this unit b Use the volume control to adjust the volume 2 Adjust the volume on the computer as follows a Double click the speaker icon on the task tray or select Start Programs Acc...

Страница 12: ...ignal via the USB con nection is activated the start up sound cannot be issued via the USB connection To play the start up sound via this unit you need a separate analog connection between this unit and the Macintosh When USB MIX is set to ON from the Setup Panel of the Application Software you can mix the start up sound via the analog connection with the same sound via the USB connection without ...

Страница 13: ...s not properly plugged into the AC outlet Insert the AC power cord firmly into the AC outlet The standby on button on the front panel of the right satellite speaker or the POWER switch on the subwoofer is turned Off Turn on the POWER switch on the subwoofer then turn on the standby on button on the right satellite speaker The volume is set to minimum Turn the speaker VOLUME control to the right to...

Страница 14: ...nput jack 3 5 mm stereo mini jack for audio signal 2 USB in use 1 USB digital 1 Headphone Output jack 3 5 mm stereo mini jack for audio signal 1 USB in use Output level 0 38 V 30Ω 200 mV Power consumption 65 W Power supply U S A and Canada models AC 120 V 60 Hz Australia model AC 240 V 50 Hz U K and Europe models AC 230 V 50 Hz General model AC 110 120 220 240 V 50 60 Hz Dimensions W H D Satellite...

Страница 15: ...Printed in China V770200 IP ...

Отзывы: