


2.
How to Remove Parts Installed
to the Bottom Cabinet Assembly
2.
ボトムキャビネット Ass'y に
取り付けてあるパーツの外し方
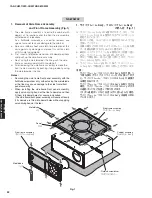
Fig. 2
2-1.
Removal of Driver Full-Range (Fig. 2)
*
The driver removal procedure is the same for
both right and left.
a.
Remove 4 screws (
②
).
b.
Remove the solder of the connector and disconnect
the cable.
c.
Remove the driver full-range.
2-2. Removal of Driver Tweeter (Fig. 2)
*
The driver removal procedure is the same for
both right and left.
a.
Remove 2 screws (
③
).
b.
Remove the solder of the connector and disconnect
the cable.
c.
Remove the solder of the connector and remove
the capacitor.
d.
Remove the driver tweeter.
2-1. スピーカーユニット(フルレンジ)の外し方
(Fig. 2)
※ スピーカーユニットの外し方は左右同じです。
a.
② のネジ 4 本を外します。
b.
コネクターの半田を取り除きケーブルを外します。
c.
スピーカーユニット(フルレンジ)を外します。
2-2. スピーカーユニット(ツィーター)の外し方
(Fig. 2)
※ スピーカーユニットの外し方は左右同じです。
a.
③ のネジ 2 本を外します。
b.
コネクターの半田を取り除きケーブルを外します。
c.
コネクターの半田を取り除きコンデンサを外しま
す。
d.
スピーカーユニット(ツィーター)を外します。
Capacitor
コンデンサー
Driver full-range
スピーカーユニット(フルレンジ)
Driver full-range
スピーカーユニット(フルレンジ)
Driver tweeter
スピーカーユニット(ツィーター)
Rubber sheet and the cloth
ゴムシートと布
Bottom cabinet assembly
ボトムキャビネット Ass'y
②
③
③
②
18
YAS-CU207/ATS-CU2070/NS-WSW42
Y
A
S-CU207/A
TS-CU2070/
NS-WSW42
Содержание YAS-207
Страница 8: ...Top view Rear view NS WSW42 8 YAS CU207 ATS CU2070 NS WSW42 YAS CU207 ATS CU2070 NS WSW42...
Страница 10: ...B model G model V model J model 10 YAS CU207 ATS CU2070 NS WSW42 YAS CU207 ATS CU2070 NS WSW42...
Страница 30: ...MEMO 30 YAS CU207 ATS CU2070 NS WSW42 YAS CU207 ATS CU2070 NS WSW42...