background image

Scooter care an

d

 stora

g

e

8-1

8

EAU37834

Matte color caution

NOTICE

ECA15193

Some mo

d

els are equippe

d

 with

matte colore

d

 finishe

d

 parts. Be

sure to consult a Yamaha 

d

ealer for

a

d

vice on what pro

d

ucts to use 

b

e-

fore cleanin

g

 the vehicle. Usin

g

  a

b

rush, harsh chemical pro

d

ucts or

cleanin

g

 compoun

d

s when cleanin

g

these parts will scratch or 

d

ama

g

e

their surface. Wax also shoul

d

 not

b

e applie

d

 to any matte colore

d

 fin-

ishe

d

 parts.

EAUN1000

Care

While the open design of a scooter re-
veals the attractiveness of the technol-
ogy, it also makes it more vulnerable.
Rust and corrosion can develop even if
high-quality components are used. A
rusty exhaust pipe may go unnoticed
on a car, however, it detracts from the
overall appearance of a scooter. Fre-
quent and proper care does not only
comply with the terms of the warranty,
but it will also keep your scooter look-
ing good, extend its life and optimize
its performance.

Before cleanin

g

1. Cover the muffler outlet with a

plastic bag after the engine has
cooled down.

2. Make sure that all caps and cov-

ers as well as all electrical cou-
plers and connectors, including
the spark plug cap, are tightly in-
stalled.

3. Remove extremely stubborn dirt,

like oil burnt onto the crankcase,
with a degreasing agent and a
brush, but never apply such prod-
ucts onto seals, gaskets and
wheel axles. Always rinse the dirt
and degreaser off with water.

Cleanin

g

NOTICE

ECA10784

Avoi

d

 usin

g

 stron

g

 aci

d

ic wheel

cleaners, especially on spoke

d

wheels. If such pro

d

ucts are

use

d

 on har

d

-to-remove 

d

irt, 

d

o

not leave the cleaner on the af-
fecte

d

 area any lon

g

er than in-

UBL2E0E0.book  Page 1  Friday, June 23, 2017  9:30 AM

Содержание X-MAX 125 ABS 2018

Страница 1: ...PANTONE285C YP125RA X MAX 125 ABS OWNER S MANUAL MOTORCYCLE English E Read this manual carefully before oper ating this vehicle BL2 F8199 E1...

Страница 2: ...claration of conformity is available at the following inter net address http www mitsubishielectric com bu automotive doc re html REMOTE CONT UNIT Smart Unit Frequency band 125 kHz The maximum radio f...

Страница 3: ...ury In addition the many tips given in this manual will help keep your scooter in the best possible condition If you have any further questions do not hesitate to con tact your Yamaha dealer The Yamah...

Страница 4: ...ry or death A WARNING indicates a hazardous situation which if not avoided could result in death or serious injury A NOTICE indicates special precautions that must be taken to avoid damage to the vehi...

Страница 5: ...y DC jack 4 29 For your safety pre operation checks 5 1 Operation and important riding points 6 1 Starting the engine 6 2 Starting off 6 3 Acceleration and deceleration 6 3 Braking 6 4 Tips for reduci...

Страница 6: ...iary lights 7 29 Brake tail light 7 30 Front turn signal light 7 30 Rear turn signal light bulb 7 31 Replacing the license plate light bulb 7 31 Troubleshooting 7 32 Troubleshooting charts 7 33 Emerge...

Страница 7: ...on Failure to inspect or maintain the vehi cle properly increases the possibility of an accident or equipment damage See page 5 1 for a list of pre operation checks This scooter is designed to carry t...

Страница 8: ...sts Never ride under the influence of alcohol or other drugs This scooter is designed for on road use only It is not suitable for off road use Protective Apparel The majority of fatalities from scoote...

Страница 9: ...cessories Here along with the information about accessories be low are some general guidelines to fol low if loading cargo to your scooter The total weight of the operator pas senger accessories and c...

Страница 10: ...delines in mind as well as those provided under Load ing when mounting accessories Never install accessories or carry cargo that would impair the per formance of your scooter Careful ly inspect the ac...

Страница 11: ...le so that the scooter will not bounce exces sively during transport EAU57600 Further safe riding points Be sure to signal clearly when making turns Braking can be extremely difficult on a wet road Av...

Страница 12: ...bsorber assembly spring preload adjusting ring page 4 25 6 Final transmission oil filler cap page 7 11 7 Final transmission oil drain bolt page 7 11 8 V belt case air filter element page 7 14 9 Engine...

Страница 13: ...tment page 4 20 2 Fuel tank cap page 4 17 3 Storage compartment B page 4 20 4 Windshield page 4 22 5 Battery page 7 26 6 Fuses page 7 27 7 Centerstand page 7 24 8 Shock absorber assembly spring preloa...

Страница 14: ...brake fluid reservoir page 7 20 4 Speedometer page 4 2 5 Multi function display page 4 3 6 Tachometer page 4 3 7 Front brake fluid reservoir page 7 20 8 Right handlebar switches page 4 12 9 Front bra...

Страница 15: ...r before us ing this vehicle NOTICE ECA24080 The smart key system uses weak ra dio waves The smart key system may not work in the following situa tions The smart key is placed in a lo cation exposed t...

Страница 16: ...key system back on EAUM3960 Operating range of the smart key system The operating range of the smart key system is about 80 cm 31 5 in from the antenna TIP As the smart key system uses weak radio wave...

Страница 17: ...WARNING EWA17952 The smart key should be carried with you Do not store it on the vehicle When the smart key is within operating range exercise due care because other people not carrying the smart key...

Страница 18: ...the smart key in water or other liquids Do not place heavy items or ex cessive stress on the smart key Do not leave the smart key in a place exposed to direct sun light high temperature or high humidi...

Страница 19: ...s within operating range To operate the vehicle turn the smart key on and bring it within operat ing range To check whether the smart key is turned on or off Push the smart key button to confirm the c...

Страница 20: ...d off Sounds once The beeper is turned on EAU76482 Replacing the smart key bat tery Replace the battery in the following sit uations The smart key system indicator light flashes for about 20 seconds w...

Страница 21: ...precautions to prevent the waterproof seal from being damaged or contaminated by dirt Do not touch the internal cir cuits and terminals This may cause malfunctions Do not apply excessive force to the...

Страница 22: ...an accident TIP Do not push the main switch knob re peatedly or turn the main switch back and forth beyond normal use Other wise to protect the main switch from damage the smart key system will tempo...

Страница 23: ...s flash once and the vehicle power turns off TIP When the main switch is turned to OFF but the smart key cannot be confirmed the smart key is either out side operation range or has been turned off the...

Страница 24: ...switch has been in the OPEN position for 3 minutes If the smart key is turned off while the main switch is in the OPEN position If you walk out of range of the smart key system with the main switch i...

Страница 25: ...all other electri cal systems are off To use the position 1 With the main switch in the position and the smart key turned on and within operating range push the main switch knob 2 While the smart key...

Страница 26: ...Smart key system 3 12 3 TIP Make sure that fuel tank cap lid is se curely closed before starting off UBL2E0E0 book Page 12 Friday June 23 2017 9 30 AM...

Страница 27: ...when the main switch is turned to ON and goes off after trav eling at a speed of 10 km h 6 mi h or higher If the ABS warning light does not come on when the main switch is turned to ON comes on or fl...

Страница 28: ...off If the light does not come on or if the light remains on have a Yamaha dealer check vehicle EAU78600 Smart key system indicator light This indicator light communicates the status of the smart key...

Страница 29: ...top the vehicle before making any setting changes to the multi function meter unit Changing settings while riding can distract the operator and increase the risk of an accident The TRIP INFO switch is...

Страница 30: ...The hour digits will start flashing 4 Use the TRIP switch to set the hours 5 Push the TRIP switch for three seconds and then release it The minute digits will start flashing 6 Use the TRIP switch to...

Страница 31: ...the vehicle as soon as pos sible The coolant temperature varies with changes in the weather and engine load Tripmeter display The tripmeter display is equipped with the following odometer tripmeter ti...

Страница 32: ...pushing the TRIP switch and then push the TRIP switch for three sec onds Fuel reserve tripmeter F Trip When approximately 2 4 L 0 63 US gal 0 53 Imp gal of fuel remains in the fuel tank the last segme...

Страница 33: ...ct time V belt replacement tripmeter V Belt Trip The V belt replacement tripmeter shows the distance traveled since the V belt was last replaced The V belt replacement indicator V Belt will flash ever...

Страница 34: ..._ _ _ km L Consumption_ _ _ L 100 km Av erage Air temp For the UK Push the TRIP switch to change the display between the air temperature display Air temp battery voltage dis play Battery traction cont...

Страница 35: ...or when stopped at traffic sig nals etc Battery voltage display This display shows the current charge state of the battery TIP If the engine turns over slowly when using the start switch have a Yamah...

Страница 36: ...set the average fuel consumption push the INFO switch for at least three seconds TIP After resetting the average fuel con sumption _ _ _ will be shown until the vehicle has traveled 1 km 0 6 mi Instan...

Страница 37: ...played refuel as soon as possible H TEMP Appears when the top seg ment of the coolant temperature meter starts flashing If H TEMP is dis played stop the vehicle then stop the engine and let the engine...

Страница 38: ...arting instructions prior to starting the engine Set this switch to to stop the en gine in case of an emergency such as when the vehicle overturns or when the throttle cable is stuck EAU78190 Hazard s...

Страница 39: ...e INFO switch move the TRIP INFO switch in direction b EAU12902 Front brake lever The front brake lever is located on the right side of the handlebar To apply the front brake pull this lever toward th...

Страница 40: ...Always keep a sufficient distance from the vehicle ahead to match the riding speed even with ABS The ABS performs best with long braking distances On certain surfaces such as rough or gravel roads th...

Страница 41: ...regulating engine power until traction is restored When traction control has engaged the indicator light will flash You may notice changes in engine re sponse or exhaust sound WARNING EWA18860 The tra...

Страница 42: ...ly one wheel is al lowed to rotate for more than a few seconds Should this happen the indicator light will come on and possi bly the warning light too TIP When the vehicle is on the centerstand do not...

Страница 43: ...then pull the cap off To install the fuel tank cap 1 Insert the fuel tank cap onto the tank opening and turn it clockwise until the install mark aligns with 2 Close the fuel tank cap lid WARNING EWA11...

Страница 44: ...y wipe off spilled fuel with a clean dry soft cloth since fuel may deteriorate painted surfaces or plastic parts ECA10072 4 Be sure to securely close the fuel tank cap WARNING EWA15152 Gasoline is poi...

Страница 45: ...are two types of gasohol gaso hol containing ethanol and that con taining methanol Gasohol containing ethanol can be used if the ethanol con tent does not exceed 10 E10 Gas ohol containing methanol i...

Страница 46: ...re than a few minutes Long idling can cause a build up of heat NOTICE ECA10702 Use only unleaded gasoline The use of leaded gasoline will cause unre pairable damage to the catalytic converter EAU78514...

Страница 47: ...o open the seat rear storage com partment via the main switch Turn the main switch to OPEN and then push the SEAT button To open the seat rear storage com partment with the mechanical key 1 Open the k...

Страница 48: ...e or breakable in the storage compartment WARNING EWA18950 Do not exceed the load limit of 1 kg 2 2 lb for storage compart ment A Do not exceed the load limit of 0 5 kg 1 1 lb for storage com partment...

Страница 49: ...fied torque EWA15511 5 Place the bolt access covers and then install the quick fasteners To change the windshield height to the low position 1 Remove the bolt access covers by removing the quick faste...

Страница 50: ...spec ified torque WARNING A loose windshield could cause an acci dent Be sure to tighten the screws to the specified torque EWA15511 5 Place the bolt access covers and then install the quick fasteners...

Страница 51: ...ECA10102 To avoid damaging the mechanism do not attempt to turn beyond the maximum or minimum settings Adjust the spring preload as follows To increase the spring preload and thereby harden the suspen...

Страница 52: ...side stand cannot be properly moved up or does not stay up otherwise the sidestand could contact the ground and distract the operator resulting in a possible loss of control Yamaha s ignition circuit...

Страница 53: ...the follow ing functions It prevents the engine from start ing when the sidestand is down It prevents the engine from start ing if the brakes are not applied It will stop the running engine if the sid...

Страница 54: ...l The system is OK The vehicle can be ridden The sidestand switch may not be working correctly The vehicle should not be ridden until checked by a Yamaha dealer The brake switch may not be working cor...

Страница 55: ...is equipped with an auxil iary DC jack located within storage compartment A A 12 V accessory connected to the auxiliary DC jack can be used when the main switch is in the ON position and should only b...

Страница 56: ...ary add recommended oil to specified level Check vehicle for oil leakage 7 9 Final transmission oil Check vehicle for oil leakage 7 11 Coolant Check coolant level in reservoir If necessary add recomme...

Страница 57: ...ting points if necessary 7 23 Centerstand side stand Make sure that operation is smooth Lubricate pivots if necessary 7 24 Chassis fasteners Make sure that all nuts bolts and screws are properly tight...

Страница 58: ...ould cause an accident or injury EAU78221 TIP This model is equipped with a lean an gle sensor to stop the engine in case of a turnover In this case the engine trouble warning light will come on but t...

Страница 59: ...y system indicator light TIP The ABS warning light should come on and stay on until the vehicle reaches a traveling speed of 10 km h 6 mi h or higher NOTICE ECA22510 If a warning or indicator light do...

Страница 60: ...irrors 3 Switch the turn signals on 4 Check for oncoming traffic and then slowly turn the throttle grip on the right in order to take off 5 Switch the turn signals off EAU16782 Acceleration and decele...

Страница 61: ...tion sites and manhole covers become extremely slip pery when wet Therefore slow down when approaching such areas and cross them with cau tion Keep in mind that braking on a wet road is much more diff...

Страница 62: ...new do not put an excessive load on it for the first 1000 km 600 mi The various parts in the engine wear and polish themselves to the correct operating clearances During this period prolonged full thr...

Страница 63: ...ill sound for approxi mately 1 minute To stop the beeper turn the vehicle power off or raise the sidestand TIP Before leaving the vehicle be sure to turn the main switch to OFF or Otherwise the batter...

Страница 64: ...If you are not familiar with vehicle ser vice have a Yamaha dealer perform service WARNING EWA15123 Turn off the engine when performing maintenance unless otherwise specified A running engine has movi...

Страница 65: ...that is certified if applicable Yamaha dealers are trained and equipped to perform these particular services EAU79250 Owner s tool kit The owner s tool kit is located on the bottom of the seat See pa...

Страница 66: ...require special tools data and technical skills EAU71060 Periodic maintenance chart for the emission control system NO ITEM 1 Fuel line Check fuel hoses for cracks or damage Replace if necessary 2 Spa...

Страница 67: ...ace brake pads if neces sary 7 Brake hoses Check for cracks or damage Replace Every 4 years 8 Brake fluid Change Every 2 years 9 Wheels Check runout and for damage Replace if necessary 10 Tires Check...

Страница 68: ...Check oil level and vehicle for oil leakage Every 3000 km 1800 mi 20 Engine oil filter el ement Replace 21 Final transmission oil Check vehicle for oil leakage Change 22 Cooling system Check coolant l...

Страница 69: ...areas Hydraulic brake service After disassembling the brake master cylinders and calipers always change the fluid Regularly check the brake fluid levels and fill the reser voirs as required Every two...

Страница 70: ...pter Refer to this section each time the panel needs to be removed and installed EAU78530 Panel A To remove the panel Remove the screws and then pull the panel outward and slide it forward as shown To...

Страница 71: ...t attempt to diagnose such problems yourself Instead have a Yamaha deal er check the vehicle If the spark plug shows signs of elec trode erosion and excessive carbon or other deposits it should be rep...

Страница 72: ...vel TIP The engine oil should be between the minimum and maximum level marks 4 If the engine oil is below the mini mum level mark add sufficient oil of the recommended type to raise it to the correct...

Страница 73: ...s properly seated 11 Refill with the specified amount of the recommended engine oil and then install and tighten the oil filler cap TIP Be sure to wipe off spilled oil on any parts after the engine an...

Страница 74: ...any leakage is found have a Yamaha dealer check and repair the scooter In addition the final transmis sion oil must be changed as follows at the intervals specified in the periodic maintenance and lub...

Страница 75: ...changed at the intervals specified in the periodic maintenance and lubrication chart EAU78580 To check the coolant level 1 Place the vehicle on the center stand TIP The coolant level must be checked...

Страница 76: ...the cooling system will not be protected against frost and corrosion If water has been added to the coolant have a Yamaha dealer check the anti freeze content of the coolant as soon as possible other...

Страница 77: ...filter element out 4 Insert a new air filter element into the air filter case 5 Install the air filter case cover by installing the screws To clean the air filter check hoses 1 Check the hoses at the...

Страница 78: ...its case The engine should never be operated without the filter elements installed other wise the piston s and or cylin der s may become excessively worn ECA10532 EAU21386 Checking the throttle grip...

Страница 79: ...ssential to maintain the tires in good condition at all times and replace them at the appropriate time with the speci fied tires Tire air pressure The tire air pressure should be checked and if necess...

Страница 80: ...who has the necessary professional knowl edge and experience to do so Ride at moderate speeds after changing a tire since the tire surface must first be broken in for it to develop its optimal charac...

Страница 81: ...ified wheels The wheel rims should be checked for cracks bends warp age or other damage before each ride If any damage is found have a Yamaha dealer replace the wheel Do not attempt even the smallest...

Страница 82: ...A soft or spongy feeling in the brake lever can indicate the presence of air in the hydraulic system If there is air in the hydraulic system have a Yamaha dealer bleed the system be fore operating the...

Страница 83: ...ar indicator almost touches the brake disc have a Yamaha dealer re place the brake pads as a set EAU40262 Checking the brake fluid level Before riding check that the brake fluid is above the minimum l...

Страница 84: ...damage painted surfaces or plastic parts Always clean up spilled fluid immediately As the brake pads wear it is normal for the brake fluid level to gradually go down A low brake fluid level may indi...

Страница 85: ...should be checked before each ride and the ca bles and cable ends should be lubri cated if necessary If a cable is damaged or does not move smoothly have a Yamaha dealer check or re place it WARNING D...

Страница 86: ...d Even though the cover is installed correctly it does not completely protect the cable from wa ter entry Therefore use care not to pour water directly onto the cover or cable when washing the vehicle...

Страница 87: ...front fork must be checked as follows at the intervals specified in the periodic maintenance and lubrication chart To check the condition Check the inner tubes for scratches damage and excessive oil l...

Страница 88: ...icle so there is no danger of it falling over EWA10752 2 Hold the lower ends of the front fork legs and try to move them for ward and backward If any free play can be felt have a Yamaha dealer check o...

Страница 89: ...o vide sufficient ventilation when charging it in an enclosed space KEEP THIS AND ALL BATTER IES OUT OF THE REACH OF CHILDREN To charge the battery Have a Yamaha dealer charge the bat tery as soon as...

Страница 90: ...rly con nected to the battery terminals NOTICE ECA16531 Always keep the battery charged Storing a discharged battery can cause permanent battery damage EAU78242 Replacing the fuses The main fuse and t...

Страница 91: ...again have a Yamaha dealer check the electrical system 1 Signaling system fuse 2 2 Signaling system fuse 3 ABS control unit fuse 4 Main fuse 2 5 Radiator fan motor fuse 6 Backup fuse 7 Spare fuse 8 A...

Страница 92: ...on have a Yamaha dealer check its electrical circuit NOTICE ECA16581 Do not affix any type of tinted film or stickers to the headlight lens EAU54502 Auxiliary lights This model is equipped with LED t...

Страница 93: ...n LED type brake tail light If the brake tail light does not come on have a Yamaha dealer check it EAU39881 Front turn signal light If a front turn signal light does not come on have a Yamaha dealer c...

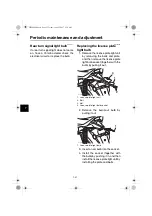
Страница 94: ...nd plate and then remove the license plate light bulb socket together with the bulb by pulling it out 2 Remove the burnt out bulb by pulling it out 3 Insert a new bulb into the socket 4 Install the so...

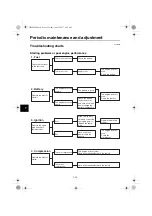
Страница 95: ...no open flames or sparks in the ar ea including pilot lights from water heaters or furnaces Gasoline or gasoline vapors can ignite or ex plode causing severe injury or prop erty damage EAU76551 Smart...

Страница 96: ...battery lead connections and have a Yamaha dealer charge the battery if necessary 2 Battery The battery is good The engine does not start Check the ignition 3 Ignition Wet Dry There is compression Th...

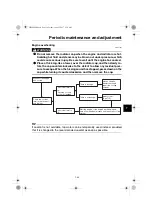
Страница 97: ...ped press down on the cap while turning it counterclockwise and then remove the cap TIP If coolant is not available tap water can be temporarily used instead provided that it is changed to the recomme...

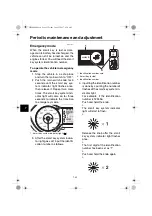
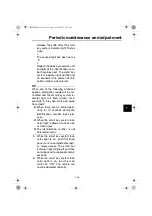
Страница 98: ...seconds to indicate the transition to emergency mode 3 After the smart key system indica tor light goes off input the identifi cation number as follows 4 Inputting the identification number is done by...

Страница 99: ...will flash quickly for 3 seconds In this case start over again from step 2 When there are no knob opera tions for 10 seconds during the identification number input pro cess When the smart key system i...

Страница 100: ...appearance of a scooter Fre quent and proper care does not only comply with the terms of the warranty but it will also keep your scooter look ing good extend its life and optimize its performance Befo...

Страница 101: ...ield Do not use strong cleaners or hard sponges as they will cause dulling or scratching Some cleaning compounds for plastic may leave scratches on the wind shield Test the product on a small hidden p...

Страница 102: ...oil as a universal clean er to remove any remaining dirt 5 Touch up minor paint damage caused by stones etc 6 Wax all painted surfaces 7 Let the scooter dry completely be fore storing or covering it...

Страница 103: ...lug and then place the spark plug on the cylinder head so that the electrodes are grounded This will limit spark ing during the next step d Turn the engine over several times with the starter This wil...

Страница 104: ...Scooter care and storage 8 5 8 TIP Make any necessary repairs before storing the scooter UBL2E0E0 book Page 5 Friday June 23 2017 9 30 AM...

Страница 105: ...p qt With oil filter removal 1 50 L 1 59 US qt 1 32 Imp qt Final transmission oil Type YAMALUBE 10W 40 or SAE 10W 30 type SE motor oil Quantity 0 21 L 0 22 US qt 0 18 Imp qt Coolant quantity Coolant r...

Страница 106: ...el type Cast wheel Rim size 14 x MT3 75 Front brake Type Hydraulic single disc brake Specified brake fluid DOT 4 Rear brake Type Hydraulic single disc brake Specified brake fluid DOT 4 Front suspensio...

Страница 107: ...system indicator warning light LED Fuse s Main fuse 20 0 A Main fuse 2 7 5 A Terminal fuse 1 2 0 A Signaling system fuse 10 0 A Signaling system fuse 2 7 5 A Radiator fan motor fuse 7 5 A Turn signal...

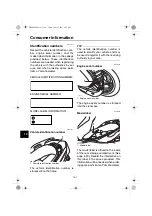
Страница 108: ...identification number is stamped into the frame TIP The vehicle identification number is used to identify your vehicle and may be used to register it with the licensing authority in your area EAU26442...

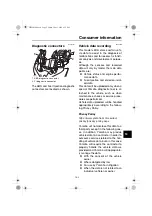
Страница 109: ...proce dures are performed Vehicle data uploaded will be handled appropriately according to the follow ing Privacy Policy Privacy Policy Yamaha will not disclose this data to a third party except in th...

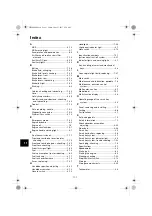
Страница 110: ...rflow hose 4 19 Fuses replacing 7 27 H Handlebar position adjusting 4 25 Handlebar switches 4 12 Hazard switch 4 12 Headlights 7 29 High beam indicator light 4 1 Horn switch 4 12 I Identification numb...

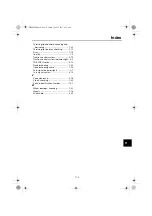
Страница 111: ...Traction control system indicator light 4 2 TRIP INFO switch 4 12 Troubleshooting 7 32 Troubleshooting charts 7 33 Turn signal indicator lights 4 1 Turn signal switch 4 12 V Valve clearance 7 16 V bel...

Страница 112: ...A5 tate_Blank fm Page 1 Thursday November 24 2011 4 30 PM...

Страница 113: ...A5 tate_Blank fm Page 1 Thursday November 24 2011 4 30 PM...

Страница 114: ...PANTONE285C MBK Industrie Z I de Rouvroy 02100 Saint Quentin SAS au capital de 14 000 000 PRINTED IN FRANCE 2018 05 E Original instructions...

Отзывы: