background image

CAUTION: READ THIS BEFORE OPERATING YOUR UNIT.

1

To assure the finest performance, please read this manual 
carefully. Keep it in a safe place for future reference.

2

Install this sound system in a well ventilated, cool, dry, clean 
place – away from direct sunlight, heat sources, vibration, 
dust, moisture, and/or cold. Allow ventilation space of at least 
10 cm on the top, and 10 cm on the back of this unit. 

3

Locate this unit away from other electrical appliances, motors, 
or transformers to avoid humming sounds.

4

Do not expose this unit to sudden temperature changes from 
cold to hot, and do not locate this unit in an environment with 
high humidity (i.e. a room with a humidifier) to prevent 
condensation inside this unit, which may cause an electrical 
shock, fire, damage to this unit, and/or personal injury.

5

Avoid installing this unit where foreign objects may fall onto 
this unit and/or this unit may be exposed to liquid dripping or 
splashing. On the top of this unit, do not place:

Other components, as they may cause damage and/or 
discoloration on the surface of this unit.

Burning objects (i.e. candles), as they may cause fire, 
damage to this unit, and/or personal injury.

Containers with liquid in them, as they may fall and liquid 
may cause electrical shock to the user and/or damage to 
this unit. 

6

Do not cover this unit with a newspaper, tablecloth, curtain, 
etc. in order not to obstruct heat radiation. If the temperature 
inside this unit rises, it may cause fire, damage to this unit, 
and/or personal injury.

7

Do not plug in this unit to a wall outlet until all connections 
are complete.

8

Do not operate this unit upside-down. It may overheat, 
possibly causing damage.

9

Do not use force on switches, knobs and/or cords.

10

When disconnecting the power cable from the wall outlet, 
grasp the plug; do not pull the cable.

11

Do not clean this unit with chemical solvents; this might 
damage the finish. Use a clean, dry cloth.

12

Only voltage specified on this unit must be used. Using this 
unit with a higher voltage than specified is dangerous and may 
cause fire, damage to this unit, and/or personal injury. 
YAMAHA will not be held responsible for any damage 
resulting from use of this unit with a voltage other than 
specified.

13

To prevent damage by lightning, keep the power cord and 
outdoor antennas disconnected from a wall outlet or the unit 
during a lightning storm.

14

Do not attempt to modify or fix this unit. Contact qualified 
YAMAHA service personnel when any service is needed. The 
cabinet should never be opened for any reasons.

15

When not planning to use this unit for long periods of time 
(i.e. vacation), disconnect the AC power plug from the wall 
outlet.

16

Install this unit near the AC outlet and where the AC power 
plug can be reached easily.

17

Be sure to read the “TROUBLESHOOTING” section on 
common operating errors before concluding that this unit is 
faulty.

18

Before moving this unit, press POWER to set this unit in the 
standby mode, and disconnect the AC power plug from the 
wall outlet.

19

VOLTAGE SELECTOR (Asia and General models only)
The VOLTAGE SELECTOR on the rear panel of this unit 
must be set for your local main voltage BEFORE plugging 
into the AC main supply. Voltages are:
Asia and General models .....AC 110–120/220–240 V, 50/60 Hz

For U.K. customers

If the socket outlets in the home are not suitable for the 
plug supplied with this appliance, it should be cut off and 
an appropriate 3 pin plug fitted. For details, refer to the 
instructions described below.

The plug severed from the mains lead must be destroyed, as a 
plug with bared flexible cord is hazardous if engaged in a live 
socket outlet.

Special Instructions for U.K. Model

CAUTION: READ THIS BEFORE OPERATING YOUR UNIT.

WARNING

TO REDUCE THE RISK OF FIRE OR ELECTRIC 
SHOCK, DO NOT EXPOSE THIS UNIT TO RAIN 
OR MOISTURE.

As long as this unit is connected to the AC wall outlet, 
it is not disconnected from the AC power source even 
if you turn off this unit by POWER.

Note

IMPORTANT

THE WIRES IN MAINS LEAD ARE COLOURED IN 
ACCORDANCE WITH THE FOLLOWING CODE:

Blue: NEUTRAL
Brown: LIVE

As the colours of the wires in the mains lead of this 
apparatus may not correspond with the coloured 
markings identifying the terminals in your plug, 
proceed as follows:
The wire which is coloured BLUE must be connected 
to the terminal which is marked with the letter N or 
coloured BLACK. The wire which is coloured 
BROWN must be connected to the terminal which is 
marked with the letter L or coloured RED.
Making sure that neither core is connected to the earth 
terminal of the three pin plug.

Содержание TX-497

Страница 1: ...TX 497 TX 497 Stereo Tuner Tuner Stéréo OWNER S MANUAL MODE D EMPLOI BEDIENUNGSANLEITUNG BRUKSANVISNING GEBRUIKSAANWIJZING ИНСТРУКЦИЯ ПО ЭКСПЛУАТАЦИИ GB ...

Страница 2: ...nit with a voltage other than specified 13 To prevent damage by lightning keep the power cord and outdoor antennas disconnected from a wall outlet or the unit during a lightning storm 14 Do not attempt to modify or fix this unit Contact qualified YAMAHA service personnel when any service is needed The cabinet should never be opened for any reasons 15 When not planning to use this unit for long per...

Страница 3: ... 9 Controlling this unit with a remote control 9 Connecting the power supply cord 10 Turning on the power 10 TUNING 11 Automatic and manual tuning 11 Presetting stations 12 Selecting preset stations 14 Exchanging preset stations 14 Receiving Radio Data System stations 15 Changing the Radio Data System mode 16 PTY SEEK function 17 EON function 18 TROUBLESHOOTING 19 SPECIFICATIONS 21 CONTENTS INTROD...

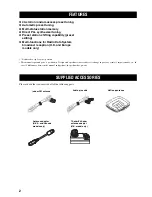
Страница 4: ...ndicates a tip for your operation This manual is printed prior to production Design and specifications are subject to change in part as a result of improvements etc In case of differences between the manual and product the product has priority Please check that you received all of the following parts FEATURES SUPPLIED ACCESSORIES AM loop antenna Indoor FM antenna Audio pin cable Antenna adapter U ...

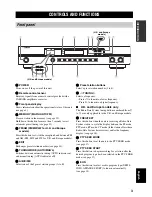
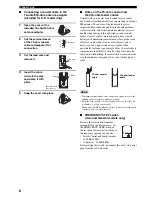
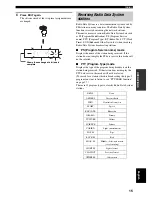
Страница 5: ...ss l to tune into a lower frequency Press h to tune into a higher frequency U K and Europe models only The Radio Data System tuning buttons numbered from A to D are only applicable to the U K and Europe models A FREQ TEXT Press this button when the unit is receiving a Radio Data System station to cycle the display between the PS mode PTY mode RT mode CT mode if the station offers those Radio Data ...

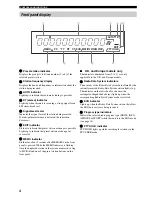
Страница 6: ...cator is flashing store the displayed station in the system memory by using A B C D E and one of the preset station buttons on the front panel U K and Europe models only The indicators numbered from 8 to A are only applicable to the U K and Europe models 8 Radio Data System indicators The name s of the Radio Data System data offered by the currently received Radio Data System station light s up Th...

Страница 7: ...ctions are complete see page 10 Asia and General models only The FREQUENCY STEP switch and VOLTAGE SELECTOR are only applicable to the Asia and General models FREQUENCY STEP switch See page 8 for details VOLTAGE SELECTOR See page 10 for details Rear panel FM ANT FREQUENCY STEP FREQUENCY STEP FM 100kHz 50kHz FM 100kHz 50kHz AM 10kHz 9kHz AM 10kHz 9kHz LINE OUT VOLTAGE VOLTAGE SELECTER SELECTER 220V...

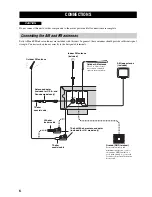
Страница 8: ...as FM ANT 75Ω UNBAL AM ANT GND AM loop antenna included Indoor FM antenna included Outdoor AM antenna Use a 5 to 10 m of vinyl covered wire extended outdoors from a window Outdoor FM antenna Antenna adapter included for U S A and Canada models only 300 ohm feeder cable 75 ohm coaxial cable 75 ohm 300 ohm antenna adapter included for U K model only Ground GND terminal For maximum safety and minimum...

Страница 9: ...necting the indoor FM antenna Insert the rectangular end of the indoor FM antenna into the FM ANT terminal A properly installed outdoor antenna provides clearer reception than an indoor one If you experience poor reception quality an outdoor antenna may improve the quality Consult the nearest authorized YAMAHA dealer or service center about outdoor antennas If you connect an outdoor FM antenna to ...

Страница 10: ... good a signal conductor as feeder cable particularly for foam type coaxial cables Coaxial cable is somewhat more difficult to install at the point where the cable enters the building If coaxial cable is selected make sure the antenna is designed to be used with that type of cable To minimize interference from automobile ignition locate the antenna as far from heavy traffic as possible Keep the fe...

Страница 11: ...TION Note FM ANT FREQUENCY STEP FREQUENCY STEP FM 100kHz 50kHz FM 100kHz 50kHz AM 10kHz 9kHz AM 10kHz 9kHz LINE OUT VOLTAGE VOLTAGE SELECTER SELECTER 220V 240V 220V 240V 110V 120V 110V 120V 75Ω UNBAL AM ANT GND R L 2 STANDBY ON STANDBY INPUT PHONES SPEAKERS BASS 5 1 4 2 3 5 1 4 2 3 A POWER ON OFF ON OFF AUX MD TAPE CD DVD TUNER PHONO PURE DIRECT CD DVD DIRECT AMP B TREBLE 5 1 4 2 3 5 1 4 2 3 BALAN...

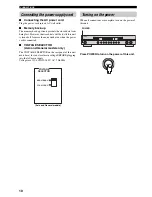
Страница 12: ...e VOLTAGE SELECTOR on the rear panel of this unit must be set for your local main voltage BEFORE plugging into the AC main supply Voltages are 110 120 220 240 V AC 50 60 Hz When all connections are complete turn on the power of this unit Press POWER to turn on the power of this unit Connecting the power supply cord VOLTAGE SELECTOR 220V 240V 110V 120V Asia and General models Turning on the power F...

Страница 13: ...Press FM AM FM MW LW for U K and Europe models to select the reception band FM or AM FM MW or LW for U K and Europe models appears in the front panel display 2 Press TUNING MODE AUTO MAN L so that the AUTO indicator disappears from the front panel display 3 Press TUNING l h to tune into the desired station manually Hold down the button to continue searching If you tune into an FM station it is aut...

Страница 14: ...lete the front panel display shows the frequency of the last preset station Any stored station data existing under a preset number is cleared when you store a new station under that preset number If the number of received stations does not reach 40 E8 automatic preset tuning has automatically stopped after searching all stations Only FM stations with sufficient signal strength are stored automatic...

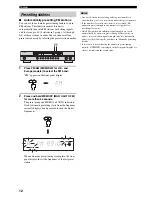
Страница 15: ...EMO indicator flashes for about 5 seconds 4 Press the preset station number button 1 to 8 you want to store while the MEMO indicator is flashing 5 Repeat steps 1 to 4 to store other stations Any stored station data existing under a preset number is cleared when you store a new station under that preset number The reception mode stereo or monaural is stored along with the station frequency FREQ TEX...

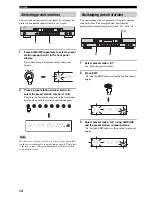
Страница 16: ...g with the station You can exchange the assignment of two preset stations with each other The example below describes the procedure for exchanging preset station E1 with A5 1 Select preset station E1 See Selecting preset stations 2 Press EDIT E1 and the EDIT indicator flash in the front panel display 3 Select preset station A5 using A B C D E and the preset station number buttons A5 and the EDIT i...

Страница 17: ...loy the PS data service this mode will not be selected PTY Program Type mode Displays the type of the program being broadcast on the station being received If the station does not employ the PTY data service this mode will not be selected To search for a station which is broadcasting the type of program you want to listen to see PTY SEEK function on page 17 There are 15 program types to classify R...

Страница 18: ... a Radio Data System indicator lights up in the front panel display You cannot change the mode if you press the button prior to this This is because this unit has not finished receiving all of the Radio Data System data from the station Radio Data System data not offered by the station cannot be selected This unit cannot utilize the Radio Data System data source if the signal received is not stron...

Страница 19: ... selected program type flashes and the PTY HOLD indicator lights up in the front panel display while searching for stations To cancel searching press PTY SEEK START again To cancel this function press PTY SEEK MODE again The unit stops searching when it finds a station broadcasting the selected type of program If the found station is not the one you desire press PTY SEEK START again This unit resu...

Страница 20: ...the EON indicator is not lit up tune into another Radio Data System station so that the EON indicator lights up 2 Press EON repeatedly to select the desired program type NEWS INFO AFFAIRS or SPORT The selected program type name appears in the front panel display To cancel this function press EON repeatedly until no program type name is shown in the front panel display If a preset Radio Data System...

Страница 21: ...re 11 There is distortion and clear reception cannot be obtained even with a good FM antenna There is multipath interference Adjust the antenna position to eliminate multipath interference No stereo effect even with a stereo broadcast The TUNING MODE button is set to the manual tuning mode Press TUNING MODE repeatedly until AUTO lights up in the front panel display 11 The desired station cannot be...

Страница 22: ...ct the power cord plug it back in after 30 seconds then use it normally A humming sound can be heard Incorrect cable connections Firmly connect the audio connection cord plugs If the problem persists the cables may be defective This unit does not operate properly The internal microcomputer has been frozen by an external electric shock such as lightning or excessive static electricity or by a power...

Страница 23: ... Ratio IHF U S A Canada General and China models Mono 82 dB Stereo 76 dB U K Europe Australia and Asia models DIN weighted Mono 40 kHz dev 75 dB Stereo 40 kHz dev 70 dB Harmonic Distortion 1 kHz U K and Europe models Mono Stereo 40 kHz dev 0 1 0 2 Other models Mono Stereo 0 1 0 2 Stereo Separation 1 kHz U K and Europe models 40 kHz dev 50 dB Other models 50 dB Frequency Response 30 Hz to 13 kHz 0 ...

Отзывы: