background image

14

Play from an input source

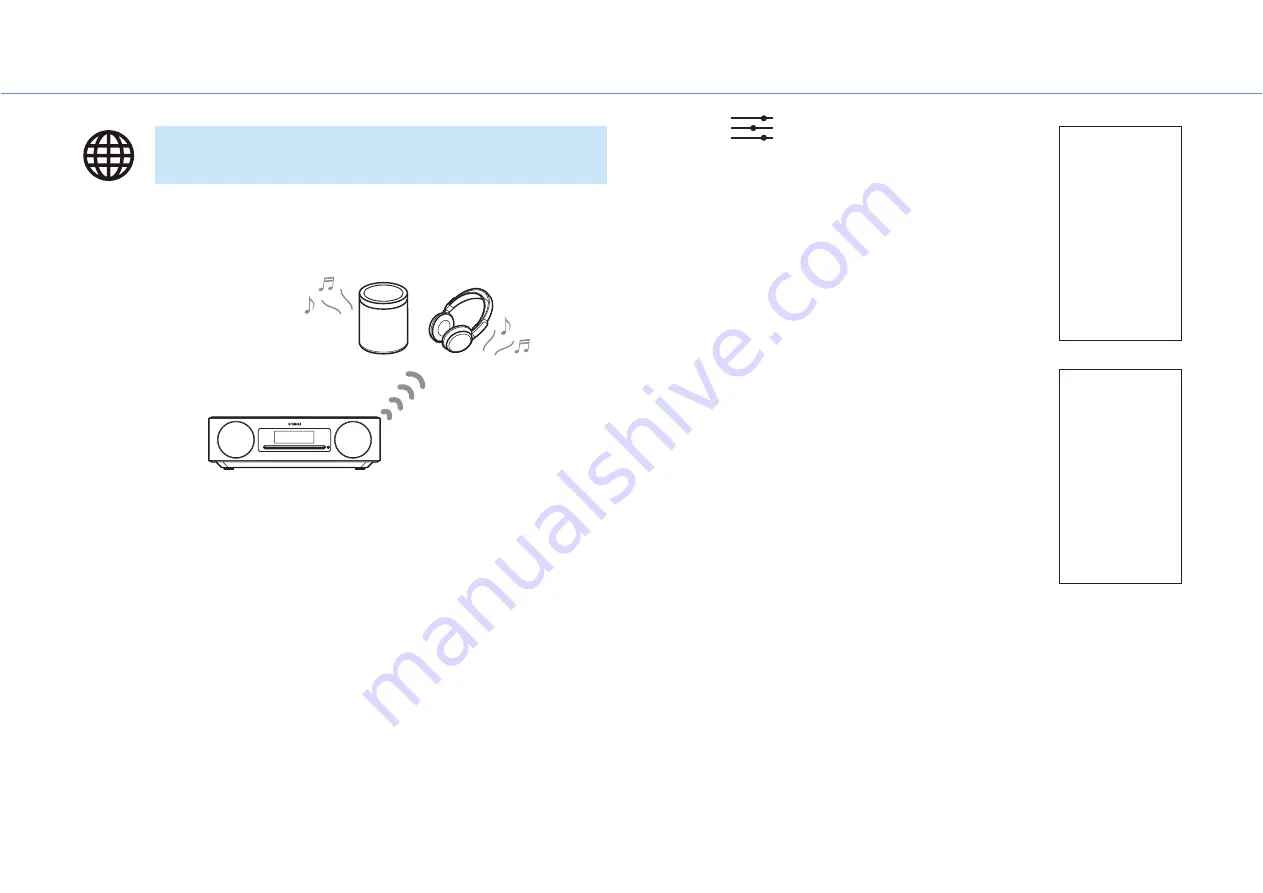
Bluetooth speakers or headphones can be used to listen to audio played via the unit. 
This function can only be controlled using the MusicCast CONTROLLER app.

Note

This function cannot be used when Bluetooth is selected as the input source. Select an input 
source other than Bluetooth.

Be sure to use Bluetooth speakers or headphone that are equipped with a volume control. 
Volume must be adjusted using the Bluetooth speakers or headphones. Volume cannot be 
adjusted from this unit.

Use the volume control on the Bluetooth speakers or headphones to turn down the volume, 
and then connect the speakers or headphones to the unit. Failure to turn down the volume 
before connecting may result in extremely loud playback to begin when the Bluetooth 
connection is established.

1

Set Bluetooth speakers or headphones to pairing mode.

2

Use the MusicCast CONTROLLER app to select an input source.

3

Tap 

 in the playback screen.

4

Tap 

Bluetooth Transmission

 in the 

Sound Settings

 screen.

5

Enable the 

Bluetooth transmission

 function in the 

Bluetooth 

Transmission

 screen.

6

Select the Bluetooth speakers or headphones to be connected.

Note

If a Bluetooth connection is not established, repeat the connection procedure from step 

1

.

If Bluetooth speakers or headphones have been previously connected to the unit, the unit will 
connect to the last connected device when transmitting mode is applied. 

Using Bluetooth speakers/headphones to listen 
to audio (transmitting)

Bluetooth speakers or headphones

Содержание TSX-N237

Страница 1: ...Desktop Audio System EN Owner s Manual ...

Страница 2: ... Shuffle repeat playback 27 Playback information 28 Adjusting sound quality 29 Registering favorites with SCENE 30 Alarm IntelliAlarm 31 Using the sleep timer 33 Child lock function 34 Charging a mobile device Qi 35 Adjusting display brightness dimmer 36 Option settings 37 Pair the unit with MusicCast enabled devices 40 Firmware updates 41 Connecting to a network manually 43 Wired network connecti...

Страница 3: ...ollectively referred to as mobile devices Screenshots in this document were captured on a device running the English version of iOS Actual screen displays may differ depending upon the version of the app or iOS used Symbols and conventions This content indicates risk of serious injury or death Notice Indicates points that you must observe in order to prevent product failure damage or malfunction a...

Страница 4: ... function that wakes you gently The free dedicated MusicCast CONTROLLER app for mobile devices can be used to easily control playback or configure the unit s settings Download the MusicCast CONTROLLER app to your mobile device from the App Store or Google Play Bluetooth CD USB Mobile device MusicCast CONTROLLER IntelliAlarm wakes you up gently Alarm IntelliAlarm p 31 Support for a broad range of i...

Страница 5: ...Disc slot p 12 0 Eject a disc p 12 A Remote sensor p 9 B AUX jack Mini jack input p 21 C HEADPHONES jack No sound is heard from the unit when the headphones are connected D Service jack Use when the unit requires maintenance E USB jack p 20 F NETWORK jack p 43 The unit can be connected to a network using either a wired or a wireless connection For a wired network connection connect a standard shie...

Страница 6: ...or The indicator is displayed while muted 6 Shuffle and repeat indicators p 27 7 Current time 8 Alarm indicators p 31 9 Child lock indicator p 34 0 Sleep indicator p 33 A Multi display Displays a variety of information including that for a song as it plays radio frequency etc Some information may be cut off as there is a limit on the number of characters that can be displayed Note Display brightne...

Страница 7: ...p playback p 12 20 8 Cursor control buttons p 10 9 OPTION p 37 0 ALARM p 31 A SNOOZE SLEEP p 33 31 B z Turn the unit on and off standby p 9 C Audio control buttons p 12 D Mute unmute E HOME p 23 24 F DISPLAY p 28 G SOUND MODE p 29 1 B E C D F G 2 3 4 5 6 7 8 9 0 A Battery insulating strip Remove the battery insulating strip before attempting to use the remote control Battery insulating strip ...

Страница 8: ...here while slowly sliding the battery holder out Replace the old battery with a new one Note Replace the old battery with a new one when the remote control s range becomes very short Replacing the remote control battery Battery holder Release tab CR2025 Lithium battery ...

Страница 9: ...o power standby mode in any of the following situations CD BLUETOOTH or USB is selected as the input source but no audio is played and no operations are performed for more than 20 minutes An input source other than any of those noted above is selected but no operations are performed for more than 8 hours See Auto Power OFF in Option settings to enable the auto power standby function p 37 Within 10...

Страница 10: ...you will utilize this feature skip the procedure described below 1 Press OPTION The option menu is displayed 2 Use e r to select and press ENTER 3 Use q w to select Clock setting and press ENTER 4 Use q w e r to adjust the date and time 5 Press ENTER to finalize and apply clock settings CLOCK Clock Setting Year 2020 June 26th 08 52AM SAVE qwer ENTER OPTION ...

Страница 11: ...er connecting to a network using one of the methods described above Yamaha recommends downloading and installing the MusicCast CONTROLLER app to your mobile device for simple operation of the unit For more information on Internet connections refer to the documentation provided with your network devices Security software installed on your computer or network device settings firewall etc may prevent...

Страница 12: ...t be possible to eject the CD See Devices media and file formats supported by the unit for information on CDs supported by the unit p 55 When CD playback is stopped playback will resume from the beginning of the song last played Pressing s while playback is stopped will clear playback memory resume playback feature If the unit is turned off when CD has been selected as the input source and a CD ha...

Страница 13: ...ill connect to the last connected device Terminate this connection to connect a new device Press for at least three seconds to terminate the Bluetooth connection on the unit Audio from a Bluetooth device can be played on the unit over a wireless connection 1 Press The unit s input source is switched to Bluetooth 2 Enable the Bluetooth function of the Bluetooth device 3 Select this unit from the Bl...

Страница 14: ... Failure to turn down the volume before connecting may result in extremely loud playback to begin when the Bluetooth connection is established 1 Set Bluetooth speakers or headphones to pairing mode 2 Use the MusicCast CONTROLLER app to select an input source 3 Tap in the playback screen 4 Tap Bluetooth Transmission in the Sound Settings screen 5 Enable the Bluetooth transmission function in the Bl...

Страница 15: ...ess e or r to select a DAB station Note Initial scan can also be performed from the option settings 1 Press OPTION when DAB is selected as the input source 2 Use e r to select and press ENTER 3 Use q w to select Initial scan and press ENTER The initial scan display is shown 4 Use e r to select OK and press ENTER to begin the initial scan Complete is displayed when the initial scan is complete If a...

Страница 16: ...s switched in the following order each time DISPLAY is pressed 1 Press OPTION when DAB is selected as the input source 2 Press and hold The preset deletion display is shown 3 Use q w to select Delete ALL or the preset number to be deleted and press ENTER 4 Use e r to select OK and press ENTER 5 Press OPTION to exit the settings display Presetting DAB stations Selecting preset DAB stations Station ...

Страница 17: ... Aid and press ENTER The Tuning Aid display is shown 4 Press ENTER 5 Press q w to change the channel label The measured DAB signal reception level is displayed The level is from 0 none to 100 best 6 Press OPTION to exit the settings display Note When the DAB signal is weak in Tuning Aid try adjusting the position of the antenna to obtain good reception Confirming the reception DAB DAB Tuning Aid 1...

Страница 18: ...d in monaural Auto preset The unit tunes in stations with good reception and presets them automatically 1 Press RADIO 2 Press OPTION 3 Use e r to select and press ENTER 4 Use q w to select Auto preset and press ENTER 5 Use e r to select OK and press ENTER Auto preset begins Complete is displayed when auto preset is complete Note Auto preset replaces all stations currently stored with new stations ...

Страница 19: ...cel manual preset 1 Press RADIO 2 Press e r to select a preset station 1 Press RADIO 2 Press and hold s The preset deletion display is shown 3 Use q w to select Delete ALL the preset number to be deleted and press ENTER 4 Use e r to select OK and press ENTER 5 Press OPTION to exit the settings display Preset Registration P01 87 50MHz Selecting a preset station Deleting a preset station qwer ENTER ...

Страница 20: ...playback before disconnecting the USB flash drive A USB flash drive is automatically charged as long as it is connected to the unit However some devices may not charge when connected See Power Off Charge in Option settings to disable the charge function p 37 Connect a USB flash drive directly to the USB jack of the unit Do not use extension cables q w e r Control menu items f Skip to the beginning...

Страница 21: ...g the power cord from the electrical outlet and connect the external device to the unit Use cables sold separately for connections 2 Plug the power cord into an electrical outlet and turn on the unit 3 Press AUX 4 Play the external device connected to the unit Note Lower the volume sufficiently on the unit and external device before connection Otherwise the volume may be unexpectedly loud when mus...

Страница 22: ...CONTROLLER app has been installed Note The types formats of audio files that can be played vary by mobile device See documentation provided with your mobile device for information on the supported file formats 1 Select this unit specified room 2 Select the mobile device to which the MusicCast CONTROLLER app has been installed 3 Select a music file Music begins playing ...

Страница 23: ... or may be available only during certain hours This function uses airable Radio s extensive catalog airable is a service of airable GmbH This service may change be discontinued or be terminated without notice The remote control can also be used to control Internet radio listening NET HOME ENTER DISPLAY s qwer 1 Press NET repeatedly to select NET RADIO 2 Brows and select a radio station Remote cont...

Страница 24: ...screen However you can only listen to those operating locally you cannot listen to services if you are outside of their service area To listen to a streaming service sign in to your account for that service from the MusicCast CONTROLLER app and start using the service Streaming services can also be selected by pressing NET Previously selected content will play Note Some streaming services require ...

Страница 25: ...r information on music files that can be played using the unit see Devices media and file formats supported by the unit p 55 Play a music file using the MusicCast CONTROLLER app The remote control can be used to control the playback of music files on the media server NET HOME ENTER DISPLAY s qwer 1 Press NET repeatedly to select SERVER 2 Brows and select a music file Remote control functions q w e...

Страница 26: ...5 For information on AirPlay visit the Apple website 1 Start iTunes or display the iPhone s music playback screen When iTunes or the iPhone recognizes the unit the AirPlay icon will be displayed on the screen Note If the icon is not displayed check to see that the unit and the computer or iPhone are correctly connected to the wireless LAN router 2 Click or tap the AirPlay icon and select the unit ...

Страница 27: ...EAT during playback The indicators will change each time SHUFFLE or REPEAT is pressed and songs will play as follows Shuffle playback Shuffle indicators Audio data CD USB media server Shuffle all songs Goes off The shuffle function is not applied Repeat playback Repeat indicators Audio data CD USB media server Repeat all songs Repeat the song being played Goes off The repeat function is not applie...

Страница 28: ... DISPLAY to switch the playing time or remaining time display between a bar display and a numerical display Audio CD Data CD USB SERVER music files stored on a computer or NAS or NET RADIO Internet radio Note Information such as the album title may not be properly displayed for songs played from some types of media Display Information Song title Artist name Album title Display Information Song tit...

Страница 29: ...ow middle and high tones Use q w to change the level Use e r to select another tone Press ENTER to save settings Default 0 Adjustable level 10 to 10 5 Press OPTION to exit the settings display Each time SOUND MODE is pressed sound mode is switched between Bass Boost and Standard Bass Boost default Best for music Standard Best for human voices talk radio etc Note Sound mode is not available when he...

Страница 30: ...unit will be turned on and playback will begin Individual songs stored on a Bluetooth or other external device cannot be assigned to SCENE buttons The Bluetooth or other external device will be selected as the input source by pressing the SCENE button to which it has been assigned Note When a favorite is registered with a SCENE button to which another favorite was previously assigned the new favor...

Страница 31: ...cified time and beeps begin sounding at the same time Music begins playing at low volume three minutes prior to the specified time increasing to the specified volume at the specified time Beeps begin sounding over the music at the specified time Beeps only Beeps begin sounding at the specified time Alarm sources CD USB flash drive radio station and network content CD Audio CD Specified song Play t...

Страница 32: ...type p 31 3 Alarm source p 31 4 Playback type p 31 5 Repeat Day of the week can be specified using the Multimedia Music Controller app 6 Volume 4 Press OPTION to exit the settings display The alarm indicator is displayed 1 Press ALARM The alarm display in the option settings is shown 2 Use q w to select the alarm number and press ENTER 3 Use q w to select ON or OFF 4 Press OPTION to exit the setti...

Страница 33: ...the alarm completely Press and hold SNOOZE SLEEP or press ALARM once while the alarm is sounding to stop the alarm completely Note If the alarm is not stopped manually it will stop automatically after 60 minutes have passed Using the sleep timer The unit automatically enters standby mode when the specified time has elapsed The time can be selected from 30 60 90 or 120 minutes or the sleep timer ca...

Страница 34: ... operate other functions turn on the unit set the unit to standby mode stop the alarm insert a CD Take all necessary precautions to prevent children from inserting other objects into the disc slot 1 Press OPTION 2 Use e r to select and then press ENTER 3 Use q w to select Child lock and then press ENTER 4 Use q w to select ON and then press ENTER 5 Press OPTION to exit the settings display The chi...

Страница 35: ... between the unit and the mobile device during charging the magnetic stripe or radio frequency identification RFID chip used on some credit cards or passports may be damaged Charging may take longer at high ambient temperatures If vibrations generated by audio output cause the mobile device to move position the non skid pad supplied with the rough surface upward between the mobile device and the u...

Страница 36: ... display is shown when Automatic is selected 6 Press ENTER to save settings 7 Press OPTION to exit the settings display Automatic The unit automatically selects brightness for bright and dark levels in accordance with ambient lighting Brightness for both levels can be fine tuned Higher values are brighter Bright level options 6 to 10 default 8 Dark level options 1 to 5 default 3 Manual Select the ...

Страница 37: ...nu See Option menu list on the next page for available options 1 Press OPTION 2 Use e r to select a menu group and press ENTER 3 Use q w e r to select a setting and press ENTER Press OPTION to cancel setup before it is completed 4 Press OPTION to exit the settings display qwer ENTER OPTION ...

Страница 38: ... in standby mode the Qi USB charging function is not available default Enable NETWORK Standby When this function is disabled the following functions are not available default Enable Turn on the unit using the MusicCast CONTROLLER app Bluetooth connection Charge a USB flash drive PW Off Clock Display When this function is disabled the clock is not displayed while the unit is in standby mode Disc ma...

Страница 39: ...condary DNS server MAC Address Wired Display the MAC address MAC Address Wireless Display the MAC address Network Name Display the network name MusicCast Network Display information regarding the MusicCast network Network route setting Wired p 43 Wireless Wi Fi WPS Button p 44 Share Wi Fi iOS p 45 IP Address setting Obtain an IP addr auto When this function is disabled the following settings can b...

Страница 40: ...ur home with simple operation Visit the Yamaha website for details regarding MusicCast and MusicCast enabled devices Register the unit with the MusicCast CONTROLLER app and then register other MusicCast enabled devices with the app Note To register the unit with the app see Use MusicCast CONTROLLER to connect to a network p 11 1 Tap Settings TSX N237D will be displayed as the name for units purcha...

Страница 41: ...contact your nearest authorized Yamaha dealer or service center When new firmware is released a notice is displayed in the MusicCast CONTROLLER app or on the unit There firmware can be updated using the app or the unit itself When using the MusicCast CONTROLLER app to update the unit s firmware simply follow the app s on screen instructions When using the unit itself to update firmware see Updatin...

Страница 42: ...e r to select OK and then press ENTER The firmware update will begin 4 Press z when Success is displayed The firmware update has been successfully completed If the unit is not connected to the Internet or Internet speed is slow use a USB flash drive to update the firmware Visit the Yamaha website for information on downloading and updating the firmware SYSTEM When the unit is not connected to the ...

Страница 43: ...ORK jack on the rear panel 1 Press OPTION 2 Select in the option menu Select Network route setting Wired and follow the instructions in the display to complete setup Note When a router that does not support DHCP is used use Network Config in the option settings to configure network settings To configure your router s subnet mask manually apply the same subnet used by this unit to all devices NETWO...

Страница 44: ...up The indicator glows when a connection has been established Note WPS cannot be used when a network cable is connected to the unit A wireless connection may not be established if the unit and the wireless LAN router access point are too far apart If you experience difficulty establishing a wireless connection position the unit and the wireless router access point closer to each other NETWORK WPS ...

Страница 45: ...ter uses WEP encryption The following settings will be initialized Network settings Bluetooth settings If any operation is performed while the indicator flashes setup will fail If this occurs use the remote control to share iOS device network settings 1 Press OPTION 2 Select in the option menu Select Network route setting Wireless Wi Fi Share Wi Fi iOS and follow the instructions in the display to...

Страница 46: ...t to the minimum level or volume is muted Increase the volume The transmitting mode is applied to the Bluetooth function Apply the receiving mode to the Bluetooth function p 13 The external device is not firmly connected to the AUX jack Confirm that the external device is firmly connected to the unit s jack If there are no problems with connection check that cables may be damaged Noise is heard Th...

Страница 47: ... control may be outside its operation range Operate the remote control within its operation range p 9 The remote control sensor on this unit may be exposed to direct sunlight or strong lighting such as an inverter type fluorescent lamp Change the orientation of lighting or the unit or location of the unit The battery may be worn out Replace the battery with a new one p 8 There are obstacles betwee...

Страница 48: ...unction on the router The unit is starting up a period of approx 20 seconds after the power cord is plugged into an electrical outlet Do not attempt to operate the unit until start up is complete An IPv6 only router is being used Use an IPv4 compatible router Files on the media server computer or NAS are not displayed do not play The file format is not supported by the unit or the media server Be ...

Страница 49: ...ess LAN router is turned off Turn on the wireless LAN router The unit and the wireless LAN router are too far apart Place the unit and the wireless LAN router closer to each other There is an obstacle between the unit and the wireless LAN router Move the unit and the wireless LAN router to a location with a direct line of sight no obstacles between the two The unit s wireless LAN function is disab...

Страница 50: ...key of 0000 The Bluetooth device does not support the Advanced Audio Distribution Profile A2DP Use a Bluetooth device that supports A2DP No sound is played or sound is interrupted during playback The volume level on the Bluetooth device is set too low Increase the volume on the Bluetooth device The Bluetooth device is not configured to transmit audio signal to this unit On the Bluetooth device sel...

Страница 51: ... the unit p 55 If the unit was moved from a cold to warm place condensation may have formed on the disc reading lens Wait for an hour or two until the unit adjusts to the room temperature and try again The CD is not ejected when is pressed Use Disc manual eject in the option settings to eject the disc p 38 Problem Cause Solution The unit stops charging Objects are positioned near the Qi icon Remov...

Страница 52: ...l scan operations were not performed Perform the initial scan operations p 15 The initial scan operations are not successful and Not Found is displayed DAB signals are too weak Use Tuning Aid to check reception strength adjust the height or direction of the antenna or move the unit p 17 The antenna is not suitably positioned for receiving DAB stations There is no DAB coverage in your area Check wi...

Страница 53: ...the antenna input is poor Change the height or direction of the antenna or change the position of the unit Tune in to a station manually p 18 Cannot select a preset radio station The preset stations may have been erased Preset radio stations again p 18 There is distortion and clear reception cannot be obtained Multipath reflection or other radio interference may be occurring Change the height or d...

Страница 54: ... by the unit has been inserted Confirm that the disc is supported by the unit p 55 Unknown device A disc or USB flash drive that is not recognized by the unit has been inserted or connected Confirm that the disc or USB flash drive is supported by the unit p 55 No content A disc or USB flash drive does not contain files supported by the unit Use the disc or USB flash drive that contains files suppo...

Страница 55: ...ecording conditions Do not use any non standard shaped discs such as a heart shaped disc Do not use discs with many scratches or a crack on their surface or warped glued discs Do not touch the surface of the disc Hold a disc by its edge or center hole Use a soft tipped pen when writing on the label side of a disc Do not use a disc to which tape stickers or labels have been affixed Discs with any o...

Страница 56: ... of channels Support for gapless playback WAV 32 44 1 48 88 2 96 176 4 192 16 24 32 2 MP3 32 44 1 48 8 to 320 2 WMA 32 44 1 48 8 to 320 2 MPEG 4 AAC 32 44 1 48 8 to 320 2 FLAC 32 44 1 48 88 2 96 176 4 192 16 24 2 ALAC 32 44 1 48 88 2 96 16 24 2 AIFF 32 44 1 48 88 2 96 176 4 192 16 24 32 2 DSD 2 8 MHz 5 6 MHz 11 2 MHz 1 2 CD Format Sampling frequency kHz Quantization bits bit Bitrate kbps Number of...

Страница 57: ...Bluetooth output Class 1 Tuner Tuning range FM Canada model 87 5 MHz to 107 9 MHz Other models 87 5 MHz to 108 0 MHz DAB Australia model only Tuning range DAB 174 MHz to 240 MHz Band III Amplifier section Maximum output power Speakers 25 W 25 W 6 Ω 1 kHz 10 THD Headphones 20 mW 20 mW 16 to 32 Ω 1 kHz 10 THD Wireless Charge Standard Qi certified General Power supply Voltage frequency VSPQF model AC...

Страница 58: ... Setup and WPA2 are registered trademarks of Wi Fi Alliance The Bluetooth word mark and logos are registered trademarks owned by Bluetooth SIG Inc and any use of such marks by Yamaha Corporation is under license MusicCast is a trademark or registered trademark of Yamaha Corporation The Qi symbol is a trademark of the Wireless Power Consortium Australia model only GPL LGPL This product utilizes GPL...

Страница 59: ...5 10 1 Nakazawa cho Naka ku Hamamatsu 430 8650 Japan Yamaha Global Site https www yamaha com Yamaha Downloads https download yamaha com Manual Development Group 2021 Yamaha Corporation Published 01 2021 KSEM A0 ...

Отзывы: