background image

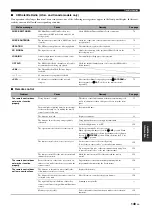
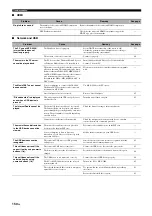
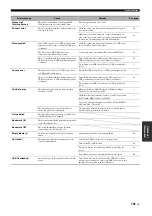
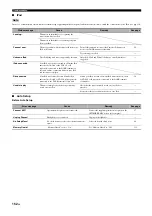
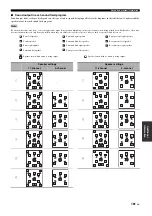
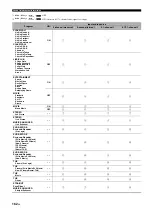
Sound field program information

163

 En

Ad
d

iti

on
al


Inf
o

rma

tion

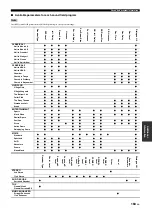
Available parameters for each sound field program

Available sound field parameter may differ depending on the speaker settings.

Note

CLASSICAL1

Hall in Munich A

Hall in Munich B

Hall in Frankfurt

Hall in Stuttgart

Hall in Vienna

Hall in Amsterdam

CLASSICAL2

Hall in USA A

Hall in USA B

Chamber

Church in Tokyo

Church in Freiburg

Church in Royaumont

LIVE/CLUB

Village Gate

Village Vanguard

The Bottom Line

Cellar Club

The Roxy Theatre

Warehouse Loft

Arena

ENTERTAINMENT

Sports

Music Video

Recital/Opera

Pavilion

Disco

Action Game

Roleplaying Game

MOVIE

Standard

Spectacle

Sci-Fi

Adventure

Drama

Mono Movie

STEREO

2ch Stereo

11ch Stereo

SUR. DECODE

Surround Decoder

THX

Cinema/Ultra2 
Cinema/Surround EX

MUSIC ENHANCER

Straight Enhancer/
11ch Enhancer

De
cod

e

r T
y

pe

D

S

P Le

ve
l

In

it

. De

la

y

R

oom Siz

e

Live

ne
ss

Sur

. Init

.Del

a

y

S

u

r. R
oom 

Siz

e

Su
r. Live

ne
ss

SB.

 Init

. De

la

y

S

B

. R
o

om

 Si
z

e

S

B

. Li

ve
ne
s

s

Re
v

. Time

Re
v

. De

la

y

Re
v

. Le
ve
l

Dialog

ue Lif

t

De
cod

e

r T
y

pe

C

e

nt
er
 Le

v

e

l

S

u

rr

ound

 L


Le
ve
l

S

u

rr

oun

d R 

Le
ve
l

Su
r.B

a

c

k

 L 

Le
ve
l

Su
r.B

a

c

k

 R 

Le
ve
l

F

.P

RNS L 

Le
ve
l

F

.P

RNS R 

Le
ve
l

R.P

RNS L 

Le
ve
l

R.P

RNS R 

Le
ve
l

Direc

t

Le
ve
l

D

eco

der


Pa
ra

m

e

te

rs

Dialog

ue Lif

t

Содержание RX-Z11 - AV Receiver

Страница 1: ... BP70 CROISSY BEAUBOURG 77312 MARNE LA VALLEE CEDEX02 FRANCE YAMAHA ELECTRONICS UK LTD YAMAHA HOUSE 200 RICKMANSWORTH ROAD WATFORD HERTS WD18 7GQ ENGLAND YAMAHA SCANDINAVIA A B J A WETTERGRENS GATA 1 BOX 30053 400 43 VÄSTRA FRÖLUNDA SWEDEN YAMAHA MUSIC AUSTRALIA PTY LTD 17 33 MARKET ST SOUTH MELBOURNE 3205 VIC AUSTRALIA 2007 All rights reserved Printed in Malaysia WK97700 UCA AV Receiver OWNER S M...

Страница 2: ...I IN USB AUDIO VIDEO AUX S VIDEO VIDEO ZONE 3 ZONE 4 ZONE 2 MIC OPTIMIZER AUDIO SELECT SPEAKERS A B YPAO SILENT CINEMA PHONES MULTI ZONE STRAIGHT TUNING MODE ZONE ON OFF MENU TONE CONTROL ZONE CONTROLS REC OUT ZONE 2 MEMORY BAND EDIT PRESET TUNING EFFECT DISPLAY MAN L AUTO SEARCH MODE PUSH ENTER PROGRAM R L OPTICAL HDMI IN USB AUDIO VIDEO AUX S VIDEO VIDEO ZONE 3 ZONE 4 ZONE 2 A B D F C E G I H P ...

Страница 3: ... SUR DECODE ENHANCER THX STRAIGHT 1 2 3 4 5 6 7 8 9 0 10 1 D E F G H I J L K M N O P 2 3 4 5 6 7 8 9 0 A B C R Q U S A and Canada models Backlight mode The remote control is equipped with the motion sensor and the remote control lights up the backlight corresponding to the motions or operation If you do not want to lights up the backlight when this unit detects motions change the backlight mode se...

Страница 4: ...system of the building as close to the point of cable entry as practical IMPORTANT Please record the serial number of this unit in the space below MODEL Serial No The serial number is located on the rear of the unit Retain this Owner s Manual in a safe place for future reference FCC INFORMATION for US customers 1 IMPORTANT NOTICE DO NOT MODIFY THIS UNIT This product when installed as indicated in ...

Страница 5: ...or fix this unit Contact qualified Yamaha service personnel when any service is needed The cabinet should never be opened for any reasons 15 When not planning to use this unit for long periods of time i e vacation disconnect the AC power plug from the wall outlet 16 Install this unit near the AC outlet and where the AC power plug can be reached easily 17 Be sure to read the Troubleshooting section...

Страница 6: ...l 65 Recording 66 FM AM tuning 68 Automatic tuning 68 Manual tuning 69 Direct frequency tuning 69 Selecting preset stations 70 Automatic preset tuning 70 Manual preset tuning 71 Exchanging preset stations 71 Using HD Radio features U S A model only 72 Searching HD Radio stations by using the GUI menu 72 Selecting HD Radio audio programs 73 Displaying HD Radio information 73 Front panel display 73 ...

Страница 7: ...trol 123 Setting the backlight mode of the remote control LIGHT 124 Setting remote control codes P SET 124 Programming codes from other remote controls LEARN 126 Changing source names in the display window RNAME 127 Macro programming features 128 Recalling programmed macro operations 128 Default macro functions 129 Programming macro operations MACRO 129 Clearing configurations 130 Clearing functio...

Страница 8: ...a trademark of THX Ltd which may be registered in some jurisdictions All rights reserved Windows XP Windows Vista Windows Internet Explorer Windows Media Audio Windows Media Connect and Windows Media Player are either registered trademarks or trademarks of Microsoft corporation in the United States and or other countries HD Radio technology manufactured under license from iBiquity Digital Corporat...

Страница 9: ...Opening and closing the front panel door 12 Quick start guide 13 Preparation Check the items 13 Step 1 Set up your speakers 14 Step 2 Connect your Blu ray Disc HD DVD player and other components 16 Step 3 Turn on the power and start playback 17 What do you want to do with this unit 18 Introduction ...

Страница 10: ...rround sound experience P 86 XM Satellite Radio information displaying capability iPod controlling capability P 78 DOCK terminal to connect a Yamaha iPod universal dock such as the YDS 10 sold separately which supports iPod Click and Wheel iPod nano and iPod mini Network features P 80 NETWORK port to connect a PC and Yamaha MCX 2000 or access the Internet Radio via LAN DHCP automatic or manual net...

Страница 11: ... accordance with your local regulations If the remote control is without batteries for more than 2 minutes or if exhausted batteries remain in the remote control the contents of the memory may be cleared When the memory is cleared insert new batteries set up the remote control code and program any acquired functions that may have been cleared Getting started Supplied accessories Note AMP TV SOURCE...

Страница 12: ...tore the remote control in the following types of conditions places of high humidity such as near a bath places of high temperatures such as near a heater or stove places of extremely low temperatures dusty places When you want to use the controls behind the front panel door open the door by gently pressing on the lower part of the panel Keep the door closed when not using these controls Using the...

Страница 13: ...ce speakers Active subwoofers x 2 Select active subwoofers equipped with an RCA input jack Speaker cable x 11 Subwoofer cables x 2 Select monaural RCA cables HDMI cables x 2 Select HDMI cables shorter than 5 meters 16 feet with the HDMI logo printed on it Blu ray Disc HD DVD player x 1 Select Blu ray Disc HD DVD player equipped with an HDMI output jack Video monitor x 1 Select a TV monitor video m...

Страница 14: ...presence left Rear presence right Subwoofer left Subwoofer right 11 2 11 1 7 2 7 1 6 2 6 1 5 2 5 1 3 2 3 1 2 2 2 1 1 2 3 4 1 2 3 4 1 Make sure that this unit and the subwoofers are unplugged from the AC wall outlets 2 Twist the exposed wires of the speaker cables together to prevent short circuits 3 Do not let the bare speaker wires touch each other 4 Do not let the bare speaker wires touch any me...

Страница 15: ...ft rear presence speaker Left front presence speaker Be sure to connect the left channel L right channel R red line and white line properly Check the impedance of the speaker you are connecting If the impedance of your speaker is 6 ohm change the setting of SPEAKER IMP in Advanced setup see page 142 Note Subwoofer cable Subwoofer cable U S A model ...

Страница 16: ...k HDMI cable HDMI OUT 1 jack Video monitor AV receiver General connection information General information on jacks and cable plugs P 29 General information on HDMI P 29 Speaker impedance setting P 43 For further connections Using other kinds of speaker combinations P 21 Connecting a video monitor via various ways of connection P 31 Connecting a Blu ray Disc HD DVD player via various ways of connec...

Страница 17: ...t panel or EPOWER on the remote control See page 43 for details Are you enjoying playback If there are some troubles with playback check the settings as follows No sound is output Are the speakers connected correctly  Check the speaker connection Are Your Blu ray Disc HD DVD player connected correctly  Check the connection of the Blu ray Disc HD DVD player Are the front speakers selected correct...

Страница 18: ...55 Using this unit in multiple rooms simultaneously multi zone configuration P 133 Automatically turning off this unit P 56 Manually adjusting various parameters of this unit Setting the language of the GUI menu P 114 Assigning the input output jacks of this unit P 96 Setting the parameters for each input source P 96 Setting the parameters related to the volume level P 102 Adjusting the tonal qual...

Страница 19: ...ents 32 Using the VIDEO AUX jacks on the front panel 39 Connecting the network 40 Connecting the USB storage devices to the USB ports 40 Connecting the FM and AM antennas 41 Connecting the power cable 42 Setting the speaker impedance and language 43 Turning this unit on and off 43 Front panel display 44 Optimizing the speaker setting for your listening room YPAO 46 Before starting the automatic se...

Страница 20: ...RONT PRESENCE REAR PRESENCE FRONT ZONE 2 ZONE 3 ZONE 4 SURROUND SB 8CH GND AM FM 1 2 1 2 OUT 2 OUT 1 BD HD DVD CD R DVD DVR DVD DTV CD MD TAPE CBL SAT OPTICAL OPTICAL COAXIAL BD HD DVD BD HD DVD 8 7 6 5 4 3 2 1 EXTRA SP REAR PRESENCE ZONE FRONT PRESENCE ZONE SURROUND SUR BACK BI AMP FRONT B ZONE FRONT A CENTER EXTRA SP DVR CBL SAT DVD A B A B A B C D 1 2 3 4 5 4 5 4 5 IN1 IN2 IN3 IN4 VCR DVR DTV D...

Страница 21: ...Surround left and right speakers The surround speakers are used for effect and surround sounds Surround back left and right speakers The surround back speakers supplement the surround speakers and provide more realistic front to back transitions Front and rear presence left and right speakers See page 27 for details Left and right subwoofers See page 26 for details Placing speakers FR FL SBR SBL R...

Страница 22: ...ame as those for the 11 2 11 1 channel speaker layout see page 21 Surround left and right speakers Connect the surround speakers to the SURROUND speaker terminals even if you place the surround speakers behind the listening position For the smooth and unbroken sound field behind the listening position place the surround left and right speakers farther back compared with the placement in the 11 2 1...

Страница 23: ...g speakers Caution Before connecting the speakers make sure that this unit is turned off see page 43 Do not let the bare speaker wires touch each other or do not let them touch any metal part of this unit This could damage this unit and or speakers Use magnetically shielded speakers If this type of speaker still creates interference with the monitor place the speakers away from the monitor If you ...

Страница 24: ...NGLE speaker terminal SPEAKERS SPEAKERS SURROUND SINGLE SUR BACK BI AMP FRONT B ZONE FRONT A EXTRA SP SURROUND SUR BACK BI AMP FRONT B ZONE FRONT A CENTER EXTRA SP A B A B R L Surround right speaker Center speaker U S A model FRONT B speakers Surround back right speaker Front right speaker Front left speaker Surround back left speaker Surround left speaker ...

Страница 25: ...peaker setting SPEAKERS SPEAKERS SURROUND FRONT B ZONE FRONT A EXTRA SP SURROUND FRONT B ZONE FRONT A CENTER EXTRA SP A B A B R L Surround right speaker Center speaker U S A model FRONT B speakers Front right speaker Front left speaker Surround left speaker ...

Страница 26: ...urround left right SBL SBR Surround back left right LSW RSW Left right subwoofer Configuration 2 Front and rear Set Configuration in Subwoofer to Front Rear see page 100 Speaker indications FL FR Front left right C Center SL SR Surround left right SBL SBR Surround back left right FSW RSW Front rear subwoofer Configuration 3 A single subwoofer Set Configuration in Subwoofer to Monaural see page 100...

Страница 27: ...MA DSP HD mode Front presence speakers Rear presence speakers Place the rear presence left and right speakers so that the distance between the rear presence left and right speakers is same as the distance between front presence left and right speakers Using presence speakers Note FR FPR FPL C FL 0 5 to 1 m 1 to 3 ft 1 8 m 6 ft or higher Speaker indications FL Front left FR Front right C Center FPL...

Страница 28: ...ke the bi amplification connections use the FRONT A and SUR BACK BI AMP terminals as shown below To activate the bi amplification connections set BI AMP to ON in Advanced setup see page 143 When you make the conventional connection make sure that the shorting bars are put into the terminals of the speakers appropriately Refer to the instruction manuals of the speakers for details Connecting the sp...

Страница 29: ...t you use a commercially available HDMI cable shorter than 5 meters 16 feet with the HDMI logo printed on it Use a conversion cable HDMI jack DVI D jack to connect this unit to other DVI components You can check the potential problem about the HDMI connection see page 114 See page 168 for the information on the input signal capability of this unit for the HDMI connection When you set Standby Throu...

Страница 30: ...ut signals is as follows 1 COMPONENT VIDEO 2 S VIDEO 3 VIDEO This unit is equipped with the two COMPONENT VIDEO MONITOR OUT jacks and HDMI OUT jacks The COMPONENT VIDEO MONITOR OUT 1 and 2 outputs the same video signals and you can use both COMPONENT VIDEO OUT jacks simultaneously Digital video signals input at the HDMI input jacks cannot be output from analog video output jacks The analog compone...

Страница 31: ...ia a DVI connection fail to recognize the HDMI audio video signals being input if they are in the standby mode In this case the HDMI indicator flashes irregularly The GUI menu is not overlaid on the input video image depending on the input video signal format and the setting of the parameters in Wall Paper see page 108 In this case the GUI menu appears with the wall paper or gray background If the...

Страница 32: ...the corresponding setting for Optical Input Optical Output or Coaxial Input in I O Assignment see page 96 If you connect your DVD player to both the DIGITAL INPUT OPTICAL and the DIGITAL INPUT COAXIAL jacks priority is given to the signals input at the DIGITAL INPUT COAXIAL jack Connecting a Blu ray Disc or HD DVD player Connect your Blu ray Disc or HD DVD player to the HDMI IN1 jack of this unit ...

Страница 33: ...Component out S video out Video out Audio out Optical out U S A model VIDEO IN COMPONENTVIDEO AUDIO IN HDMI DIGITAL IN PR PB Y CBL SAT DTV CBL SAT S VIDEO VIDEO DTV CBL SAT OPTICAL COAXIAL 8 3 CBL SAT C 2 3 IN3 DTV CBL SAT 2 3 R L L R O V S PR PB Y L R C V S Satellite receiver or cable TV receiver Coaxial out Component out Video out Audio out S video out Optical out Audio out Video out S video out...

Страница 34: ...VR 4 4 4 R L L R V V S S PR PB Y L R O DVD recorder Optical out S video in Video in Audio in Video out Audio out HDMI out Component out S video out U S A model VIDEO OUT VIDEO IN AUDIO OUT AUDIO IN VCR VCR VCR S VIDEO VIDEO 5 VCR 5 5 5 V L R V L R S S VCR S video in Video in Audio out Video out S video out Audio in indicates recommended connections indicates alternative connections U S A model ...

Страница 35: ...line boosting transformer or an MC head amplifier When you connect both the DIGITAL INPUT OPTICAL jack and the DIGITAL INPUT COAXIAL jack to an audio component the priority is given to the DIGITAL INPUT COAXIAL jack Notes DIGITAL OUT GND AUDIO OUT AUDIO IN DIGITAL IN CD R MD TAPE CD R CD PHONO MD TAPE CD R CD MD TAPE OPTICAL OPTICAL COAXIAL 5 1 R L L R L R L R L R L R L R C O O CD recorder Turntab...

Страница 36: ...tivating the other zones see page 133 Pre amplifier mode If you want use the external amplifiers for the all channels in the main zone set PREAMP MODE to ON in the advanced setup see page 143 When PREAMP MODE is set to ON the power consumption is reduced PRE OUT jack Output audio channel 1 FRONT Front left right 2 SURROUND Surround left right 3 SUBWOOFER Subwoofer left right see page 26 4 SUR BACK...

Страница 37: ...ee page 54 this unit automatically turns off the digital sound field processor and you cannot select sound field programs The audio signals input at the CENTER and SUBWOOFER MULTI CH INPUT jacks are mixed down to the left and right headphone channels This unit redirects the audio signals input at the CENTER and or SUBWOOFER MULTI CH INPUT jacks to the front left and right speaker channels when you...

Страница 38: ...T 1 jacks Using the TRIGGER OUT jacks This unit can control the components for example the electric screen projector etc corresponding to the selected input source and activating deactivating the desired zone This unit sends the 12 V 15 mA direct electric current at the TRIGGER OUT jacks according to the settings of Trigger Output in Manual Setup see page 114 Connect one of the TRIGGER OUT jack of...

Страница 39: ...PTIMIZER AUDIO SELECT SPEAKERS A B YPAO SILENT CINEMA PHONES ON OFF PURE DIRECT VOLUME MULTI ZONE STRAIGHT TUNING MODE ZONE ON OFF MENU TONE CONTROL ZONE CONTROLS REC OUT ZONE 2 MEMORY BAND EDIT PRESET TUNING EFFECT DISPLAY MAN L AUTO SEARCH MODE PUSH ENTER PROGRAM R L OPTICAL HDMI IN USB AUDIO VIDEO AUX S VIDEO VIDEO ZONE 3 ZONE 4 ZONE 2 R L OPTICAL AUDIO S VIDEO VIDEO HDMI IN O V S L R Game cons...

Страница 40: ...k settings manually see page 111 Yamaha MCX 2000 MCX A10 and MCX C15 may not be for sale in same locations This unit is equipped with both the front and rear USB ports Connect the USB storage device for example a high capacity USB hard disk drive to the front or rear USB port of this unit Set USB Select in Input Select to Front or Rear to select the active USB port see page 98 The initial setting ...

Страница 41: ... 1 and ANTENNA 2 FM terminals y You can select whether this unit tune to the conventional FM and AM stations or HD Radio FM and AM stations by selecting HD Radio or TUNER in Input Select see page 96 and in Manual Setup see page 110 Assembling the supplied AM loop antenna For HD Radio tuning U S A model only Connecting the wire of the AM loop antenna Connecting the FM and AM antennas Note for U S A...

Страница 42: ...Use these outlet s to supply power to any connected components Connect the power cable of your other components to these outlet s Power to these outlet s is supplied when this unit is turned on However power to these outlet s is cut off when this unit is turned off For information on the maximum power or the total power consumption of the components that can be connected to these outlet s see Spec...

Страница 43: ... while Please wait appears in the front panel display this unit does not accepts the front panel operations and stores the remote control operations This unit performs the stored remote control operations after Please wait disappears Turning off this unit Press BMASTER ON OFF on the front panel again to release it outward to the OFF position to turn off this unit AMAIN ZONE ON OFF on the front pan...

Страница 44: ...oder is active see page 86 9 Input signal indicators The respective indicator lights up when this unit is reproducing DSD Direct Stream Digital PCM Pulse Code Modulation WMA Windows Media Audio MP3 MPEG 1 Audio Layer 3 or AAC MPEG 4 AAC audio signals 0 SP A B indicators Lights up according to the set of front speakers activated see page 55 SP A The FRONT A speakers are activated SP B The FRONT B s...

Страница 45: ...he auto setup procedure see page 46 or the speaker level setting procedure in the Speaker Level see page 102 Presence speaker indicators Light up according to setting for Front Presence and Rear Presence see page 100 in Speaker Set when this unit is in the auto setup procedure see page 46 or the speaker level setting procedure in the Speaker Level see page 102 y You can make settings for the prese...

Страница 46: ...e crossover frequency controls of the connected subwoofer is set to the maximum If you use the external amplifiers see page 36 the amplifiers are turned on and the settings are appropriate The room is sufficiently quiet Set the operation mode selector on the remote control to FAMP Be advised that it is normal for loud test tones to be output during the automatic setup procedure To achieve the best...

Страница 47: ...peration on this unit Keep quiet when you leave the room The necessary time for the automatic setup procedure may differ depending on the environment of the listening room and connected speakers from 30 seconds to 5 minutes 4 Once this unit completes all measurements and adjustments successfully following message appears in the front panel display y You can check the detailed results of the measur...

Страница 48: ...rs from 30 seconds to 5 minutes y To cancel the automatic setup procedure press 0RETURN The error message E09 User Cancel appears in the menu screen and this unit stops the measurement immediately see page 49 Using the basic automatic setup Information Setup Menu Start Start ENTER Measurement Descriptions Multi Measure Multiple point measurement You can make adjustments of this unit for multiple l...

Страница 49: ...ture to review the result of the automatic setup 1 Set the operation mode selector to FAMP and then press IMENU to turn on the GUI screen 2 Press 9k n repeatedly and then 9h to select Auto Setup 3 Press 9k to select Information 4 Press 9h and then 9k n repeatedly to select the desired check items If error or warning messages appear When this unit detects potential problems during the automatic set...

Страница 50: ...efer to Using advanced automatic setup on this page Wiring Speaker wiring Displays the polarity of each connected speaker NRM appears when the polarity of the connected speaker is normal REV appears when the polarity of the connected speaker is reversed DET appears when this unit detects the subwoofer s is connected appears when no speaker is connected to the corresponding speaker channel Distance...

Страница 51: ...istening position 2 11 Press 9ENTER to start the measurement at the next listening position y To skip the measurements at the remaining listening positions press 9n 12 Repeat steps 10 and 11 until the measurements at all listening points are completed 13 Once following display appears in the video monitor place the supplied microphone base at the listening point you want to be seated most frequent...

Страница 52: ...video monitor See page 49 for details 1 2 3 Equalizing Level Angle Check Angle Result Put the microphone at 2nd listening position Next ENTER 1 2 3 Equalizing Level Angle Check Angle Result Put the microphone at 3rd listening position Next ENTER Angle Check Angle Result Retry Exit Detail Setup Measurement Over Successfully For other configuration of the listening position The following examples in...

Страница 53: ...io input jacks AUDIO SELECT 56 Muting the audio output 56 Using the sleep timer 56 Operating this unit by using the graphical user interface GUI menu 57 Sound field programs 58 Selecting sound field programs 58 Sound field program descriptions 58 Using CINEMA DSP HD mode 64 Enjoying unprocessed input sources 64 Using audio features 65 Enjoying pure hi fi sound 65 Adjusting the tonal quality 65 Adj...

Страница 54: ...ted when the component connected to the MULTI CH INPUT jacks is selected as the input source see page 54 Press HSTRAIGHT and the rotate MPROGRAM to select the desired sound field program when TUNER or XM U S A and Canada models only is selected as the input source y Choose a sound field program based on your listening preference not merely on the name of the program When you select an input source...

Страница 55: ... If you connect or disconnect your headphones to or from this unit in the party mode the sounds in the zones that join in the party mode are muted for a moment You can combine a video image from a video source with sound from an audio source For example you can enjoy listening to classical music while viewing beautiful scenery from the video source in the video monitor Press the input selector but...

Страница 56: ... select the desired input source 2 Start playback on the selected source component or select a broadcast station Refer to the operating instructions for the source component See page 68 for details about tuning instructions 3 Press CSLEEP repeatedly to set the amount of time Each time you press CSLEEP the front panel display changes as shown below The SLEEP indicator flashes while you are switchin...

Страница 57: ...e Sci Fi Currently selected decoder Currently selected sound field program Menu area Currently selected input source Currently selected menu item Current menu directory Volume level see page 54 Stereo Surround Input Select Manual Setup Auto Setup System Memory Sound Video Basic Multi Zone Network Button Function 9 Cursor k n Selects the item in the current menu level 9 Cursor h Selects the current...

Страница 58: ...T jacks is selected as the input source see page 54 or when this unit is in the Pure Direct mode see page 65 Sampling frequencies higher than 96 kHz are sampled down to 96 kHz or lower and then sound field programs are applied y You can select the desired sound field programs and setting the parameters by using GUI menu See page 91 for details y Select a sound field program based on your listening...

Страница 59: ...st all contents relatively well but provides little brilliance or powerfulness Complex Sounds transform in complex ways as they fade out with a rich brilliant impression depending on the program This is extremely effective for the right contents but is suited for a smaller range of contents For the CINEMA DSP programs The sound field to be generated is evaluated according to whether it is nearer t...

Страница 60: ...h in Freiburg Located in the south of Germany this grand stone built church has a pointed tower at 120 meters in height Its long and narrow shape and the high ceiling enable the elongated reverberation time and limited initial reflection time Thus the rich reverberation rather than the sound itself reproduces the atmosphere of the church Church in Royaumont This program features the sound field cr...

Страница 61: ...emphasizes the vividness of vocals and solo play and the beat of rhythm instruments and to the surround sound field that reproduces the space of a big live hall Recital Opera This program controls the amount of reverberations at an optimum level and emphasizes the depth and clarity of human voices Recital Opera offers the reverberations of an orchestra box in front of the listener at the same time...

Страница 62: ...sound Sci Fi This program clearly reproduces the finely elaborated sound design of the latest science fiction and special effects featuring movies You can enjoy a variety of cinematographically created virtual spaces reproduced with clear separation between dialog sound effects and background music Adventure This program is ideal for precisely reproducing the sound design of action and adventure m...

Страница 63: ...ce F R balance Atmosphere Small Vertical Front Calm Large Horizontal Rear Powerful 2ch Stereo Use this program to mix down multi channel sources to 2 channels 11ch Stereo Use this program to output sound from all speakers When you play back multi channel sources this unit downmixes the source to 2 channels and then output the sound from all speakers This program creates a larger sound field and is...

Страница 64: ... HD CUBIC ON appears in the front panel display and the HD indicator see page 45 and HD sound field indicators light up while this unit is in the CINEMA DSP HD mode CINEMA DSP HD mode creates the intensive and stereoscopic sound field in the listening room HD CUBIC OFF appears in the front panel display and the HD indicator disappears when the CINEMA DSP HD mode is turned off Conventional CINEMA D...

Страница 65: ...sponse BASS 3 Rotate MPROGRAM to adjust the high frequency response TREBLE or the low frequency response BASS Control range 6 0 dB to 6 0 dB If you increase or decrease the high frequency or the low frequency sound to an extreme level the tonal quality of the surround speakers may not match that of the front L R and center speakers and the subwoofer TONE CONTROL is not effective when PURE DIRECT o...

Страница 66: ...S video or a composite video signal you can record only an S video or a composite video signal on your VCR The analog audio and video signals input at the DOCK terminal can be output at the analog audio OUT REC jacks and DVR or VCR OUT jacks for recording Check the copyright laws in your country to record from CDs radio etc Recording of copyrighted material may infringe copyright laws y Do a test ...

Страница 67: ... information 73 XM Satellite Radio tuning U S A and Canada models only 74 Connecting the XM Mini Tuner Home Dock 74 Activating XM Satellite Radio 74 Basic XM Satellite Radio operations 75 Setting the XM Satellite Radio preset channels 76 Displaying the XM Satellite Radio information 77 Using iPod 78 Controlling iPod 78 Using Network USB features 80 Navigating the network and USB menus 80 Using a P...

Страница 68: ...display this unit is in the manual tuning mode Press ITUNING MODE on the front panel to set this unit to the automatic tuning mode If a colon appears in the front panel display this unit is in the preset station tuning mode and automatic tuning is not possible Press LPRESET TUNING or ISRCH MODE to turn the colon off 4 Rotate MPROGRAM or press 9PRESET CH k n to begin automatic tuning When this unit...

Страница 69: ... the desired reception band FM or AM appears in the front panel display 2 Make sure that a colon does not appear in the front panel display y If a colon appears in the front panel display you cannot enter the frequency of the desired station Press LPRESET TUNING on the front panel to turn the colon off 3 Enter the frequency of the desired station by pressing the numeric buttons B Example To tune i...

Страница 70: ...hich this unit stores FM stations After you perform step 3 press MPROGRAM or 9A E l h repeatedly to select the desired preset group and then rotate MPROGRAM or press 9PRESET CH k n repeatedly to select the preset station number which the first station will be stored You can begin the tuning toward lower frequencies to store FM stations automatically Press LPRESET TUNING so that the colon disappear...

Страница 71: ...ars from the front panel display Any stored station data existing under a preset station number is cleared when you store a new station under the same preset station number The reception mode stereo or monaural is stored along with the station frequency You can exchange the assignments of two preset stations with each other The example below describes the procedure to exchange preset station E1 wi...

Страница 72: ... then press IMENU to display the GUI menu The top GUI menu appears in the video monitor 2 Press 9k to select Input Select and then press 9h 3 Press 9k n repeatedly to select TUNER and then press 9h 4 Press 9n repeatedly to select HD Radio 5 Press 9k n to select Station Search and then press 9h 6 Press 9ENTER to enter the search menu 7 Press 9l h repeatedly to place the _ underscore under the space...

Страница 73: ...available when a station name is received as data in 4 alphabetical codes Lower line Song title Artist name Program types Comment Music information is available only when data programs are received If the music information is long it automatically scrolls to the left in the front panel display y You can set the front panel display mode by using the Scroll parameter in Front Panel Disp see page 112...

Страница 74: ...er XM Radio ID on the XM Mini Tuner on the XM Mini Tuner package and on XM Channel 0 see page 76 Record the Radio ID in the following eight squares for reference The XM Radio ID does not use the letters I O S or F Subscription of your XM Satellite Radio service For U S customers URL http activate xmradio com Phone 1 800 XMRADIO 1 800 967 2346 For Canadian customers URL http www xmradio ca Phone XM...

Страница 75: ... to select ALL CH SEARCH y You can change the channel category by pressing MPROGRAM or 9CAT l h repeatedly 2 Rotate MPROGRAM or 9PRESET CH k n repeatedly to search for a channel within all channels y You can search for a channel quickly by pressing and holding 9PRESET CH k n Category Search mode 1 Press LSEARCH MODE or ISRCH MODE repeatedly to select CAT SEARCH 2 Press MPROGRAM or 9CAT l h repeate...

Страница 76: ...cribed in Preset Search mode on page 75 1 Search for a channel you want to set as a preset channel by using one of the XM Satellite Radio search modes 2 Press JMEMORY or 0MEMORY The MEMORY indicator flashes in the front panel display for approximately 10 seconds You must proceed to and carry out steps 3 through 5 while the MEMORY indicator is flashing in the front panel display 3 Press MPROGRAM or...

Страница 77: ... following information screen is displayed in the video monitor y To turn off the displayed information screen press IDISPLAY or KDISPLAY again You can set the time for which the XM Satellite Radio information is displayed in the video monitor by using the On Screen parameter in Manual Setup see page 108 To hold the XM Satellite Radio information screen press 9ENTER on the remote control while it ...

Страница 78: ...e mode You can perform the basic operations of your iPod play stop skip etc using the supplied remote control without the aid of the video monitor y You can view the photos or video clips stored on your iPod some models only Operations can be also done with the controls on your iPod Controlling iPod in the menu browse mode You can perform the advanced operations of your iPod using the supplied rem...

Страница 79: ...ffle Repeat Repeat Use this feature to set this unit to repeat one song or a sequence of songs Choices Off One All Select Off to deactivate this feature Select One to set this unit to repeat one song Select All to set this unit to repeat a sequence of songs When Repeat is set to a setting other than Off or appears in the top right corner while one song or a sequence of songs are being repeated Pre...

Страница 80: ...he available PC servers and MCX 2000 are displayed y You can also browse and select the desired contents by using your PC See page 120 for details Using Network USB features Notes Navigating the network and USB menus Note NET USB PC MusicCAST MCX 2000 Popular Stations New Stations USB Server Internet Radio Files Directories Help Location Podcasts Bookmark Genres Selects an Internet Radio station t...

Страница 81: ...lected menu or to return to the previous menu level 5 Press 9ENTER to play the selected song or to listen to the selected station y See page 79 for details about the functions of the play information display Some items do not appear in the play information display depending on the selected sub input source You can set the time for which the GUI screen of the Network USB is displayed in the video m...

Страница 82: ...ur PC With Windows Media Player 11 you can play back the audio files on your PC For details refer to the documents of Windows Media Player 11 y You can also play back the audio files on your PC with Windows Media Connect 2 0 installed 1 Install Windows Media Player 11 on your PC You can download the installer of Windows Media Player 11 from the Microsoft website or use the upgrade function of the ...

Страница 83: ...TLE on the remote control You can also register your favorite Internet Radio stations to this unit by accessing the following website with the web browser on your PC To use this feature you need the MAC address of this unit as the ID number and your e mail address to create your personal account Use Information in the Network menu to display the MAC address of this unit see page 111 For details re...

Страница 84: ...h stores the selected item is turned off or disconnected from the network the selected Internet Radio station is temporary unavailable or out of service the directory of the selected item has been changed y This unit stores the relative position of the preset items in a directory or playlist and does not recall the correct item by using numeric buttons 1 8 B if you add or delete music files to or ...

Страница 85: ...es 119 Controlling this unit by using the Web browser Web Control Center 120 Remote control features 121 Controlling this unit a TV or other components 121 Customizing the remote control 123 Setting the backlight mode of the remote control LIGHT 124 Setting remote control codes P SET 124 Programming codes from other remote controls LEARN 126 Changing source names in the display window RNAME 127 Ma...

Страница 86: ...c PL II Game Neo 6 Cinema Neural THX U S A and Canada models only Off When you select Decoder Type to Off in the THX Surround mode this unit activates the decoder corresponding to the input source Advanced sound configurations Selecting decoders Pro Logic Dolby Pro Logic processing for any sources PLIIx Movie PLII Movie Dolby Pro Logic IIx or Dolby Pro Logic II processing for movie sources The Pro...

Страница 87: ... then press QTHX repeatedly to select the desired THX Surround mode You can select the THX Surround mode for movies music or games For 2 channel sources You can select the following THX Surround programs y When this unit is in the THX Cinema THX Music or THX Games mode you can select the desired surround decoder see page 86 For multi channel sources You can select the following THX Surround progra...

Страница 88: ... S Wave Control Parametric EQ Tone Control Lipsync Pure Direct Channel Mute Conversion HDMI Processing Component I P HDMI Resolution HDMI Aspect Short Message On Screen Position Wall Paper Test Tone THX Set Speaker Set Speaker Distance Speaker Level Volume P 102 Sound P 103 Video P 107 Basic P 99 Speakers Headphones Speakers Headphones Control Bass Treble Auto Bypass HDMI Auto Auto Manual THX Ultr...

Страница 89: ...Disp iPod Audio Select Decoder Mode EXTD Surround Memory Guard HDMI Set Trigger Output Main Load Main Save Main Rename Zone2 Load Zone2 Save Zone2 Rename Zone3 Load Zone3 Save Zone3 Rename Zone4 Load Zone4 Save Zone4 Rename Zone2 Volume Zone2 Max Vol Zone2 Initial Vol Zone2 Balance Zone2 Mono Muting Type Tuner Select U S A model only Zone3 Volume Zone3 Max Vol Zone3 Initial Vol Zone3 Balance Zone3...

Страница 90: ...Multi Zone Multi zone menu See page 109 for details Network Network and USB menu See page 111 for details Option Option menu See page 112 for details Auto Setup Automatic setup menu Use this feature to run the automatic setup and specify which speaker parameters to be adjusted see page 46 System Memory System memory menu Use this feature to store and recall various settings of this unit see page 1...

Страница 91: ...ct sound of the selected sound field program is too weak you cannot recognize any difference between the sound field programs Decrease the value of DSP Level when the sound is vague you feel that the additional sound effect is excessive Control range 6 dB to 3 dB Adjusting the vertical dialogue position Dialogue Lift Use this feature to adjust the vertical position of the dialogues in movies The i...

Страница 92: ...he CINEMA DSP programs Control range 1 to 99 ms Init Delay 1 to 49 ms Sur Init Delay and SB Init Delay Room Size Sur Room Size SB Room Size Room size Presence surround and surround back room size Adjusts the apparent size of the sound field The larger the value the larger the surround sound field becomes As the sound is repeatedly reflected around a room the larger the hall is the longer the time ...

Страница 93: ...dB at 1 kHz This changes the apparent size of the acoustic environment over an extremely wide range Set a longer reverberation time to get more sustaining reverberation sound and set a shorter time to get articulate sound Control range 1 0 to 5 0 s Rev Delay Reverberation delay Adjusts the time difference between the beginning of the direct sound and the beginning of the reverberation sound The la...

Страница 94: ...ixed to 2 channels and output from the front left and right speakers The low frequency signals of the front left and right channels are redirected to the subwoofer in the following cases Bass Out is set to Front SWFR see page 101 Front is set to Small see page 99 and Bass Out is set to SWFR see page 101 Center Level Surround L Level Surround R Level Sur Back L Level Sur Back R Level F PRNS L Level...

Страница 95: ...Initial setting 3 Dimension PLIIx Music and PLII Music only Pro Logic IIx Music and Pro Logic II Music dimension Adjusts the sound field either towards the front or towards the rear Control range 3 towards the rear to 3 towards the front Initial setting STD standard Center Image Neo 6 Music only DTS Neo 6 Music center image Adjusts the front left and right channel output relative to the center cha...

Страница 96: ...hen select VCR 2 Select I O Assignment and then Coaxial Input 3 Select 5CD Example 2 Clearing a jack assignment 1 Select Input Select and then select the desired input source DVD etc 2 Select I O Assignment and then select the desired jack assignment Coaxial Input Optical Input Optical Output Analog I O Component Video or HDMI 3 Select None and then press 9ENTER to clear the assignment None appear...

Страница 97: ... SMALL FIGURE MARK 3 Press 9k n to select the character you want to use and 9l h to move to the next one You can use up to 9 characters for each memory Press 9n to change the character in the following order or press 9k to go in the reverse order CAPITAL A to Z space SMALL a to z space LATIN CAPITAL Ä Ö Ü etc space LATIN SMALL ä ö ü etc space FIGURE 0 to 9 space MARK etc space Press 9ENTER to swit...

Страница 98: ...t Repeat Use this feature to set this unit to repeat one song or a sequence of songs If Repeat is set to Single the setting will be reset to Off when this unit is turned off When you set BGV to Last you can select the background video source by using the remote control only Shuffle Shuffle Use this feature to set this unit to play songs or albums in a random order USB Select USB port select Select...

Страница 99: ...nd modes Speaker Set Speaker settings Use to manually adjust any speaker setting y If you are not satisfied with the bass sounds from your speakers you can change these settings according to your preference Front Front speakers When Bass Out is set to Front see page 101 you can select only Large in Front If the value of Front is set to other than Large in advance this unit change the value to Larg...

Страница 100: ...hen the center speaker is large Small Select this setting when the center speaker is small None Select this setting when you do not use the center speaker The center channel signals are directed to the front left and right speakers Choice Descriptions Large Select this setting when the surround speakers are large Small Select this setting when the surround speakers are small None Select this setti...

Страница 101: ...ss and set the crossover frequency to the maximum The available speaker channels differ depending on the setting of the speakers If you are only using one surround back speaker connect it to the SUR BACK SINGLE jack and adjust the distance in Surround Back L Unit Unit Selects the unit for displaying the values of Speaker Distance parameter Initial setting Feet U S A and Canada models Meter Other m...

Страница 102: ...aptive dynamic range control feature does not function when this unit is in the THX Surround modes see page 87 or Pure Direct mode see page 65 If you set Direct in 2ch Stereo to Auto see page 94 and this unit is in the 2ch Stereo mode the adaptive dynamic range control feature does not function in some cases Adaptive DSP Lvl Adaptive DSP effect level Use this feature to make fine adjustments of th...

Страница 103: ...t to adjust the headphone LFE level Depending on the settings of Bass Out see page 101 some signals may not be output at the SUBWOOFER PRE OUT jacks Dynamic Range Dynamic range Use this feature to select the amount of dynamic range compression to be applied to your speakers or headphones This setting is effective only when the unit is decoding bitstream signals Speakers Speaker dynamic range Adjus...

Страница 104: ... 2 Press 9h to access the settings window 3 Press 9k n l h to select PARAM and then press 9ENTER to select a parameter from Band band Freq frequency or Q Q factor y You can adjust Gain gain with any parameter Choice Descriptions Flat Manual Copies the result of the automatic setup that the Flat type parametric equalizer is applied to Front Manual Manual Copies the result of the automatic setup tha...

Страница 105: ... range 6 0 dB to 6 0 dB Initial setting 0 0 dB Treble Treble control Use this feature to adjust high frequencies output to your speakers or headphones Choices 2 5 kHz 3 5 kHz 8 0 kHz Control range 6 0 dB to 6 0 dB Initial setting 0 0 dB Auto Bypass Auto bypass Use this feature to select whether the audio output bypasses the tone control circuitry when Treble and Bass are set to 0 dB see page 65 Li...

Страница 106: ...n if Pure Direct is set to Video On Channel Mute Channel mute Use this feature to mute specific speaker channels Mode Mode Use this feature to activate or deactivate the Channel Mute setting for each speaker Each speaker settings Select whether this unit mutes each speaker channel when you set Mode to Enable Choice Functions Video Off Does not output video signals Video On Outputs video signals Fo...

Страница 107: ...e GUI screen is not displayed in the video monitor HDMI Processing HDMI video processing Use this feature to select whether this unit processes the video signals input at the HDMI IN jacks Component I P Component interlace progressive conversion Use this feature to activate or deactivate the analog interlace progressive conversion of the analog video signals input at the composite video S video an...

Страница 108: ...no video signal being input When Conversion is set to Off no background is displayed even if Wall Paper is set to other than None Choice Functions Through Does not make any adjustments to the aspect ratio for the HDMI video signal sources 16 9 Normal Displays video images with the aspect ratio of 4 3 on your video monitor with the aspect ratio of 16 9 Black stripes appear on the right and left sid...

Страница 109: ...al Vol setting For example Zone2 Initial Vol is set to 20 0 dB and then Zone2 Max Vol is set to 30 0 dB the volume level is automatically set to 30 0 dB when you turn on the power of this unit next time Zone2 Initial Vol Zone3 Initial Vol Zone4 Initial Vol Zone 2 Zone 3 Zone 4 initial volume setting Use this feature to set the volume level of Zone 2 Zone 3 or Zone 4 when the power of each zone is ...

Страница 110: ...is tuned into a HD Radio station in Zone 2 Zone 3 or Zone 4 The XM Satellite Radio information when XM is selected as the input source of Zone 2 Zone 3 and or Zone 4 U S A and Canada models only You can connect up to two composite and one component video monitors to the ZONE OUT VIDEO jacks and ZONE OUT COMPONENT VIDEO jacks If you connect multiple video monitors to the ZONE VIDEO and ZONE OUT COM...

Страница 111: ...of the Configuration parameters Procedure of the network configuration 1 From the top GUI menu press 9k n on the remote control repeatedly and then 9h to select Configuration 2 Press 9k n repeatedly and then 9h to select DHCP 3 Press 9k n to select On or Off and then 9ENTER to confirm If you select On you do not have to set other network parameters Refer to step 5 and finish the configuration If y...

Страница 112: ...tings Standby Charge iPod charge on the standby mode Use this feature to select whether this unit charges the battery of the stationed iPod or not when this unit is in the standby mode see page 78 Audio Select Default audio input jack select Use this feature to designate the default audio input jack select setting see page 96 for the input sources connected to the DIGITAL INPUT jacks when you turn...

Страница 113: ...he standby mode the audio signals are only output at the HDMI OUT 1 or HDMI OUT 2 When Standby Through is set to On the amount of power consumption in the standby mode is increase Input output jack select When Standby Through is set to On you can designate an HDMI IN jack and an HDMI OUT jack that accept the signals when this unit in in the standby mode Input HDMI IN jack select Use this feature t...

Страница 114: ... send the voltage signals at the selected TRIGGER OUT jack while the selected input source is selected Manual Select this setting to send the voltage signals manually Choice Descriptions Input High Sends the voltage when you select the input source you set in Source Input Low Stops sending the voltage when you select the input source you set in Source Choice Function High Sends the voltage signals...

Страница 115: ...e GUI menu operation You can save the current system settings stored in Memory1 to Memory10 by using the System Memory menu in the GUI menu 1 Press IMENU on the remote control The top menu appears in the video monitor 2 Press 9k n repeatedly to select System Memory and then press 9h The System Memory menu appears in the video monitor 3 Press 9k n repeatedly to select the desired zone and then pres...

Страница 116: ... Memory and then press 9h The System Memory menu appears in the video monitor 3 Press 9k n repeatedly to select the desired zone and then press 9h In the following example Main is selected 4 Press 9k n repeatedly to select Main Rename example and then 9h The list of the memory number appears in the video monitor 5 Press 9k n repeatedly to select the desired memory number and then 9h The rename dis...

Страница 117: ...e Radio or network USB sources selected radio station etc is also saved Note Group Parameters Page Input HDMI Out Audio Select 97 Decoder Mode 97 Input source 54 HDMI OUT SEL Audio Stereo Surround 91 Pure Direct on off 65 EXTD SUR setting 87 Adaptive DRC 102 Adaptive DSP Lvl 102 LFE Level 103 Dynamic Range 103 Tone Control 105 Pure Direct 106 CINEMA DSP HD ON OFF 64 Volume Volume level 54 SP Confi...

Страница 118: ... following example you select Main main zone The list of the memory number appears in the video monitor You can recall the system settings for the selected zone only when the zone is turned on 4 Press 9k n to select Main Load and then press 9h The following menu appears in the video monitor y If system settings are already stored in the selected memory number the stored system parameter settings a...

Страница 119: ...eplaying games You can switch the input source sound field program and the HDMI OUT jack simultaneously Recommended parameter settings Input source V AUX see page 54 Sound field program Roleplaying Game see page 58 HDMI OUT SEL setting OUT 2 see page 55 Saved parameter groups Input HDMI Out Audio Example 2 Switching the setting of this unit according to the environment of the listening room Use th...

Страница 120: ... the connections We recommend that you use Windows Internet Explorer 6 or 7 that is installed on Windows XP or Windows Vista PC to access this unit You can select whether this unit accepts the controls by using the Web browser when this unit is in the standby mode See page 143 for details You can register the MAC address of the PCs you want to use to control this unit and limit the PCs that can co...

Страница 121: ...a the remote control operates the component that is set to the DTV area see page 124 Remote control features Controlling this unit a TV or other components Notes AMP TV SOURCE ZONE MODE SELECT SETUP ID MACRO 4 3 SYSTEM MEMORY VOLUME DVD CD V AUX MULTI AV TV PHONO CD R POWER STANDBY POWER POWER DTV DVR VCR DOCK TUNER XM BD HD DVD MD TAPE CBL SAT NET USB REC SRCH MODE LEVEL BAND MENU TITLE CLASSICAL...

Страница 122: ...1 Power 1 Power 1 Power 1 DVR power 2 Power 1 Power 1 Power 1 Power 1 Power 1 2 TITLE BAND Title Title Title Title Band 3 PRESET CH k Menu up Menu up Menu up Channel up Menu up Channel up Menu up PRESET CH n Menu down Menu down Menu down Channel down Menu down Channel down Menu down CAT A E l Menu left Menu left Menu left Menu left Menu left CAT A E h Menu right Menu right Menu right Menu right Di...

Страница 123: ...of the remote control to customize the remote control 1 Press GSETUP on the remote control using a ballpoint pen or similar object SETUP appears in the display window on the remote control 2 Press 9k n repeatedly to select the desired setup mode 3 After the configurations press GSETUP again to exit from the setup menu If you do not complete each of the operations within 30 seconds this unit automa...

Страница 124: ...trol code is preset as listed above In this case try setting another Yamaha remote control code 1 Press GSETUP on the remote control using a ballpoint pen or similar object The remote control enters the setup menu SETUP appears in the display window 4 on the remote control 2 Press 9k n repeatedly to select P SET and then press 9ENTER The remote control enters the preset mode P SET and name of the ...

Страница 125: ...u continuously want to set up another code for another control area repeat steps 3 through 6 7 Press GSETUP again to exit from the setup mode 8 Press Ap or 2AV POWER to confirm whether you can control your component using the remote control y If operation is not possible and the manufacturer of your component has more than one code try each of them until you find the correct one ERROR appears in t...

Страница 126: ...ars in the display window 4 3 Press 9k n repeatedly to select LEARN and then press 9ENTER The remote control enters the learning mode LEARN and the name of the selected control area appears in the display window 4 alternately 4 Place this remote control about 5 to 10 cm 2 to 4 in apart from the other remote control on a flat surface so that their infrared transmitters are aimed at each other and t...

Страница 127: ...posed to direct sunlight when the function to be programmed is continuous or uncommon You can change the name of the control area input source that appears in the display window 4 on the remote control if you want to use a different name than the factory preset This feature is useful when you have set an control area to control a different component 1 Set the operation mode selector to FSOURCE and...

Страница 128: ...e CD input and press the play button to start playback The macro programming feature lets you perform all of these operations simply by pressing the CD macro button The buttons listed as macro buttons below are factory set with macro programs You can also program your own macros see page 129 Recalling programmed macro operations 1 Press HMACRO on the remote control 2 Press the desired macro button...

Страница 129: ...int pen or similar object SETUP appears in the display window 4 2 Press 9k n repeatedly to select MACRO and then press 9ENTER The remote control enters the macro programming mode MACRO and M the three letter name of the selected control area for example M DVD appears in the display window 4 alternately 3 Press the desired macro button you want to assign the macro program to and then press 9ENTER M...

Страница 130: ...window 4 NG appears in the display window 4 if clearing was unsuccessful ERROR appears in the display window 4 if you press a button not indicated in the respective step or if you press more than one button simultaneously Notes Note DVD CD V AUX MULTI AV TV PHONO CD R POWER STANDBY POWER POWER DTV DVR VCR DOCK TUNER XM BD HD DVD MD TAPE CBL SAT NET USB 1 2 3 Indicates the number of macro steps ent...

Страница 131: ...he desired control area by pressing 5SELECT l h repeatedly If you want to erase the function learned in the AMP or TV control area set the operation mode selector to FAMP or FTV 4 Press 9ENTER E KEY appears in the display window 4 5 Press and hold the button you want to clear for about 3 seconds If clearing is successful ERASE and OK appears in the display window 4 y If you continuously want to cl...

Страница 132: ... battery according to the polarity markings and If the batteries run out immediately remove them from the simplified remote control to prevent an explosion or acid leak If a battery starts leaking dispose of it immediately Be careful not to let the leaking battery acid touch your skin or clothing Before inserting new batteries wipe the compartment clean Dispose of batteries according to your regio...

Страница 133: ...e configuration Step 1 Planning the multi zone system First plan the total multi zone system with this unit carefully P 134 Step 2 Connecting the speakers and or external amplifiers Wire cables between rooms and connect the component and speakers to this unit P 135 Step 3 Set the zone parameters Once you have finished the connections turn on this unit and then set the parameters in Multi Zone menu...

Страница 134: ...r service center for the planning and setup of the multi zone system that best meet your requirements In the following instruction following system configuration is the example When you use this system configuration you can enjoy 7 2 channel playback in the main zone and 2 channel playback in the optional two zones You can also enjoy 5 2 channel playback in the main zone and 2 channel playback in ...

Страница 135: ... to a Passive Loudspeaker Selector Box or multiple speakers per channel could create an abnormally low impedance load resulting in amplifier damage See this owner s manual for correct usage Compliance with minimum speaker impedance information for all channels must be maintained at all times This information is found on the back panel of your Receiver REAR PRESENCE ZONE FRONT PRESENCE ZONE SURROUN...

Страница 136: ...me control on this unit does not function to the output level of the ZONE DIGITAL OUT COAXIAL jack Notes Compatible audio signals in the Zone 2 Zone 3 and or Zone 4 When you connect the external amplifiers in Zone 2 Zone 3 and or Zone 4 to the ZONE OUT jacks of this unit this unit can transmit the analog audio signals only In this setting this unit cannot play back the digital audio sources input ...

Страница 137: ...ack the same source simultaneously Video signal up conversion to the zone component video signals Low quality video signals input at the VIDEO or S VIDEO jacks may not be output at the ZONE OUT COMPONENT VIDEO jacks correctly Note DIGITAL OUT ZONE OUT COAXIAL ZONE PR PB Y COMPONENTVIDEO VIDEO 1 ZONE OUT PR PB Y COMPONENTVIDEO VIDEO PR PB Y V V This unit Zone 2 Zone 3 Zone 4 Zone monitor Zone monit...

Страница 138: ...use an infrared emitter Up to six Yamaha components can be connected as shown TRIGGER OUT jacks This unit is equipped with two TRIGGER OUT jacks You can turn on and off the component corresponding to the selection of the input source of the desired zone or turning on and off the desired zone Use Trigger Output in Manual Setup to set the functions of the TRIGGER OUT jacks see page 114 REMOTE OUT 1 ...

Страница 139: ...or details 8 Once you have finished the settings of the zone parameters press IMENU to exit the GUI menu You can select the zone you want to control by using the control buttons on the front panel or on the remote control Basic operation Front panel operations 1 Press OZONE 2 OZONE 3 or OZONE 4 on the front panel to individually turn on or off Zone 2 Zone 3 or Zone 4 2 Press OZONE CONTROLS on the ...

Страница 140: ...r details about the iPod operations see Using Network USB features on page 80 The selected input sources are shared across all zones If you set the recording source other than SOURCE see page 66 the input source of Zone 2 is fixed to the source you set as the recording source Adjusting the volume level of Zone 2 Zone 3 or Zone 4 Rotate EVOLUME on the front panel or press JVOLUME to adjust the volu...

Страница 141: ...e zones which join the party mode 4 You can also operate the specific zone separately when this unit is in the party mode Turning on the party mode Press CPARTY on the remote control to turn on the party mode PARTY MODE ON appears in the front panel display and then the main zone and the zones which join the party mode are turned on Turning off the party mode Press CPARTY again to turn off the par...

Страница 142: ...t to adjust The name of the selected parameter appears in the front panel display 4 Push MPROGRAM repeatedly to change the selected parameter setting 5 Press BMASTER ON OFF to release it outward to the OFF position to save the new setting and turn off this unit y The settings you made are reflected next time you turn on this unit Speaker impedance SPEAKER IMP Use this feature to set the speaker im...

Страница 143: ...amplifiers for the other zones Recovery and backup of the system settings RECOV BACKUP Use this feature to save and restore the settings of this unit This unit does not save the FM AM preset stations preset network USB items and system memory settings If no settings are saved you cannot select RECOVERY See page 142 for the operation of the advanced setup Choice Functions YES Select this setting to...

Страница 144: ...in the GUI graphical user interface menu OSD display in the zone monitor and the messages that appear in the front panel display Choices ENGLISH English JAPANESE Japanese FRENCH French GERMAN German SPANISH Spanish RUSSIAN Russian You can also select the language setting by using GUI menu See page 114 for details The selected language is displayed The selected language is not displayed The menu it...

Страница 145: ...Information Troubleshooting 146 Resetting the system 154 Glossary 155 Sound field program information 160 Parametric equalizer information 164 Block diagrams 165 Specifications 167 Index 169 Additional Information ...

Страница 146: ... Speaker connections are not secure Secure the connections 23 The volume is turned down Turn up the volume The front speakers to be used have not been selected properly Select the front speakers by pressing GSPEAKER A or GSPEAKER B on the front panel 55 The sound is muted Press LMUTE or JVOLUME on the remote control to resume audio output and then adjust the volume 56 Signals this unit cannot repr...

Страница 147: ...r Set is set to Front when a Dolby Digital or DTS signal is being played Set Bass Out to SWFR or Front SWFR 101 Bass Out in Speaker Set is set to SWFR or Front when a 2 channel source is being played Set Bass Out to Front SWFR 101 The source does not contain low frequency signals No sound is heard from the surround back speakers Surround in Speaker Set is set to None and Surround Back is automatic...

Страница 148: ...se Remedy See page Problem Cause Remedy See page FM FM stereo reception is noisy The characteristics of FM stereo broadcasts may cause this problem when the transmitter is too far away or the antenna input is poor Check the antenna connections 41 Try using a high quality directional FM antenna Use the manual tuning method 69 There is distortion and clear reception cannot be obtained even with a go...

Страница 149: ...ff axis from the front panel 12 Direct sunlight or lighting from an inverter type of fluorescent lamp etc is striking the remote control sensor of this unit Reposition this unit The batteries are weak Replace all batteries 11 The batteries do not last long and get quickly exhausted Using alkaline batteries is strongly recommended Set the backlight mode to OFF 124 The operation mode selector is set...

Страница 150: ...as an illegal device Turn this unit off then on again 83 The Internet Radio cannot be played The firewall of the network device is activated The Internet Radio can be played only when it passes through the port designated by each radio station The port number is variable depending on radio station Check the firewall setting of the network device Connection to the Internet is disconnected Check the...

Страница 151: ...r USB portable audio player to this unit Turn off this unit and reconnect your USB storage device or USB portable audio player to the USB port of this unit 43 Try resetting your USB storage device or USB portable audio player Unable to play This unit cannot play back the songs currently stored on your PC Make sure Windows Media Player 11 or Windows Media Connect 2 0 is installed on your PC Check t...

Страница 152: ...uch as the YDS 10 sold separately connected to the DOCK terminal of this unit and the connection between your iPod and this unit is complete Disconnected Your iPod was removed from a Yamaha iPod universal dock such as YDS 10 sold separately connected to the DOCK terminal of this unit Station your iPod back in a Yamaha iPod universal dock such as YDS 10 sold separately connected to the DOCK termina...

Страница 153: ...s are not Connect surround speakers when you use surround back speakers 23 E07 No MIC The optimizer microphone was unplugged during the Auto Setup procedure Connect the supplied optimizer microphone to the OPTIMIZER MIC jack on the front panel 47 E08 No R PRNS SP A rear presence channel signal is not detected Check the rear presence speaker connections 23 E09 User Cancel The Auto Setup procedure w...

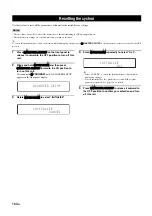
Страница 154: ...lease it outward to the OFF position to turn off this unit 2 Press and hold MPROGRAM and then press BMASTER ON OFF inward to the ON position to turn on this unit Press and hold MPROGRAM until ADVANCED SETUP appears in the front panel display 3 Rotate MPROGRAM to select INITIALIZE 4 Press MPROGRAM repeatedly to select ALL y Select CANCEL to cancel the initialization procedure without making any cha...

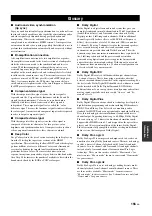
Страница 155: ...igital surround sound system that gives you completely independent multi channel audio With 3 front channels front L R and center and 2 surround stereo channels Dolby Digital provides 5 full range audio channels With an additional channel especially for bass effects called LFE Low Frequency Effect the system has a total of 5 1 channels LFE is counted as 0 1 channel By using 2 channel stereo for th...

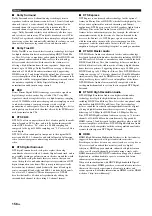
Страница 156: ...enables 6 1 channel reproduction by adding the surround back channel to the existing 5 1 channel format DTS Express DTS Express is an advanced audio technology for the optional feature on Blu ray Disc or HD DVD which offers high quality low bit rate audio optimized for network streaming and Internet applications DTS Express is used for the Secondary Audio feature of Blu ray Disc or the Sub Audio f...

Страница 157: ... compression This is used as a method of recording CDs and DVD audio The PCM system uses a technique for sampling the size of the analog signal per very small unit of time Standing for Pulse Code Modulation the analog signal is encoded as pulses and then modulated for recording Sampling frequency and number of quantized bits When digitizing an analog audio signal the number of times the signal is ...

Страница 158: ...e appropriate THX processing to enhance music listening THX Music applies a dedicated music profile of THX Loudness Plus designed around the varying mix levels in music sources which are often very different than film or television sources Additionally THX Music applies Timbre Matching to the surround speaker channels THX Games mode THX Games mode gives the benefit of THX Loudness Plus as well as ...

Страница 159: ...atre a large number of surround speakers help create an enveloping surround sound experience but in a home theatre there are usually only two speakers This can make the surround speakers sound like headphones that lack spaciousness and envelopment The surround sounds will also collapse into the closest speaker as you move away from the middle seating position Adaptive Decorrelation slightly change...

Страница 160: ...A DSP Since the Dolby Surround and DTS systems were originally designed for use in movie theaters their effect is best felt in a theater having many speakers designed for acoustic effects Since home conditions such as room size wall material number of speakers and so on can differ so widely it is inevitable that there are differences in the sound heard Based on a wealth of actually measured data Y...

Страница 161: ...er Rear presence left speaker Front right speaker Surround back right speaker Rear presence right speaker Surround left speaker Front presence left speaker Speaker from which sound is being output Speaker from which no sound is being output L SR FPR C SBL RPL R SBR RPR SL FPL Speaker settings 11 channel 5 channel 1 2 3 4 5 6 L C R SL SBR SBL FPL FPR RPL RPR SR L C R SL SBR SBL SR FPL FPR RPL RPR L...

Страница 162: ... Arena ON 1 1 3 4 OFF 2 2 3 4 ENTERTAINMENT Sports Music Video Recital Opera Pavilion Disco Action Game Roleplaying Game MOVIE Standard Spectacle Sci Fi Adventure Drama ON 3 4 3 4 OFF 5 4 3 4 MOVIE Mono Movie ON 3 3 3 4 OFF 5 6 3 4 STEREO 2ch Stereo 7 7 7 7 STEREO 11ch Stereo MUSIC ENHANCER 11ch Enhancer 4 4 4 4 SUR DECODE Surround Decoder Pro Logic 8 9 9 0 SUR DECODE Surround Decoder PLIIx Movie ...

Страница 163: ...tre Warehouse Loft Arena ENTERTAINMENT Sports Music Video Recital Opera Pavilion Disco Action Game Roleplaying Game MOVIE Standard Spectacle Sci Fi Adventure Drama Mono Movie STEREO 2ch Stereo 11ch Stereo SUR DECODE Surround Decoder THX Cinema Ultra2 Cinema Surround EX MUSIC ENHANCER Straight Enhancer 11ch Enhancer Decoder Type DSP Level Init Delay Room Size Liveness Sur Init Delay Sur Room Size S...

Страница 164: ...les more precise adjustments of frequency characteristics as in Figure 2 This is not possible using only a single equalizer band as in Figure 1 Figure 1 Figure 2 Standing wave A wave generated when two waves of the same length frequency and speed but traveling in opposite directions overlap Standing waves appear to be stationary and simply oscillating in a fixed position without progressing Under ...

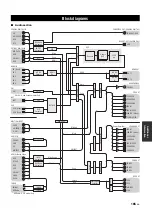
Страница 165: ...IN XM NET USB XM U S A and Canada models Only Main Zone HDMI DSP HDMI Main Zone Audio ADC ZONE2 REC OUT COAXIAL DIGITAL REC OUT OPTICAL DIGITAL HDMI OUT HEAD PHONES PRE OUT SURR SB FRONT C SW PHONO CD R CD MD TAPE DVD DTV LD DVR VCR CBL SAT V AUX DOCK FM AM HD Radio PHONO EQ INPUT Selector REC Zone Selector TUNER TUNER FRONT CENTER Mono SURROUND SUR BACK FRONT PRES REAR PRES SUR BACK ZONE 2 ZONE 3...

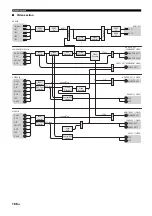
Страница 166: ... SAT DVR VCR DOCK INPUT Selector REC Zone Selector Video Decoder Video Encoder Source REC Selector Zone OSD S E L DVR VCR MONITOR OUT ZONE2 OUT 1 ZONE2 OUT 2 DVR VCR S E L INPUT Selector REC Zone Selector Source REC Selector BD HD DVD DVD CBL SAT DVR V AUX DVD DTV CBL SAT DVR VCR DOCK HDMI IN COMPONENT VIDEO IN S VIDEO IN VIDEO IN HDMI OUT MONITOR OUT COMPONENT VIDEO ZONE2 OUT COMPONENT VIDEO MONI...

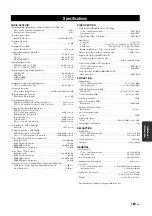
Страница 167: ...BLE Boost Cut 10 dB 10 kHz TREBLE Turnover Frequency 1 6 kHz Filter Characteristics fc 40 60 80 90 100 110 120 160 200 Hz H P F Front Center Surround Surround Back Small 12 dB oct L P F Subwoofer 24 dB oct VIDEO SECTION Video Format MONITOR OUT Wall Paper U S A and Canada models NTSC PAL Australia model PAL NTSC Video Format Video Conversion NTSC PAL Signal Level Composite 1 Vp p 75 Ω S video 1 Vp...

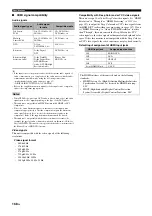
Страница 168: ...p 50 Hz 720p 60 Hz 50 Hz 1080i 60 Hz 50 Hz 1080p 60 Hz 50 Hz 24 Hz Compatibility with Deep Color and xvYCC video signals This unit accepts 30 or 36 bit Deep Color video signals Set HDMI Resolution to Through or HDMI Processing to Off see page 107 to output the Deep Color and xvYCC video signals from the HDMI OUT jacks without any processing see page 107 If you set HDMI Processing to On and HDMI Re...

Страница 169: ...ont panel display 45 CLASSICAL 1 59 CLASSICAL 2 60 Component I P 107 Component interlace progressive conversion 107 COMPONENT VIDEO jacks 20 29 COMPONENT VIDEO MONITOR OUT jacks 20 Configuration 100 Connecting a Blu ray Disc player 32 Connecting a DVD recorder 34 Connecting a multi format player 37 Connecting a VCR 34 Connecting an external decoder 37 Connecting an HD DVD player 32 Connecting an i...

Страница 170: ... remote control 128 Main 11ch Stereo 109 Main zone 11 channel stereo 109 Manual 106 114 Manual 114 Manual audio delay adjustment 106 Manual parametric equalizer configuration of each speaker 104 Manual preset tuning FM AM tuning 71 Manual tuning FM AM tuning 69 Max Volume 102 Maximum volume 102 MCX 2000 using 82 Media Access Control address 112 Memory Guard 113 Memory guard 113 MEMORY indicator Fr...

Страница 171: ...es 101 SPEAKER IMP 142 Speaker impedance 142 Speaker impedance setting 43 Speaker Level 102 Speaker level 102 Speaker level adjustment 65 Speaker Set 99 Speaker setting optimize 46 Speaker settings 99 Speaker terminals 20 Speaker wiring Auto setup parameter 48 50 Speakers placement 21 Specifications 167 Spectacle 62 Sports 61 Standard 62 Standby Charge 112 Standby mode Zone2 Zone3 139 Standby Thro...

Страница 172: ...um volume setting 109 Zone 2 monaural mode 110 Zone 2 settings 109 Zone 2 3 4 muting type 110 Zone 2 3 4 tuner function select 110 Zone 3 balance 109 Zone 3 initial volume setting 109 Zone 3 Maximum volume setting 109 Zone 3 monaural mode 110 Zone 3 settings 109 Zone 4 balance 109 Zone 4 initial volume setting 109 Zone 4 Maximum volume setting 109 Zone 4 monaural mode 110 Zone 4 settings 109 Zone ...

Страница 173: ...00401 02801 06301 07001 07401 GRUNPY 02701 HALLMARK 02601 HANKOOK 00301 02601 02701 HANSEATIC 00401 04101 04601 05201 07001 HANTAREX 06801 HARMAN KARDON 00801 HARVARD 02701 HAVERMY 01301 HCM 00101 05101 HELLO KITTY 05601 HINARI 00101 00401 HISAWA 05701 HITACHI 00101 00301 01201 01501 01701 01801 02201 02601 03001 04501 06101 06901 07301 11701 12101 HUA TUN 00101 HUANYU 04901 HYPSON 00401 03701 ICE...

Страница 174: ...USE 00401 04101 05801 07901 Yamaha 00301 01801 08301 10001 11001 13501 13601 13701 13801 14001 14101 14201 YAPSHE 03401 YOKO 00401 03701 ZENITH 00201 01201 02601 05801 VCR ADMIRAL 01102 ADVENTURA 00002 AIKO 02102 AIWA 00002 00402 02202 02602 02702 AKAI 00602 02302 AKIBA 01402 ALBA 01402 02102 02302 02702 AMERICA ACTION 02102 AMERICAN HIGH 00302 AMSTRAD 00002 ANAM 00402 01902 02002 02102 02902 ANAM...

Страница 175: ...NERAL INSTRUMENT 00103 00803 01303 01703 GOLDSTAR 00503 HAMLIN 00303 00703 JERROLD 00103 00803 01303 01703 LG 00503 MEMOREX 00003 MNET 01203 MOTOROLA 00803 01303 01703 02303 NOOS 01803 PACE 00603 02203 PANASONIC 00003 00203 00403 PARAGON 00003 PHILIPS 01003 01103 PIONEER 00503 01603 01903 PULSAR 00003 PVP STEREO VISUAL MATRIX 00103 QUASAR 00003 RCA 02403 02503 REGAL 00703 00903 RUNCO 00003 SAGEM 0...

Страница 176: ...6 SAMSUNG 01106 04506 SANYO 02006 SHARP 01406 SHERWOOD 03206 SHINSONIC 00506 SLIM ART 03306 SM ELECTRONIC 02806 SONY 00506 04006 SYLVANIA 02206 TATUNG 03206 TEAC 01006 02606 TECHNICS 00006 THETA DIGITAL 01006 THOMSON 00306 TOSHIBA 00106 04606 URBAN CONCEPTS 00106 XBOX 00306 Yamaha 00006 00706 00806 04306 04406 ZENITH 00106 01206 02906 ZEUS 03306 DVD RECORDER HITACHI 01507 PANASONIC 00007 00107 002...

Страница 177: ... BP70 CROISSY BEAUBOURG 77312 MARNE LA VALLEE CEDEX02 FRANCE YAMAHA ELECTRONICS UK LTD YAMAHA HOUSE 200 RICKMANSWORTH ROAD WATFORD HERTS WD18 7GQ ENGLAND YAMAHA SCANDINAVIA A B J A WETTERGRENS GATA 1 BOX 30053 400 43 VÄSTRA FRÖLUNDA SWEDEN YAMAHA MUSIC AUSTRALIA PTY LTD 17 33 MARKET ST SOUTH MELBOURNE 3205 VIC AUSTRALIA 2007 All rights reserved Printed in Malaysia WK97700 UCA AV Receiver OWNER S M...

Отзывы: