4. Adding Groove to a Pattern
86
RS7000
4.
Press [PLAY] to begin playback and use [Knob 1] through
[Knob 4] to adjust the groove parameters as required.
5.
Press [EXIT] to return to the PATTERN Play or Patch mode.
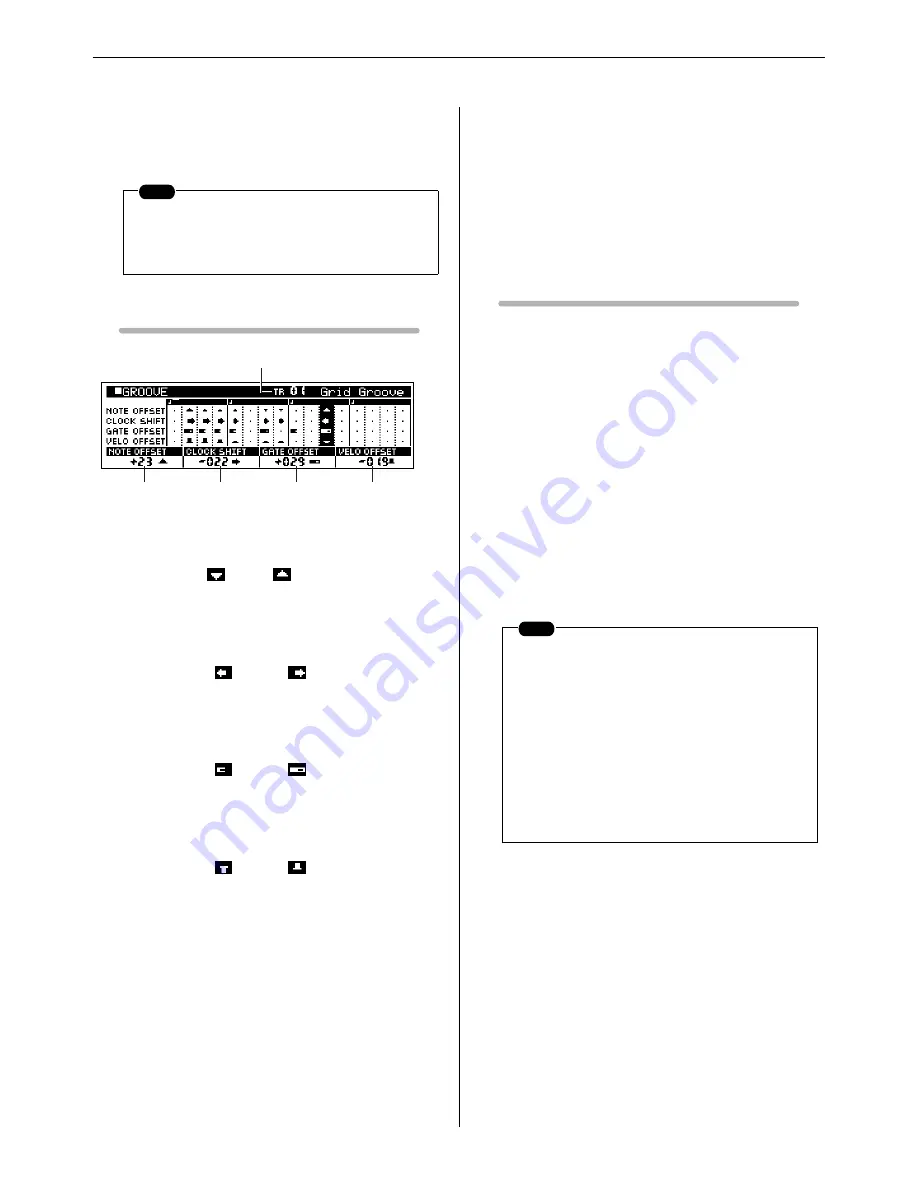
Display Parameters
1
NOTE OFFSET ..........................................
[Knob 1]
[Settings] -99
~ +99
Shifts the notes on the selected grid segment(s) up or down in
semitone increments.
2
CLOCK SHIFT ...........................................
[Knob 2]
[Settings] -120
~ +120
Shifts the timing of notes on the selected grid segment(s)
backward or forward in clock increments.
3
GATE OFFSET ..........................................
[Knob 3]
[Settings] -120
~ +120
Increases or decreases the gate time of notes on the selected
grid segment(s) in clock increments.
4
VELO OFFSET (Velocity Offset).............
[Knob 4]
[Settings] -127
~ +127
Increases or decreases the velocity of notes on the selected
grid segment(s).
5
TR (Track)
[Settings] TR01 ~ 16
Specifies the track to which the groove settings are to be
applied.
See “Pattern Playback”, page 72, for the track selection pro-
cedure.
Recording the Groove Settings to a Phrase
Using the Overdub Record Mode
If a user phrase is assigned to the track to which groove has been
applied, the following procedure can be used to actually record
the groove settings to the track.
1.
Set up the GROOVE parameters as required.
2.
Press [PATTERN] to go to the PATTERN Play page.
3.
Press [REC] to engage the Rec Standby mode.
4.
Use [Knob 2](REC TYPE) to select the OVERDUB record
type.
5.
Use [Knob 3](REC QUANTIZE) to set the REC QUANTIZE
value to “OFF” (OFF).
6.
Press [PLAY] to begin recording.
7.
When the entire phrase has played through once, press the
[STOP] button to stop recording.
The groove settings have now been recorded along with the
phrase, and the groove settings for that track are initialized.
NOTE
When you need to make large value changes rotate a
knob while holding the [SHIFT] button to change val-
ues in increments of 10 rather than 1.
1
2
4
3
5
[Knob 1]
[Knob 2]
[Knob 3]
[Knob 4]
NOTE
• Please note that during this process any keys
played on the keyboard, panel knob opera-
tions, or data received from an external MIDI
controller will also be recorded.
• If MEMORY PROTECT is ON, “Memory Pro-
tected” will appear on the display when you
press the [REC] button and the Rec Standby
mode will not be engaged. If this happens go
to the UTILITY mode and turn MEMORY
PROTECT OFF (Page 257) and then con-
tinue from step 2 of the above procedure.
Содержание RS7000 Ver.1.2
Страница 1: ......
Страница 26: ...Restoring the Initial Factory Settings 26 RS7000 ...
Страница 50: ...6 Finalizing Your Sound 50 RS7000 ...
Страница 51: ...RS7000 51 Chapter 1 Basic 1 RS7000 System Overview 52 2 RS7000 Internal Structure 58 3 Basic Operation 64 ...
Страница 178: ...7 Pattern Chain Editing 178 RS7000 ...
Страница 254: ...4 The Sample Jobs 254 RS7000 ...
Страница 255: ...RS7000 255 Chapter 6 The Utility Mode About the Utility Mode 256 1 System 257 2 MIDI Setup 260 3 MIDI Filter 262 ...
Страница 263: ...RS7000 263 Chapter 7 Other Information 1 MIDI Basics 264 2 MIDI Events Handled by the RS7000 266 ...


