background image

CONTENTS

DaNSe

11

RIVAGE PM series  V3 Supplemental Manual

;

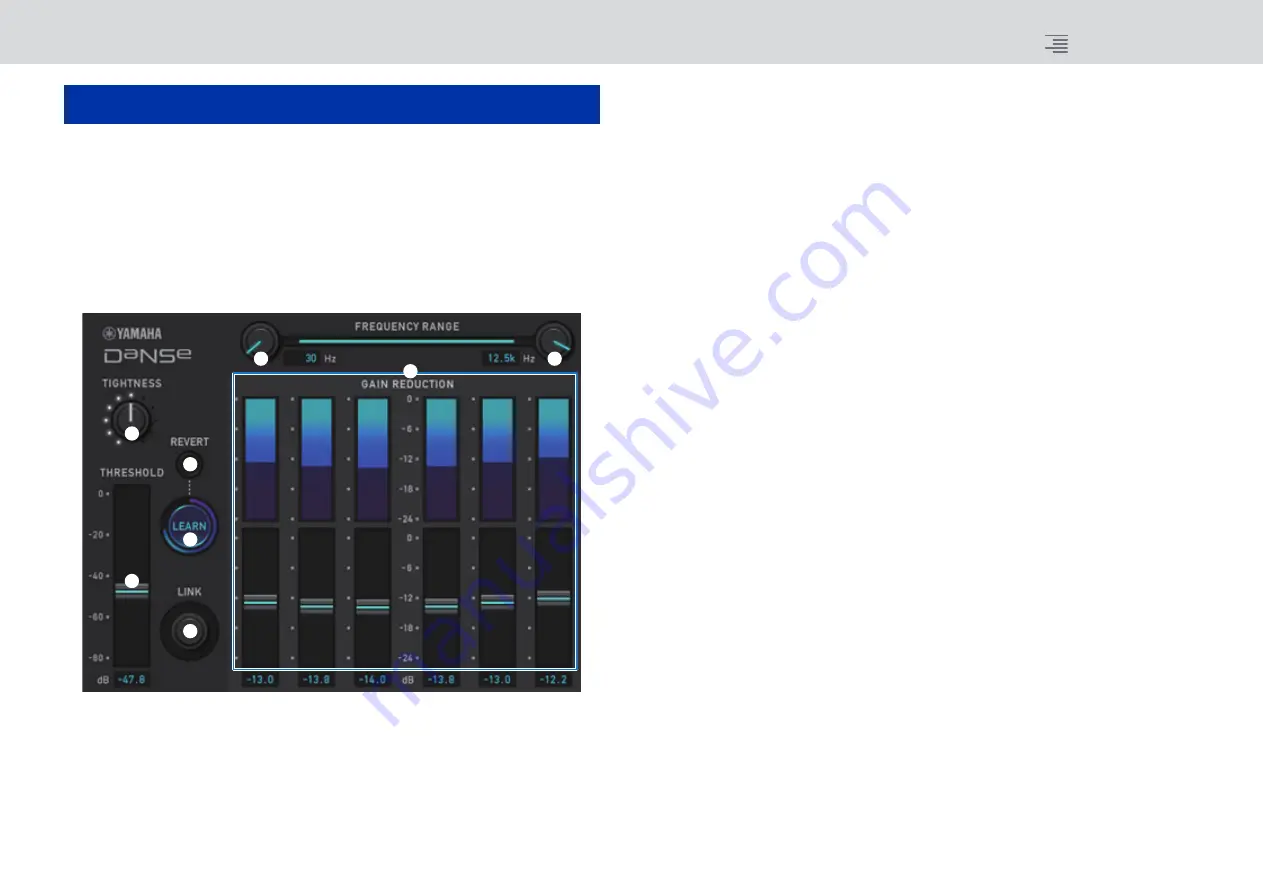
DaNSe is a powerful, intuitive Dynamic Noise Suppressor designed by the legendary Dr. K’s Labs to 
feature exceptional sound quality. This innovative new algorithm can learn the noise characteristics 
of an audio signal, and then automatically remove the noise. The controls on the GUI are user-
friendly and easy to learn. Enhanced graphics allow the user to fine-tune and edit the filters in real 
time to reduce even the most difficult noises.
Using DaNSe can enhance podium, lavaliers and various microphones in spoken word situations 
where the stage environment may have fan noise from moving lights or LED video screens. It can 
also be used in theatrical uses to reduce various ‘room tones’ thereby increasing speech intelligibility 
and gain before feedback.

1

LOW FREQUENCY knob

Adjusts the lowest frequency value of the noise band that you wish to suppress.
You cannot set a value higher than one quarter of the HIGH FREQUENCY knob setting.
Since this setting is used during analysis by the LEARN function, you must adjust this value 
before using the LEARN function.

2

HIGH FREQUENCY knob

Adjusts the highest frequency value of the noise band that you wish to suppress.
You cannot set a value that is lower than the LOW FREQUENCY knob setting multiplied by 
four.
Since this setting is used during analysis by the LEARN function, you must adjust this value 
before using the LEARN function.

3

LEARN button

Activates the LEARN function. Once the LEARN function starts, it will analyze the input 
signal for 10 seconds, and then automatically adjust the THRESHOLD, GAIN 1–6, and the 
internal signal processing parameter settings, to achieve the optimal noise suppression effects 
that would be suitable for the environment and situation.
After the LEARN operation is complete, adjust the THRESHOLD and TIGHTNESS settings to 
your taste to achieve a more ideal sound quality.
To interrupt the LEARN operation, press the LEARN button again or close the GUI.

* The effect of the LEARN operation may vary depending on the environment, even if you adjust 

the displayed parameters in the same way, because the internal signal processing parameters 
are automatically adjusted according to the environment. 
If the parameters are not configured as a Recall Safe target, recalling a scene or library during 
the LEARN operation may lead to a failure of the LEARN analysis.

4

REVERT

Use this button to revert to the settings obtained immediately after the LEARN analysis if you 
happen to have adjusted the parameters manually after the LEARN analysis.
This button becomes active after the LEARN operation is complete.

5

TIGHTNESS knob

Adjusts the release time. Turning the knob to the right produces a faster release time.

6

THRESHOLD

Adjusts the threshold for all bands.

7

LINK knob

Simultaneously adjusts the GAIN 1–6 values relatively.

8

GAIN 1–6

Adjusts the maximum gain reduction amount for BANDs 1–6.

DaNSe

8

3

4

5

7

6

1

2

Содержание RIVAGE PM Series

Страница 1: ...EN V3 Supplemental Manual ...

Страница 2: ...oved sync operations 19 Warning against loading a conflicting system configuration 20 Increased loadable items 20 Improved EQ functions 21 Additional options for the parameter set and copy function 21 Additional library screen function 23 DSP latency display 24 Improved RTA display 24 Flashing ON buttons 25 ON KEYS FUNCTION DURING SOF 25 A new SHIFT key function 26 Improved keyboard input 26 Impro...

Страница 3: ...of label to be displayed via the PREFERENCES settings or USER DEFINED keys SCREEN SETTINGS tab on the PREFERENCES popup window 1 NAMES You can select CHANNEL NAME PORT NAME or PORT ADDRESS e g M1 RY1 1 as a label Supporting labels Supported O Not supported X TWINLANe network Dante network I O network PORT NAME 1 Device Slot Port RPio622 222 O RY O O MY O O Device Slot Port x x O Device Slot Port C...

Страница 4: ...on Press this button repeatedly to toggle between the direct input and the input from the NAME EDIT popup window 8 DEVICE SYNC DANTE SETUP popup button Press this button to access the DEVICE SYNC popup window in which you can sync port name or other labels NOTICE To apply the labeled names you must synchronize the data from the control surface to the connected device If you synchronize the data in...

Страница 5: ...NLATCH While pressing and holding down the key the port name is displayed When releasing the key the channel name is displayed CHANNEL ADDRESS LATCH Pressing the key repeatedly will toggle between channel name and address The key is lit while the address is displayed UNLATCH While pressing and holding down the key the address is displayed When releasing the key the channel name is displayed SWITCH...

Страница 6: ...channel 1 Preset buttons Press one of these buttons to select the corresponding preset group of parameters to copy Press the selected preset button again to access the INPUT OUTPUT CH COPY PRESET popup window in which you can select parameters to register as a preset You can also use the preset button 2 located in the lower right corner in this section to specify parameters that will be copied whe...

Страница 7: ...u can edit the preset name 2 Parameter buttons Turn on these buttons to register a group of parameters as a preset 3 WITH PLUGINS button Turn on this button to include in the copy source the plug ins that have been inserted into the selected channel and the patches and parameters 4 WITH SENDS button Turn on this button to include in the copy source all the SEND settings on off level PAN etc for th...

Страница 8: ...on off mode points 1 PAN BALANCE CSR DCA ASSIGN DCA assign settings MUTE ASSIGN Mute assign settings Copy source Copy destination 31BandGEQ Copy the source and patch On Band Gain Limit Flex15GEQ Copy the source and patch On Band Gain Limit 8BandPEQ Copy the source and patch On Type Band Gain Band Q Band Bypass Band Freq Low Shel High Shel AutoMixer Assign an available channel Parameters will not b...

Страница 9: ... switch to a Dual type and then copy and patch including parameters and bypass settings Copy and patch only the L channel if the copy source is a normal type 1 including parameters and bypass settings BLANK Clear the insert module patch on the copy destination channel The DSP allocation used on the copy destination will be retained Copy source Copy destination 31BandGEQ Copy the source to both L a...

Страница 10: ...e DIGITAL GAIN PRE GC will be enabled if a device patched to the input features gain compensation If the device does not feature gain compensation selecting PRE GC will be ignored and PRE D GAIN will be automatically selected These options will be available under one of the following conditions An RY16 ML SILK card inserted into the RPio622 222 has been patched to the inputs Devices are controlled...

Страница 11: ... function you must adjust this value before using the LEARN function 3 LEARN button Activates the LEARN function Once the LEARN function starts it will analyze the input signal for 10 seconds and then automatically adjust the THRESHOLD GAIN 1 6 and the internal signal processing parameter settings to achieve the optimal noise suppression effects that would be suitable for the environment and situa...

Страница 12: ...or INPUT patch screen A new SUB IN function enables you to patch input ports directly to the output channels In this way you can connect bus out signals from another console via a cascade connection to expand the number of inputs SUB IN patch screen 1 Input port list Displays the input ports for the input sources 2 SUB IN ATT button Press this button to access the SUB IN ATT popup window in which ...

Страница 13: ...channel type and then use the knobs to adjust the gain for each channel Channel names are now displayed in the patch screens meter screens and other screens This improvement will make it easier to identify the channel you are working on and will make for more efficient controls and operations INPUT PATCH PLUG IN screen Improved channel name indicators ...

Страница 14: ...d channel name indicators 14 RIVAGE PM series V3 Supplemental Manual Meter screen Touch the label indicator beneath each fader to switch to the channel name indicator PLUGIN screen USB RECORDER screen BUS SETUP screen ...

Страница 15: ...ton only for the Focus function Press this button to immediately apply a change 4 ALL ON ALL OFF button for the Focus and Global Paste functions Switch all settings on or off including the PLUG IN GEQ tab and BUS OTHERS tab settings Button indicators The button indicators change according to the parameter status The ALL ON and ALL OFF buttons have been added to the PLUG IN GEQ popup window and BUS...

Страница 16: ...bal Paste related operation Improvement to the GLOBAL PASTE screen now enables you to select parameters more easily and recall libraries and presets GLOBAL PASTE screen 1 LIBRARY button Press this button to open the library window The library screen data is shared by Global Paste and FOCUS 2 ALL ON ALL OFF button Switches all settings on or off 3 SET BY SEL button If this button is on you will be ...

Страница 17: ...ibrary Channels unassigned from the DCA will be turned off This button is also effective when you recall a DCA library or preset PRESET Assign mode You can use presets to configure channel assignment DCA name color and icon settings The presets also enable you to store or recall DCA libraries as easily as other libraries The functions of the CH ON FOLLOWS DCA ASSIGN button and SET BY SEL button ar...

Страница 18: ...cate the assigned channels 5 BANK CLEAR button Clears the assignment for the selected bank Pressing this button will open a confirmation dialog box Press OK to clear the assignment Otherwise press CANCEL to return to the previous screen without changing the setting 6 BANK COPY button Press this button to copy the settings of the selected bank 7 BANK PASTE button Press this button to paste the copi...

Страница 19: ...d for the purpose of data safety Also you can now set multiple data sync directions simultaneously DEVICE SYNC screen 1 Sync direction buttons Press one of these buttons to set multiple data sync directions simultaneously 2 CLEAR ALL button Press this button to clear the data sync direction When you press the SYNC button for data sync process a confirmation dialog box appears Press the OK button t...

Страница 20: ...ew the conflicting items If you load ALL types of data pressing the WITH SYSTEM SETTINGS button will also load the following items Word clock settings DANTE SETUP including device mount patch and port name settings WITH RECALL settings for the RY slot on the RPio622 222 Parameter settings on the RY card will always be loaded regardless of the WITH RECALL settings Network settings HY slot and RIVAG...

Страница 21: ... you to set a parameter for multiple channels simultaneously by touching the parameter while pressing and holding down the SHIFT key and then selecting multiple channels STEREO A B on off on the input channels and MIX channels Bank link on off for EQ and dynamics in Theatre mode Setting procedure STEREO A B While pressing and holding down the SHIFT key press the TO ST A B button to access the PARA...

Страница 22: ...estination select knobs Select a range of channel numbers to which to apply the parameter value 3 SELECT ALL button Selects all channels as the copy destination 4 REVERT button Cancels the SELECT ALL button setting EQ and Dynamics EQUALIZER DYNAMICS field on the SELECTED CHANNEL VIEW screen While pressing and holding down the SHIFT key press the LINK button to access the PARAMETER SET BANK LINK po...

Страница 23: ...F 2 Destination select knobs Select a range of channel numbers to which to apply the parameter value 3 SELECT ALL button Selects all channels as the copy destination 4 REVERT button Cancels the SELECT ALL button setting A Sort function has been added to the library screen ACTOR LIBRARY screen You can sort the library items by library number or name 3 4 1 2 Additional library screen function ...

Страница 24: ... output The more the Delay Compensation is applied the higher the latency values will result The values also vary depending on the Fs sampling frequencies MIX Latency from INPUT to MIX OUT STEREO Latency from INPUT to STEREO OUT MATRIX Latency from INPUT to MATRIX OUT These values do not include the A D D A or network latency A new OFFSET knob and a linear display enable you to identify even a sof...

Страница 25: ...can now specify the behavior of the ON keys during SENDS ON FADER mode SURFACE SETTING2 screen 1 ON KEYS FUNCTION DURING SOF SEND Use the ON key to switch the send on or off CHANNEL Use the ON key to switch the channel on or off This is useful if a monitoring engineer wants to control channel on off all the time even during SENDS ON FADER mode Flashing ON buttons ON KEYS FUNCTION DURING SOF 1 ...

Страница 26: ...SHIFT KEYS Specifies the behavior of the SHIFT keys INDIVIDUAL Effective only on the corresponding BAY If multiple operators are controlling the unit each of them can use the respective SHIFT key without interfering with the controls of other operators LINK Effective on all BAY When you enter characters such as a scene title from the keyboard you can press the ENTER key instead of the OK button to...

Страница 27: ...e ENTER key RIVAGE PM Editor can now simultaneously display multiple screens that correspond to each bay PM Editor startup screen 1 NUMBER OF WINDOWS Enables you to select the number of screens to be displayed simultaneously 1 3 The screens correspond to the following bays 1st screen BAY R 2nd screen BAY C 3rd screen BAY L 1 Improved RIVAGE PM Editor 1 ...

Страница 28: ...ERATION MODE is a dedicated PM Editor setting USER DEFINED keys You can now assign the following functions to these keys MIDI GPI CS screen SURFACE SETTINGS1 screen SURFACE SETTING2 screen SCREEN SETTINGS screen New functions added to the USER DEFINED keys USER DEFINED knobs and Fn keys Function PARAMETER 1 PARAMETER 2 PARAMETER 3 Description DSP MIRRORING DSP ACTIVATE A Switches the specified DSP...

Страница 29: ...Y ALL While holding down this key press a SEL key to switch the assignment on off 2 BAY C 1 SET PHASE BAY ALL BAY C 1 SET INSERT1 ON BAY ALL BAY C 1 SET INSERT2 ON BAY ALL BAY C 1 SET DIRECT OUT ON BAY ALL BAY C 1 SET PRE SEND BAY ALL BAY C 1 SET TO STEREO A BAY ALL BAY C 1 SET TO STEREO B BAY ALL BAY C 1 SET TO LCR BAY ALL BAY C 1 SET GAIN COMPENSATION ON BAY ALL BAY C 1 SET NOMINAL VALUE BAY ALL...

Страница 30: ... that is not synchronizing with the TWINLANe network Access the DEVICE SYNC screen and sync the device CURRENT SCENE UPDATED SCENE x xx This message appears after the unit updates a scene without displaying the confirmation message Word Clock Sync Error The word clock for the Dante audio network is not properly configured Access the WORD CLOCK screen and check the setting ...

Страница 31: ...es 31 RIVAGE PM series V3 Supplemental Manual Published 01 2019 IP A1 2019 Yamaha Corporation Manual Development Group Yamaha Downloads https download yamaha com Yamaha Pro Audio global website http www yamahaproaudio com ...

Отзывы: